【Blender 2.93】Modeling a Desert (Sand Dunes)
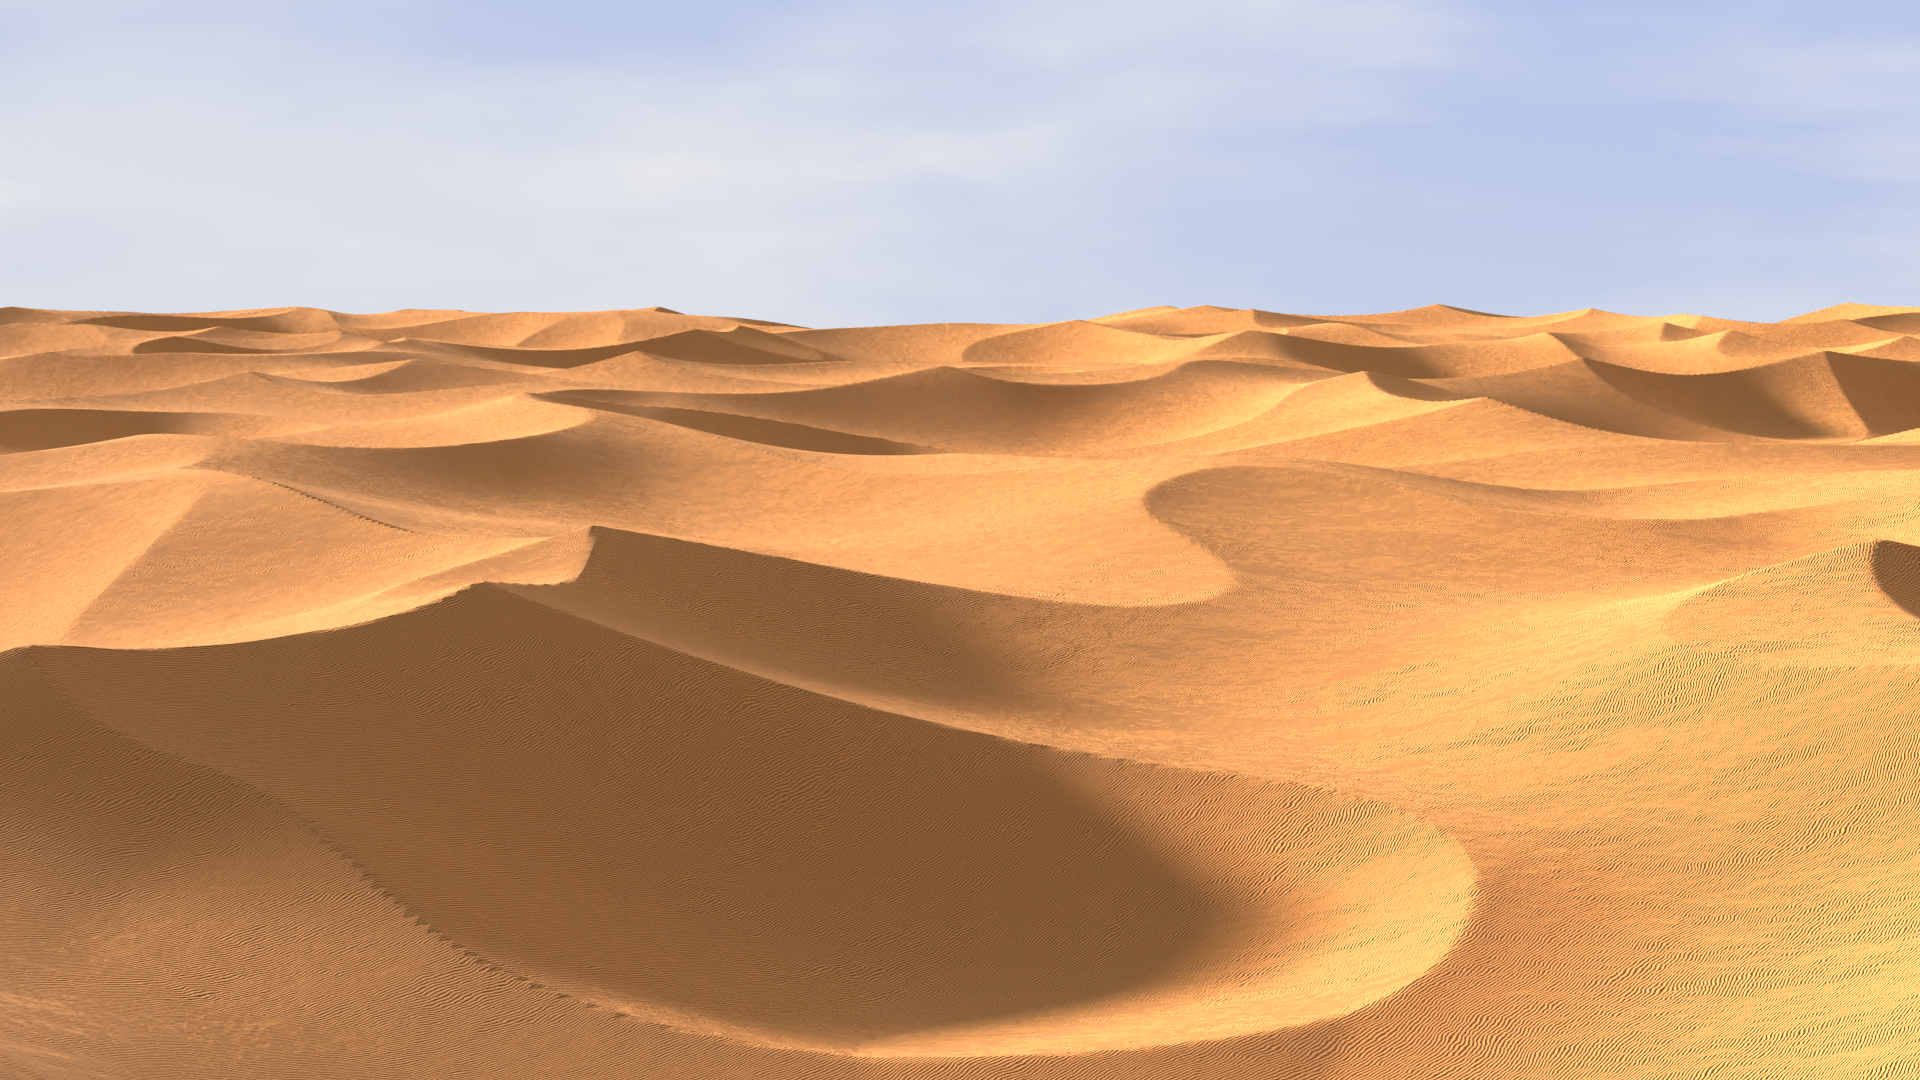
Here’s a guide to modeling a desert (sand dunes).
Using Blender’s built-in addons like Dynamic Sky, A.N.T. Landscape, and the Ocean Modifier, I created an endless stretch of sand dunes.
Additionally, I incorporated material nodes introduced in my previous articles, How to Create Seashell Patterns and How to Create Jellyfish Patterns, to replicate the windblown patterns on the dune surface known as ripples.
This scene can be used in various ways, such as animating humans or animals walking through it or as a backdrop for battle animations. Why not give it a try? 😆
Feel free to share your thoughts or questions on Klala’s Twitter (https://twitter.com/klala_lab)! 😊"
AD
Concept of the Artwork
On June 18, 2021, the theme for the #深夜のモデリング60分一本勝負 (One-Model Challenge from here on) was “Desert."
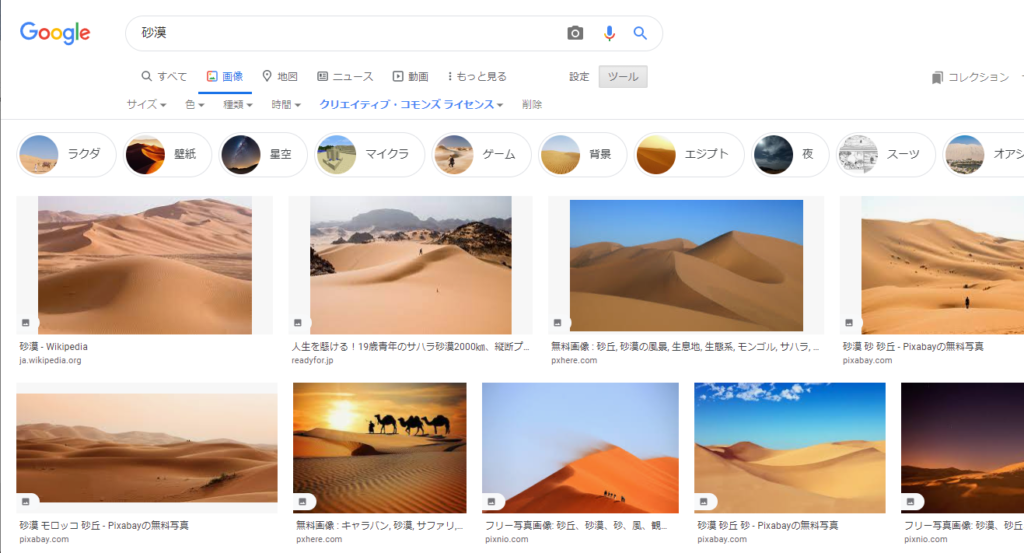
When thinking of a desert, the image of endless sand dunes likely comes to mind, as shown in these Google search results. (Though, of course, some might imagine rocky deserts instead.)
Using these images as inspiration, I set out to create a scene that evokes “endless sand dunes stretching under a bright blue sky."
Both the dunes and the sky can be modeled using Blender’s built-in addons, and the surface patterns can be expressed using material nodes. If you’re reasonably familiar with Blender, this can easily be completed within an hour!
Techniques Used
A.N.T. Landscape Add-on: Dune Preset
Ocean Modifier
Wave Texture
Noise Texture
Bump
Dynamic Sky Add-on
Creation Steps
Sand Dune Modeling (Using the A.N.T. Landscape Add-on)
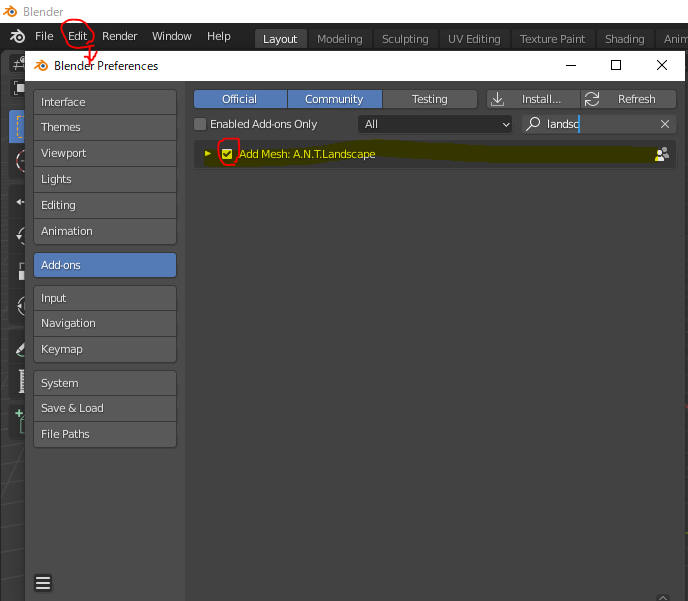
Enable the Add-on
Go to Edit > Preferences > Add-ons, search for “Landscape," and enable the A.N.T. Landscape add-on by checking the box.
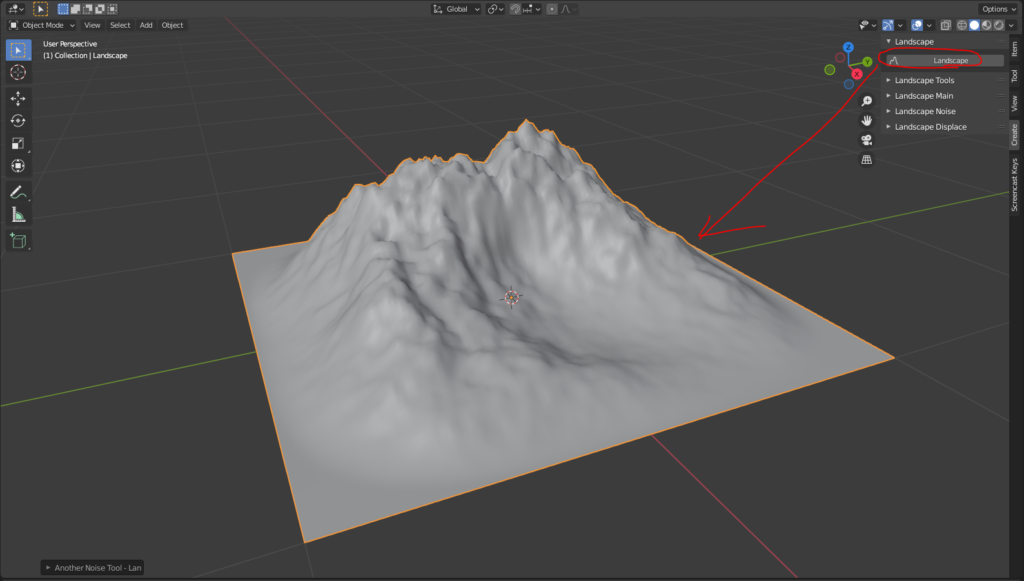
Generate the Mesh
In Object Mode, press N to open the side panel. Under Create > Landscape, click “Landscape" to generate a mesh.
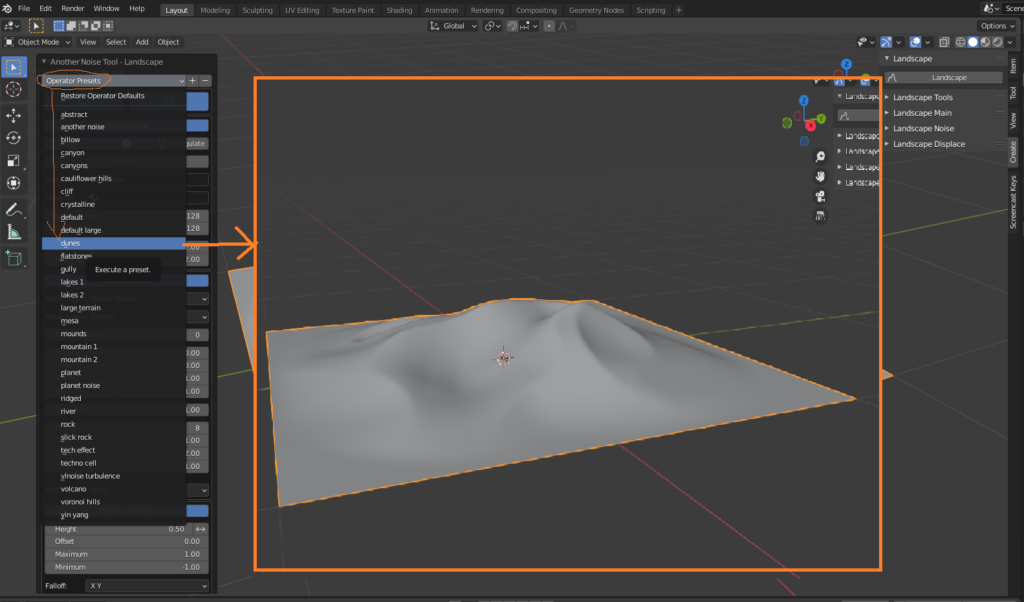
Select the Dune Preset
From the menu on the left, choose the Dune preset. A sand dune-like landscape will appear.
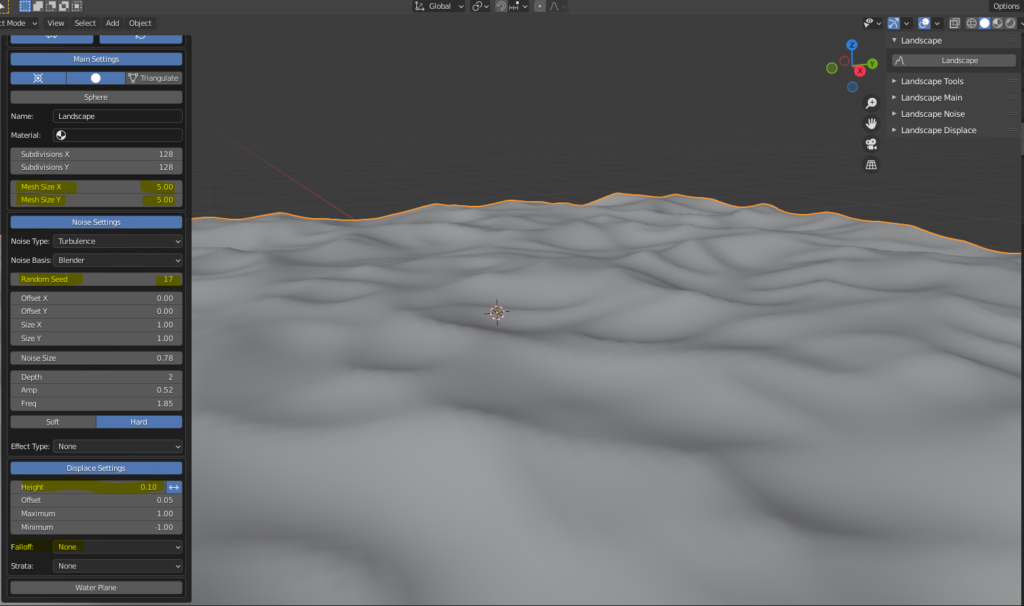
Adjust Settings for Wide Sand Dunes
Modify the following settings to create a more expansive dune:
- Mesh Size X, Y: Increase from 2 to 5 (to expand the dune area).
- Random Seed: Adjust this value to find a shape you prefer.
- Falloff: Change from XY to None (to ensure elevation at the mesh edges).
- Height: Reduce from 0.50 to 0.10 (to soften the height difference when Falloff is set to None).
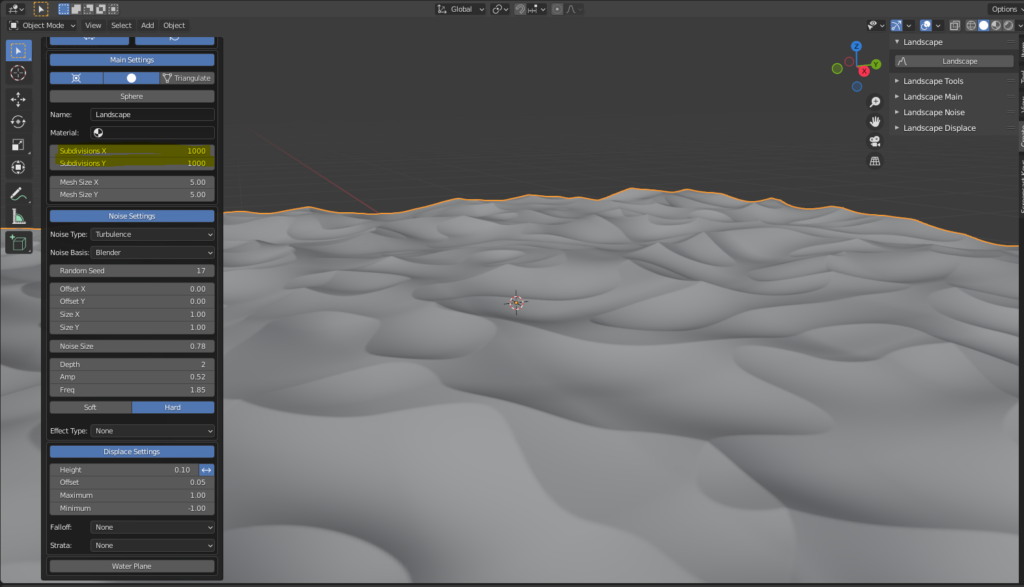
Increase Subdivisions for Smooth Ridges
Change Subdivisions from 128 to 1000 to create sharper, more detailed ridges. Note that higher values will increase rendering time and may slow down your system.
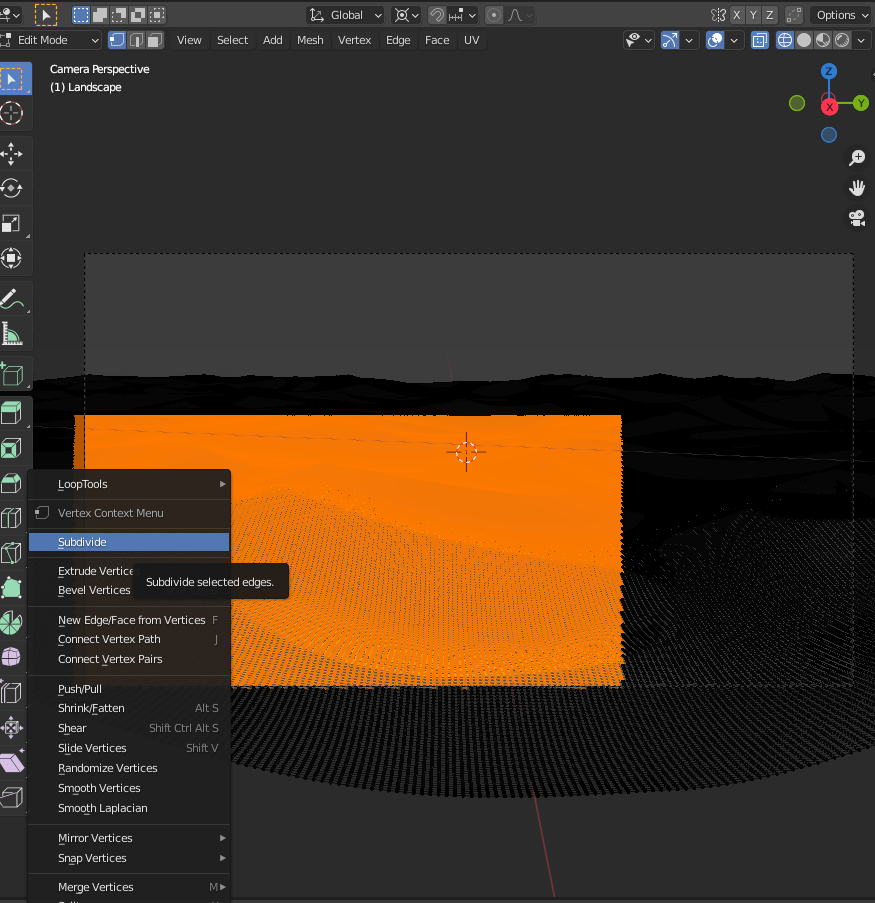
Apply Smoothing
To smooth jagged edges in the foreground:
- Select the mesh in the foreground.
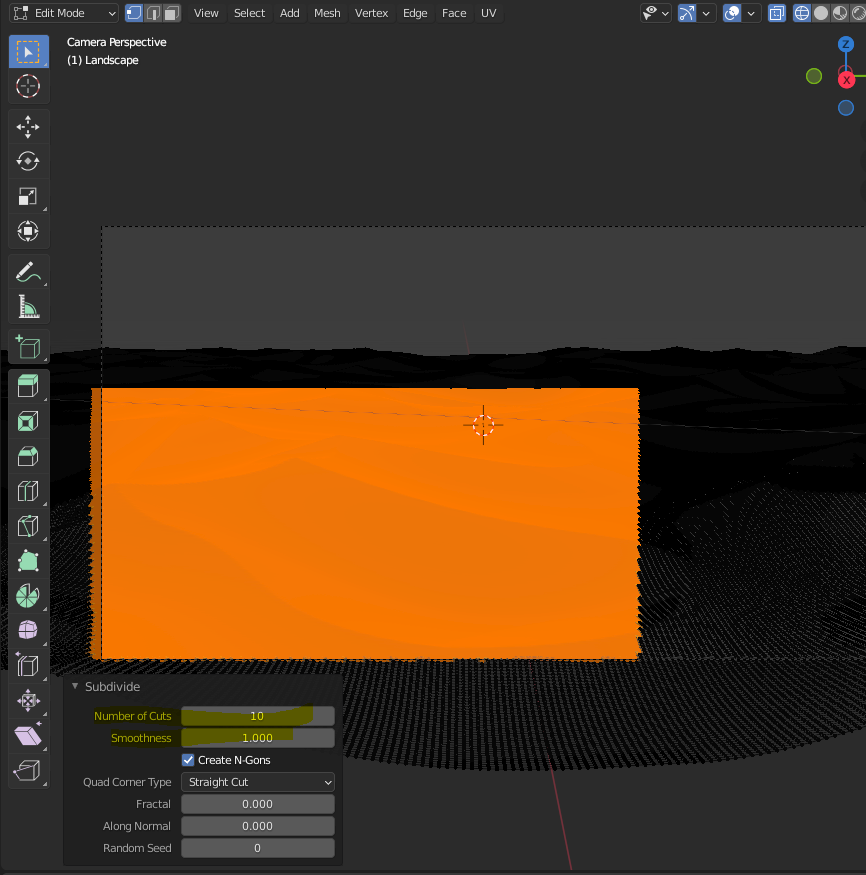
- Right-click and choose Subdivide (set the number of cuts to 10).
- Apply Shade Smooth to reduce jagged lines.

For sharper and smoother dunes overall:
Increase the subdivision count during the initial landscape generation. Note that this requires higher system performance.
With these steps, you can create a sprawling desert landscape, as shown below! 🐫

AD
Sand Dune Modeling (Using the Ocean Modifier)
Here’s an alternative method to model sand dunes using the Ocean Modifier.
(This was the method used for my initial Twitter post, as I wasn’t familiar with the A.N.T. Landscape settings at the time.)
Add a flat mesh plane in Object Mode.
Open the Modifier Properties panel and add the Ocean modifier.
From the Spectrum dropdown menu, select Established Ocean (Sharp Peaks).
Adjust the Scale value from 1 to approximately 1.4 to enhance the dune shapes.
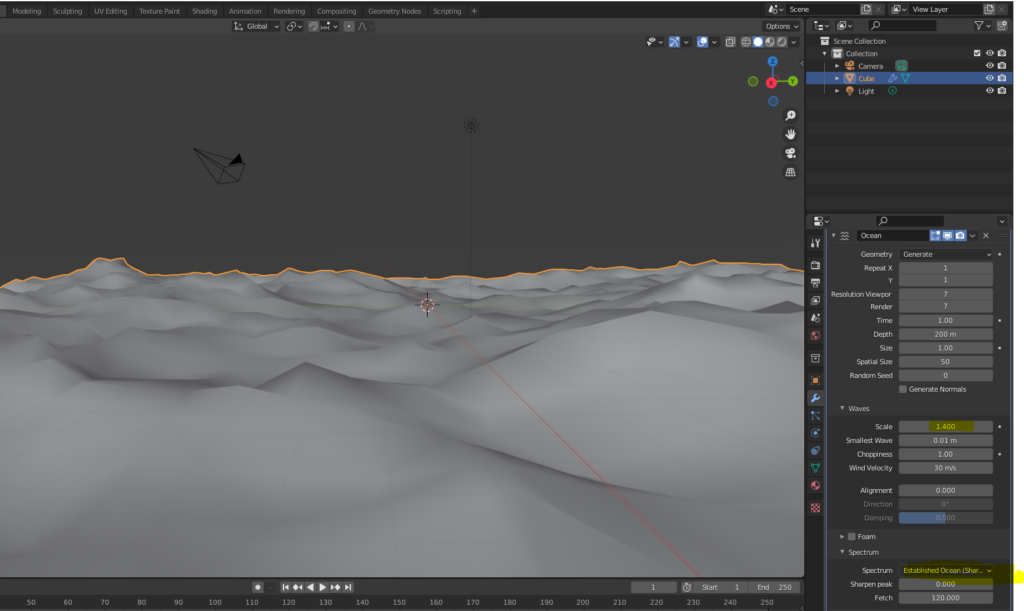
At this stage, the mesh will appear blocky and jagged.
Once satisfied, apply the modifier to finalize the mesh.
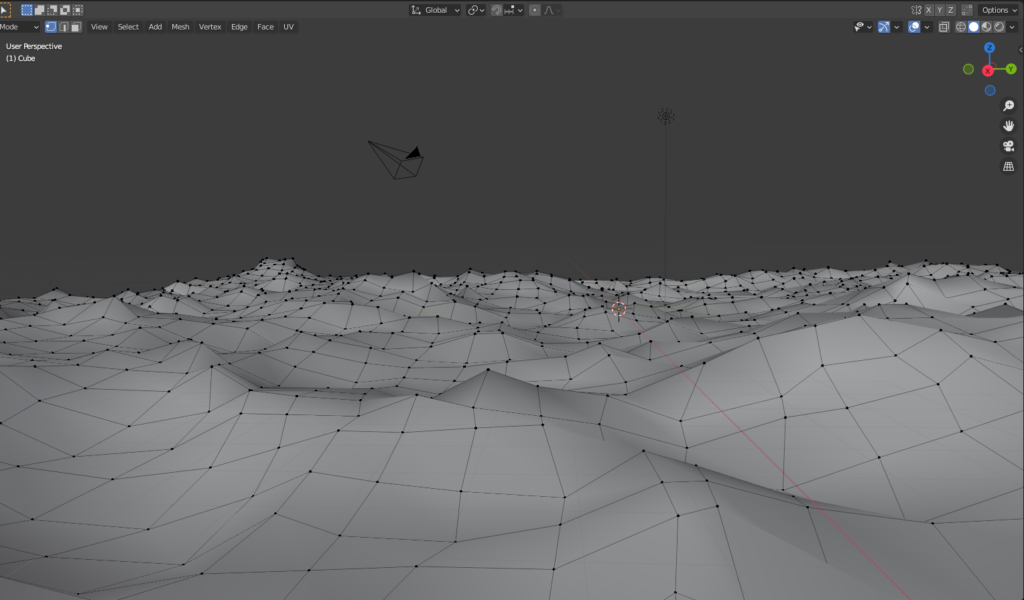
Add a Subdivision Surface modifier with a level of 2 to smooth out the mesh.
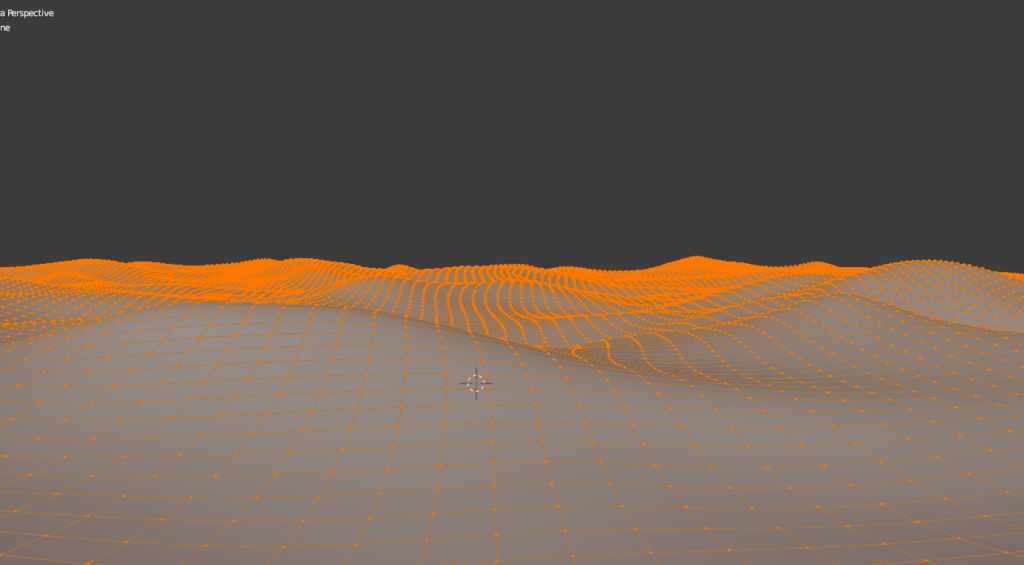
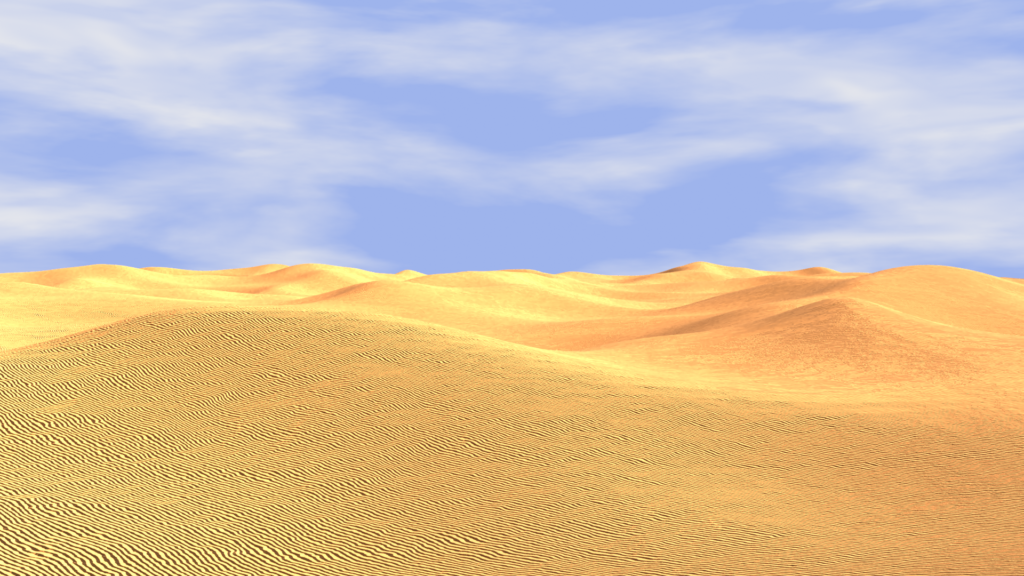
After assigning materials and setting up lighting, render the scene.
The resulting dunes may lack the sharp ridges achieved with the A.N.T. Landscape method, but they effectively convey the feel of an endless desert. This method is a solid alternative for creating expansive dunes! 🌵
Sand Dune Material
To recreate the wind-formed patterns (called ripple marks) on the surface of the sand dunes, I utilized the material nodes introduced in my earlier articles, How to Create Seashell Patterns and How to Create Jellyfish Patterns.
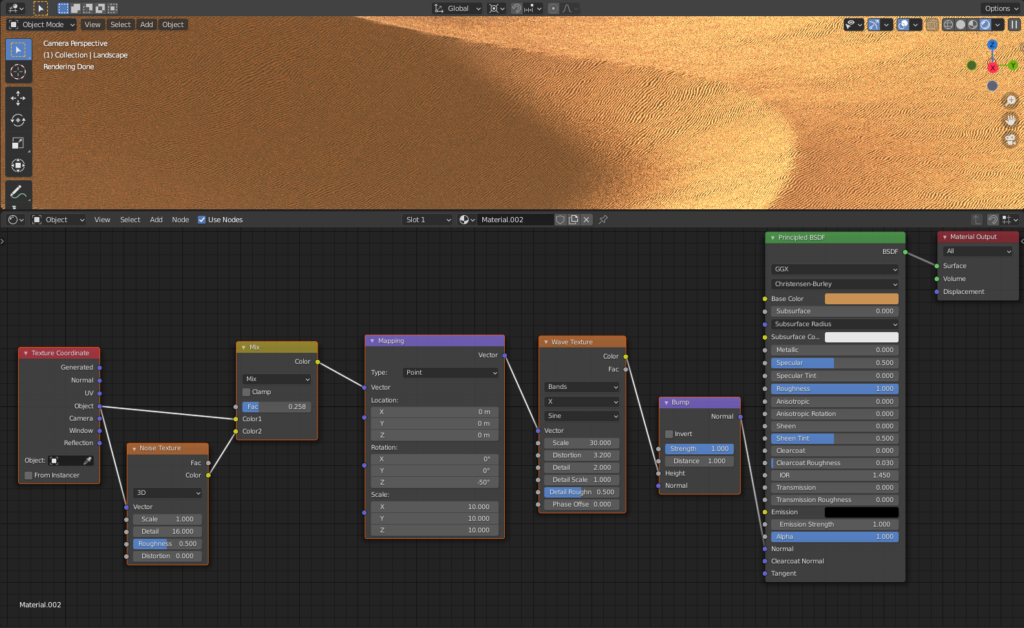
Here’s the material node setup I created. (Refer to the linked articles above for detailed instructions on node creation.)
- Noise Texture: Used to distort the wave texture.
- Wave Texture: Provides the base pattern for the ripple marks.
- Bump Node: Connected to the Normal input of the material shader to create the illusion of raised and indented surfaces.
This combination of nodes allowed me to achieve a realistic ripple texture across the dunes’ surface.
Sky Background
You can easily create a sky background in Blender using the built-in Dynamic Sky add-on.
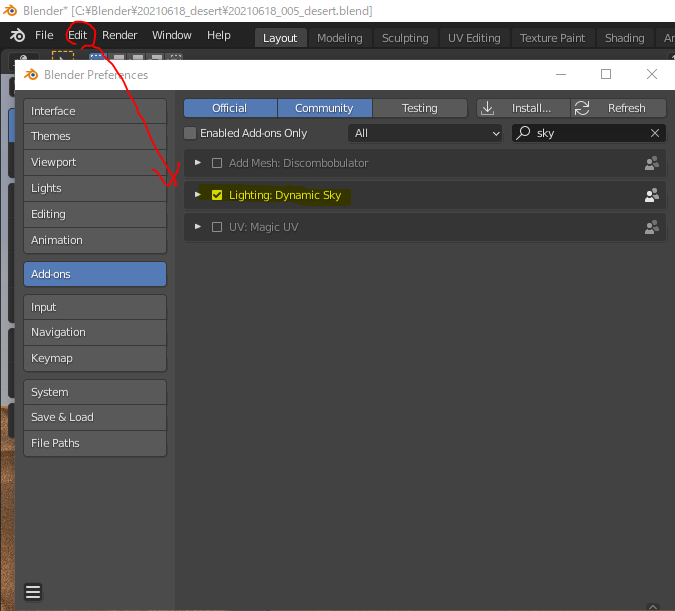
Go to Edit > Preferences > Add-ons, search for “sky," and enable the Dynamic Sky add-on by checking the box.
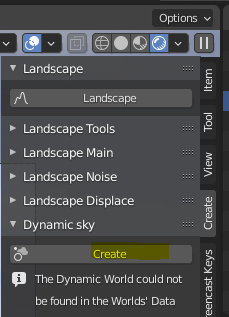
In Object Mode, press N, then go to Create > Dynamic Sky, and click Create to generate the world background.
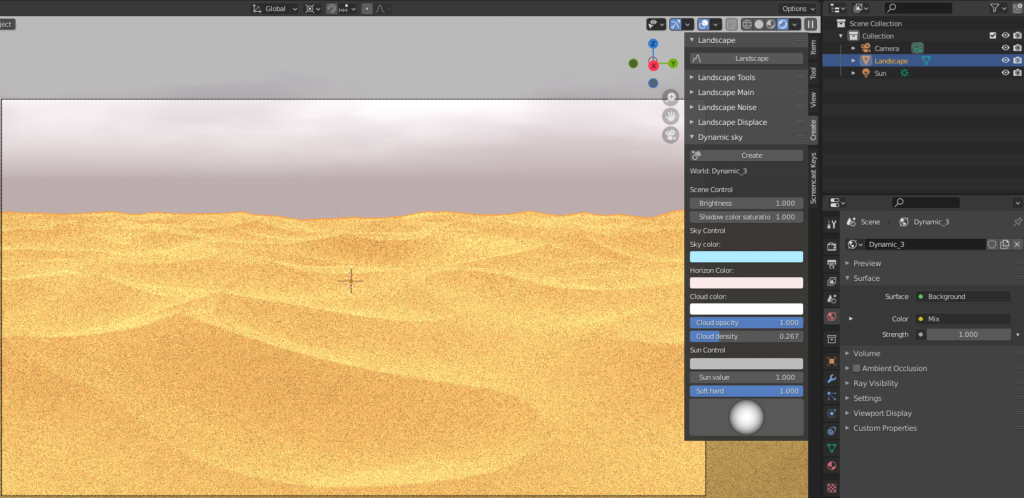
Once the world background is generated, select it in the World Properties panel, and the sky will appear along with the following settings menu:
- Scene Control: Controls the brightness and shading intensity.
- Sky Color: The color of the sky.
- Horizon Color: The color of the horizon (the line where the sky and ground meet).
- Cloud Color: The color of the clouds.
- Cloud Opacity: The amount of clouds.
- Cloud Density: The density of the clouds.
- Sun Value: The strength of the sunlight.
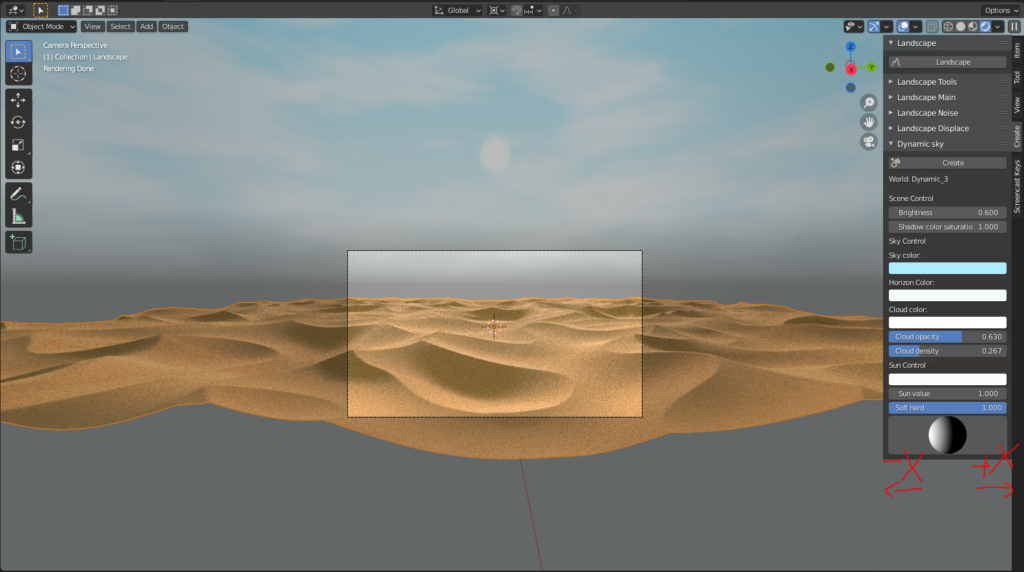
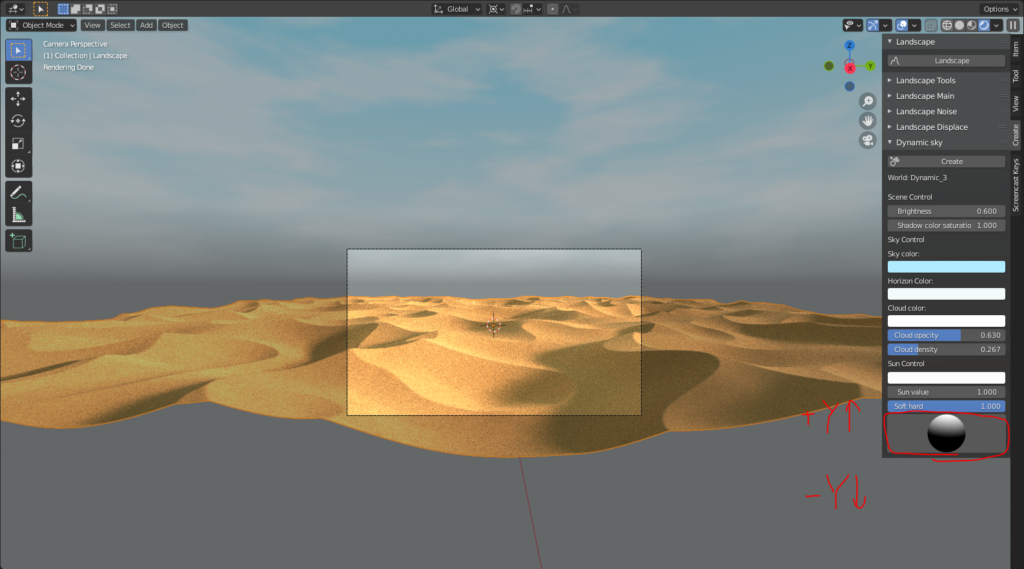
At the bottom of the settings menu, you’ll see a circular icon representing the sun’s position.
By moving the white dot left and right, you can adjust the sun’s position along the ±X axis, and by moving it up and down, you can adjust the ±Y axis, which will change the direction of the shadows.
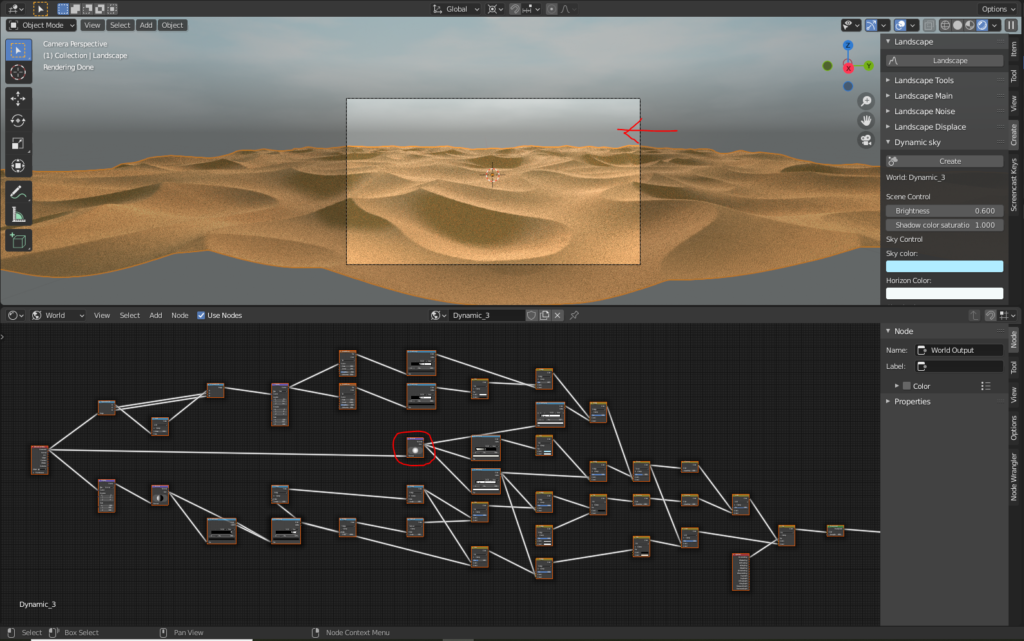
The position of the horizon can’t be directly adjusted from the menu (as far as I know), so you’ll need to adjust it in the Shader Editor.
To do this, split the Blender window into two views, and in one of them, open the Shader Editor. Then, from the top left, select Object > World, and you’ll see the world material nodes as shown below.
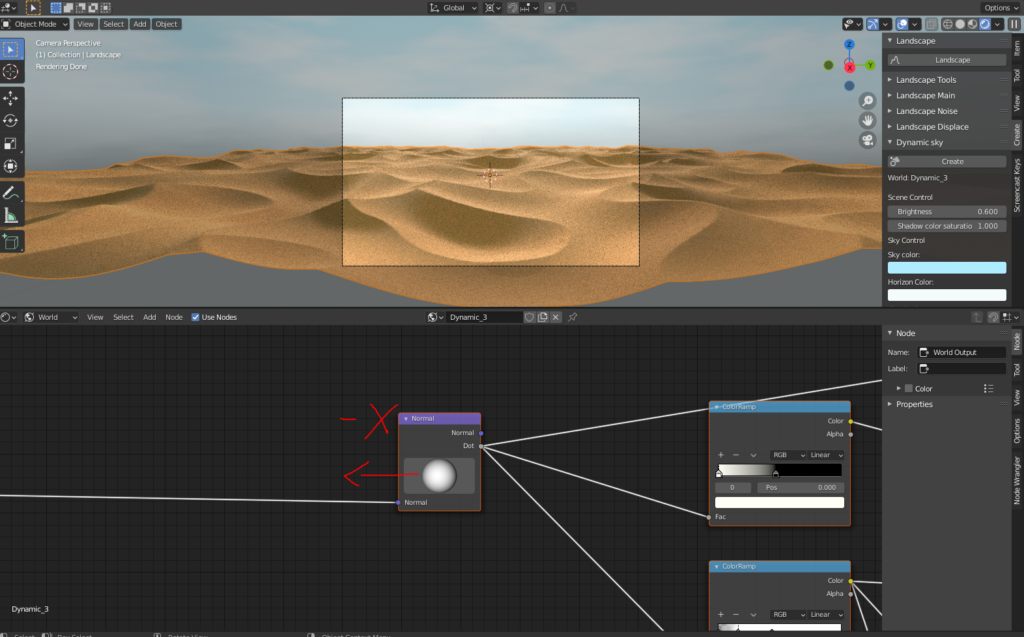
While there are many connected nodes that might be difficult to understand at first glance, after some trial and error, I found that by adjusting the Normal Node, highlighted in red, I was able to move the horizon line.
By default, the horizon line is quite high, as shown in the image below, so I wanted to lower it.
In the image below, since I’m viewing the sky in the -X direction, I moved the white portion of the Normal Node along the -X axis to adjust the horizon’s position.
Rendering Settings
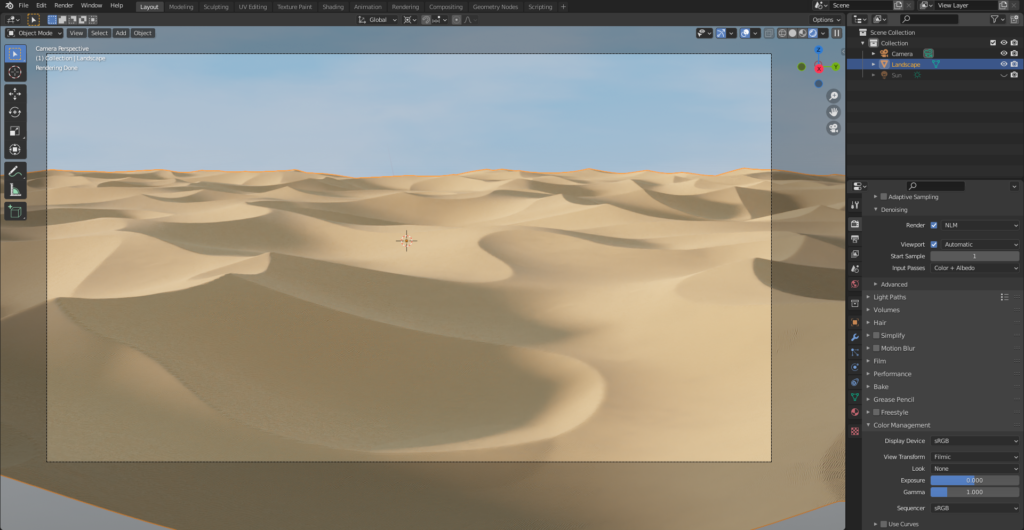
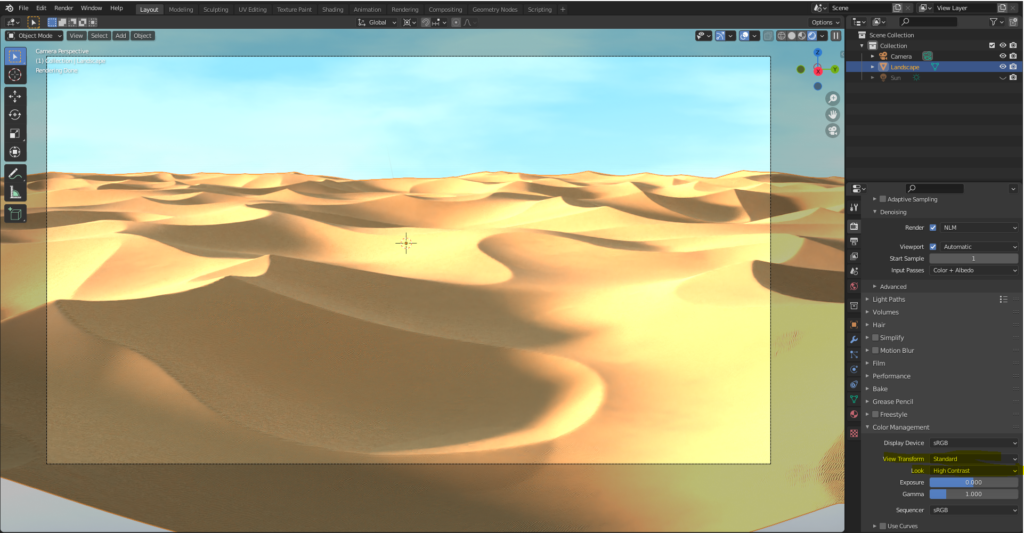
The default rendering settings are generally fine, but I made some adjustments to emphasize the shading.
I changed the View Transform to Standard and set the Contrast to High Contrast.
Default Settings
Standard & High Contrast
AD
Conclusion
I hope this guide on creating sand dunes was helpful!
The tools I introduced today—Dynamic Sky, A.N.T.Landscape, and the Ocean Modifier—can be used not only for desert scenes but also in various landscape modeling scenarios. I hope you find them useful! 😊
Reference Sites & Tutorials
ceriseworks: How to Create Sand Textures in Blender – Super Easy with Blender Kit
3D Bibi: How to Create a Simple, Photorealistic Sky in Blender 2.9 with Dynamic Sky
Klala’s lab How to Create the Pattern of a Snail Shell (or Seashell)
Klala’s lab How to Create the Pattern of a Glowing Jellyfish
AD
