【Blender 2.93】How to Create the “Glowing Jellyfish” Pattern【Material Node Study】
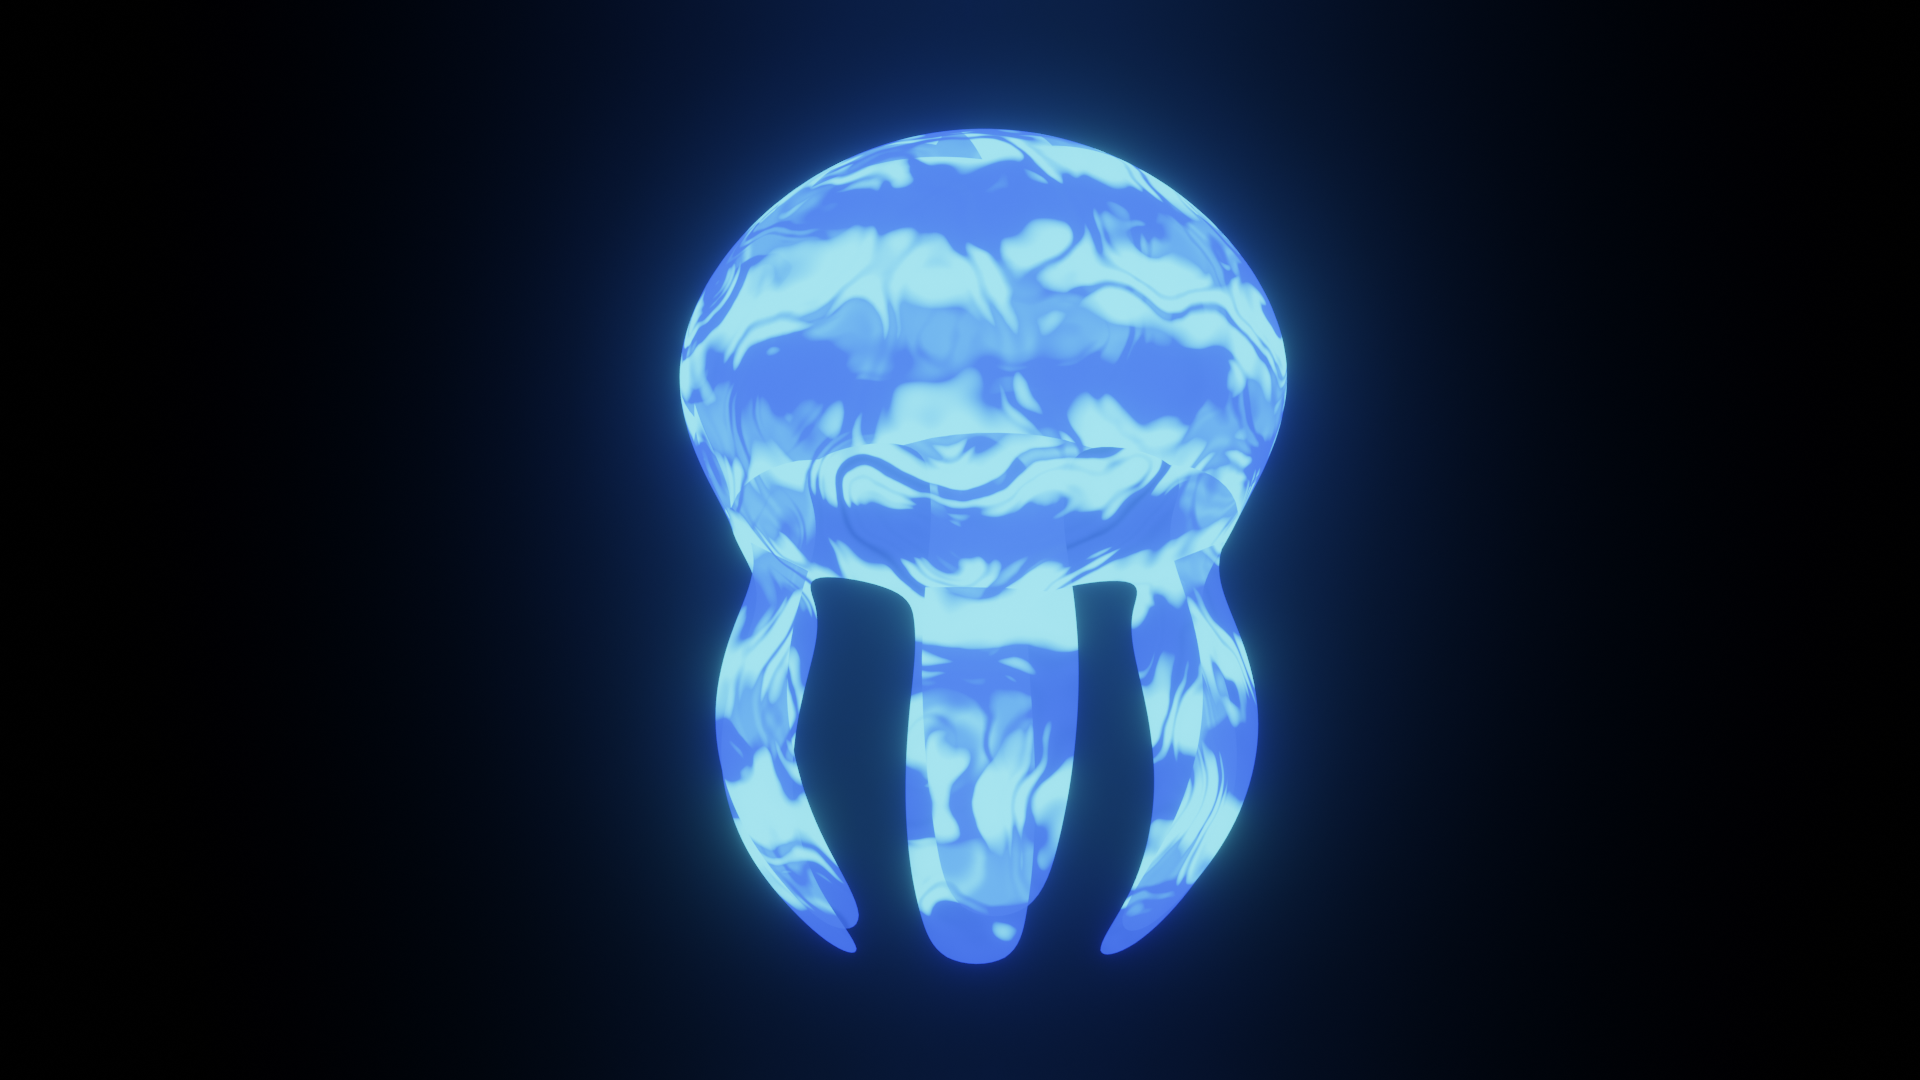
On June 12, I created a summary of how to model and design materials for a “Glowing Jellyfish."
By combining striped and spotted patterns, you can create a fantastical glowing jellyfish design 💡
Feel free to share your thoughts or questions via Klala’s Twitter account (https://twitter.com/klala_lab) 😊
いい感じに縞模様と斑点模様をミックスさせたクラゲのマテリアルができました😊
— クララ/Klala (@klala_lab) June 12, 2021
明日はこちらを泳がせてみようと思います🐠
おやすみなさい🌙#blender #b3d #3dcg #blender初心者 pic.twitter.com/EPeYGz0E3X
AD
Background of Creation
In a previous article about ”Dice Animation”, I introduced Ume-chan’s (@zero_blender) course, “Learn Physics Animation by Creating," where I learned how to make a jellyfish swim using “Soft Body" and “Particles."
2021 Latest Edition: Introduction to Physics – Learn Physics Animation by Creating
https://www.udemy.com/course/2021-ass/?referralCode=E719AEB3A5C765F1FDAA
To add a touch of originality, I decided to apply what I recently learned about Material Nodes to create beautiful glowing patterns for the jellyfish 😊.
This design incorporates various elements…
Jellyfish Modeling
The jellyfish was created using the following steps (though it differs slightly from Ume-chan’s course):
-
Add a UV Sphere
- Set the subdivision to 12.
-
Edit Mode
- Switch to face selection (press 3 on the keyboard).
- Delete faces to leave six tentacles (use Shift and Ctrl while clicking).
-
Enable X-Ray Mode
- Press Shift + Z to turn on transparency.
-
Adjust Tentacle Tips
- Select the vertices at the tentacle tips and use S to scale them.
- Enable Proportional Editing by pressing O. Then, repeatedly use S to scale and G + Z to move, refining the shape.
-
Subdivision and Smoothing
- Switch to Object Mode and add a Subdivision Surface Modifier by pressing Ctrl + 1.
- Right-click and enable Smooth Shading.
Demo Video
I’ve created a short, 3-minute video demonstrating the above steps. (Please pardon any mistakes in key presses as I’m still a bit unfamiliar 🙇💦.)
To display shortcut keys, I used the Screencast Keys add-on, which can be downloaded from the linked site. This add-on is widely used in YouTube tutorials 😊.
Here’s the final result (after applying subdivision):
Soft Body Application
In Ume-chan’s course, you can learn how to apply a Soft Body modifier to make the jellyfish gently swim through the water. It’s a very clear and detailed course, so if you’re interested, I highly recommend checking out the linked page! 😊
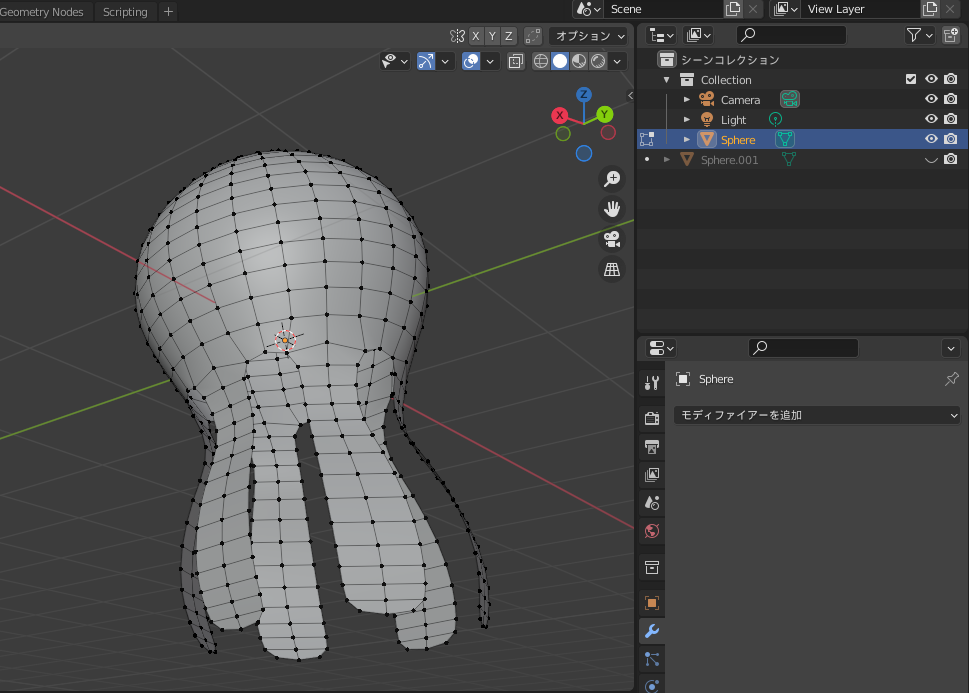
Tips for Mesh Optimization
To prevent slow physics simulations, it’s better not to use too many subdivisions.
- Subdivision Level Comparison
- In the model above, the Subdivision Surface level is set to 1, resulting in 637 vertices.
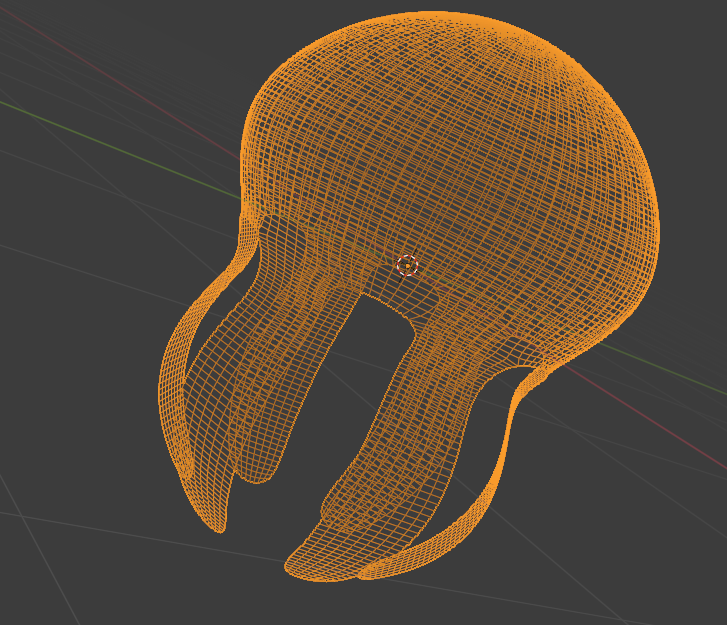
- My initial model, with a Subdivision Surface level of 2, had nearly 9,025 vertices, causing significant slowdown 😅.
If you have a high-performance CPU, this may not be an issue. However, on my PC (Core i5-10400F), baking all physics simulations (Soft Body & Particles) took over an hour 😅💦.
This left little room to tweak turbulence and vortices. For particle animation, keeping vertex count as low as possible is essential!
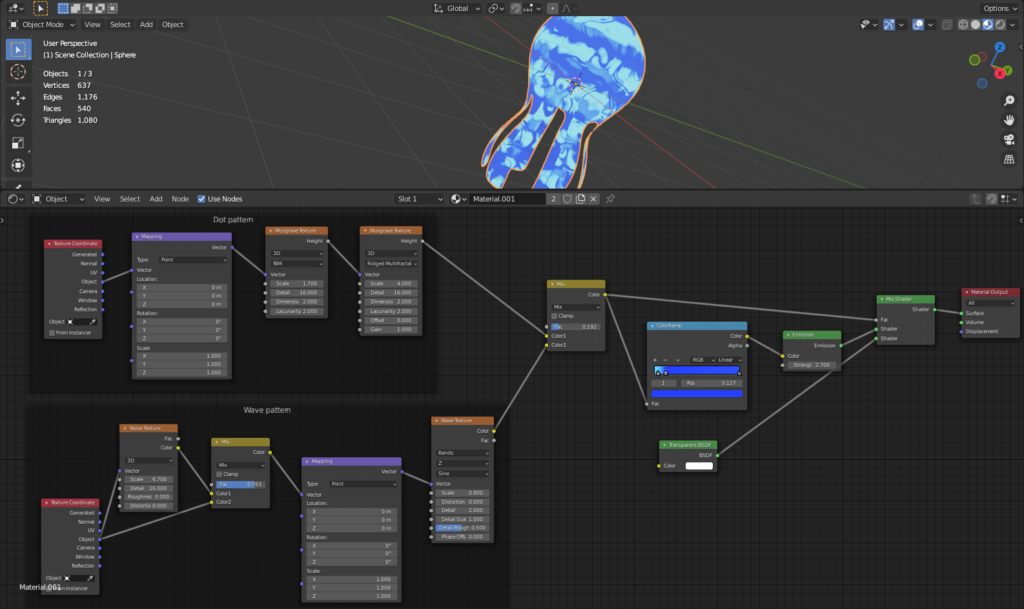
Material Node Creation Steps
To begin, here’s a preview of the completed node setup and the resulting jellyfish pattern.
I will walk you through the steps to create the following node structure and achieve the desired pattern:

(English Ver.)
Basic Pattern ①: Spot Pattern → Musgrave Texture
Initially, I wanted to create a glowing spot pattern (similar to the imagery of the “Forest Spirit" in the movie Princess Mononoke). For this, I used the Musgrave Texture introduced in my previous article, How to Create Shell Patterns.
First, connect the Musgrave Texture to the “Material Output" node. Use the Node Wrangler add-on’s shortcut (Ctrl+T) to link the Musgrave Texture to “Texture Coordinate" and “Mapping" nodes.
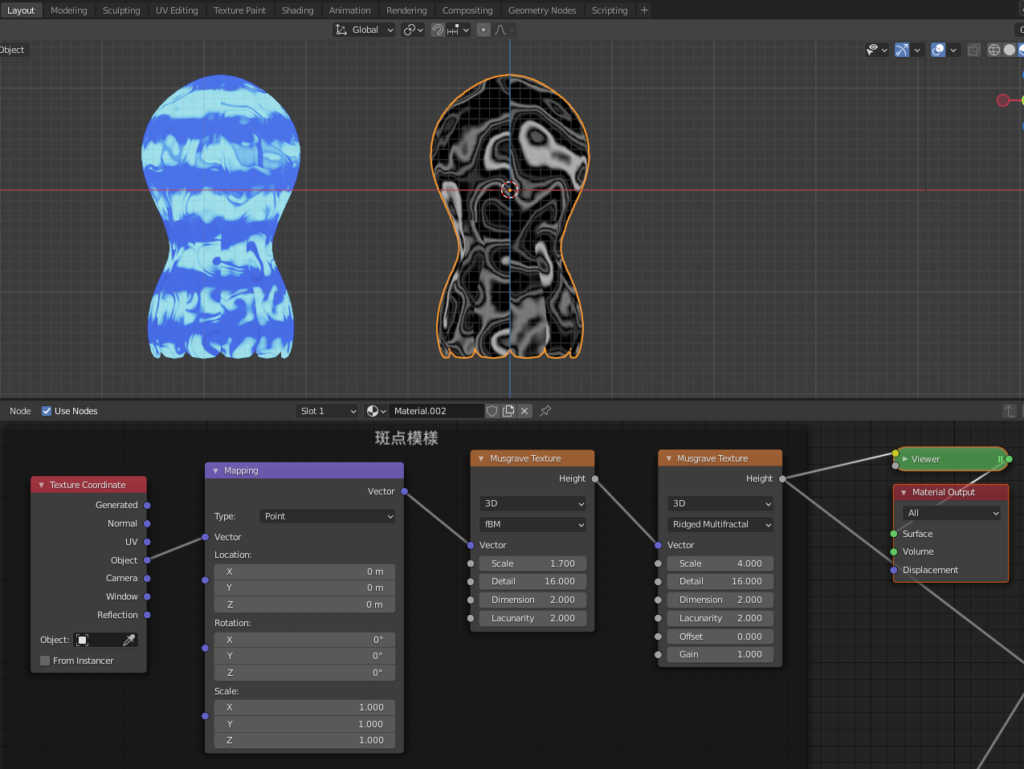
This produces a black-and-white pattern like the one shown below. I set the parameters as indicated in the diagram.
(For comparison, the finished material is displayed alongside it.)
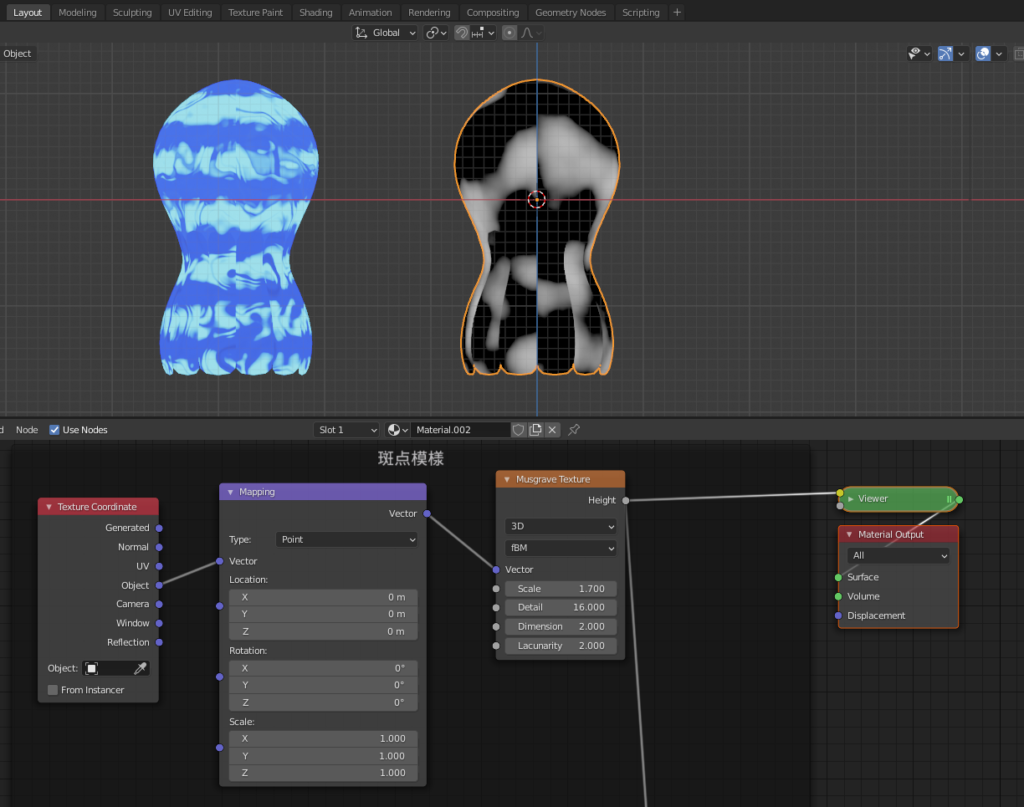
To achieve a more intricate pattern, I added another Musgrave Texture, connecting it to the first one. (The technique of layering textures is something I learned from Taka’s YouTube video, How to Create Realistic Rust Materials.
By changing the default “fBM" setting in the Musgrave Texture to “Ridged Multifractal," a ripple-like spot pattern emerges, as shown below.
This completes Basic Pattern ①: Spot Pattern.
AD
Basic Pattern ②: Stripe Pattern → Wave Texture
Next, I created Basic Pattern ②: a stripe pattern. (In the following steps, we’ll layer Patterns ① and ② together.)
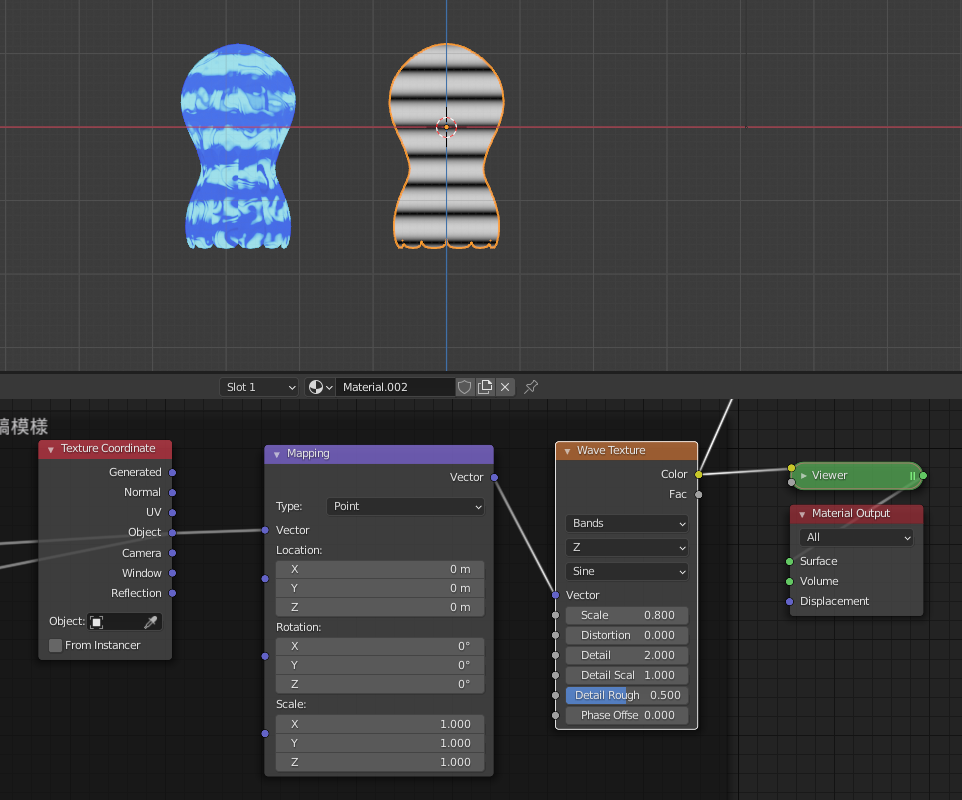
Similar to the previous How to Create Shell Patterns article, I added a Wave Texture and connected it to the “Material Output" node.
Using the Node Wrangler add-on shortcut (Ctrl+T), I added “Texture Coordinate" and “Mapping" nodes. By setting the Wave Texture’s coordinate axis to Z, I was able to generate horizontal stripes, as shown below.
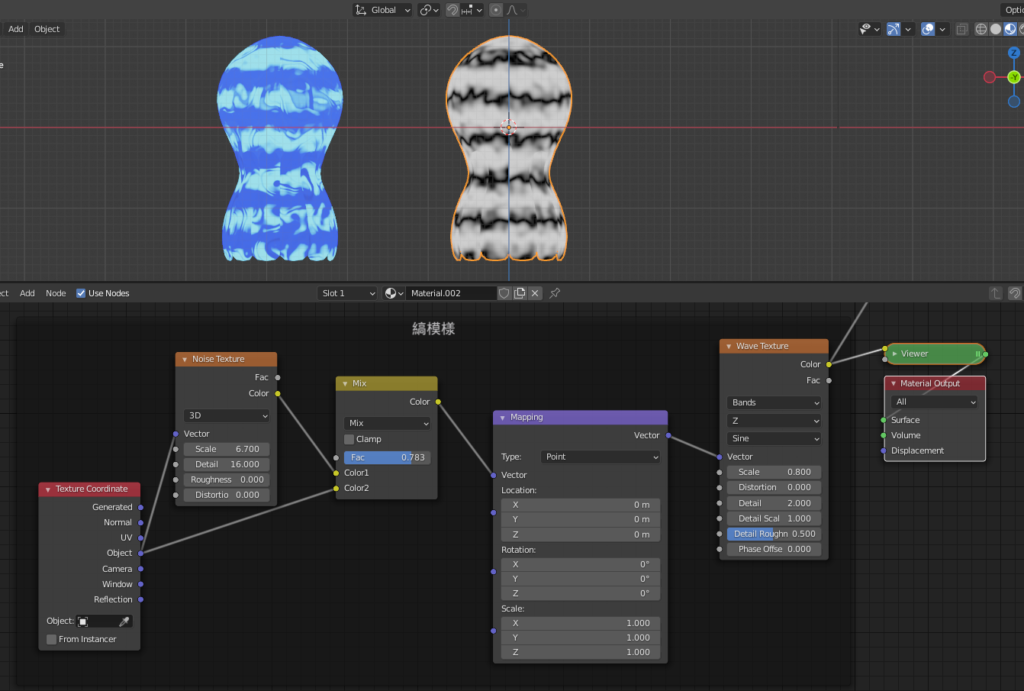
To add more variation, I inserted a “Noise Texture" and a “Mix Shader" between the “Texture Coordinate" and “Mapping" nodes. This adjustment created a wavy effect on the stripes, as illustrated below. (This technique was inspired by Blender Tube’s video, How to Create Stained Glass.)
This completes Basic Pattern ②: Stripe Pattern.
Combining Patterns → RGB Mix
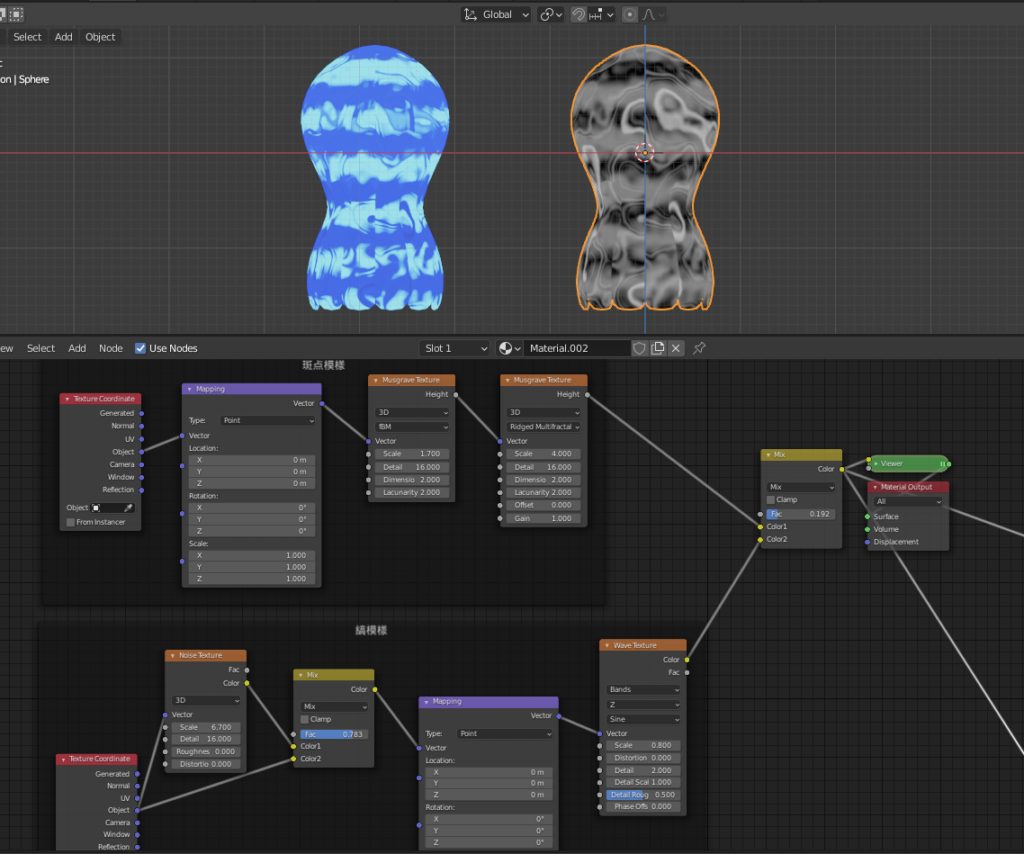
Next, I combined Basic Pattern ① (Spot Pattern using the Musgrave Texture) with Basic Pattern ② (Stripe Pattern using the Wave Texture) using the Color > Mix RGB node. By adjusting the Factor, you can control the blending ratio of the two patterns.
(The “Mix Shader" node might be easily confused with the “Mix RGB" node, but here’s a quick tip: use “Mix Shader" for combining shaders like Principled BSDF or Emission, and use “Mix RGB" for combining textures or colors! 😅)
Fluorescence & Transparency → Emission and Transparent Shaders
Finally, I used the black-and-white texture as a base to create a jellyfish-like glowing and transparent material. This was achieved by combining an Emission Shader and a Transparent BSDF using the Mix Shader node.
Here’s how the setup works:
Add three shaders: Emission, Transparent BSDF, and Mix Shader.
Connect the texture so that the white areas correspond to the Transparent Shader, and the black areas to the Emission Shader.
However, the black areas won’t glow unless we modify them.
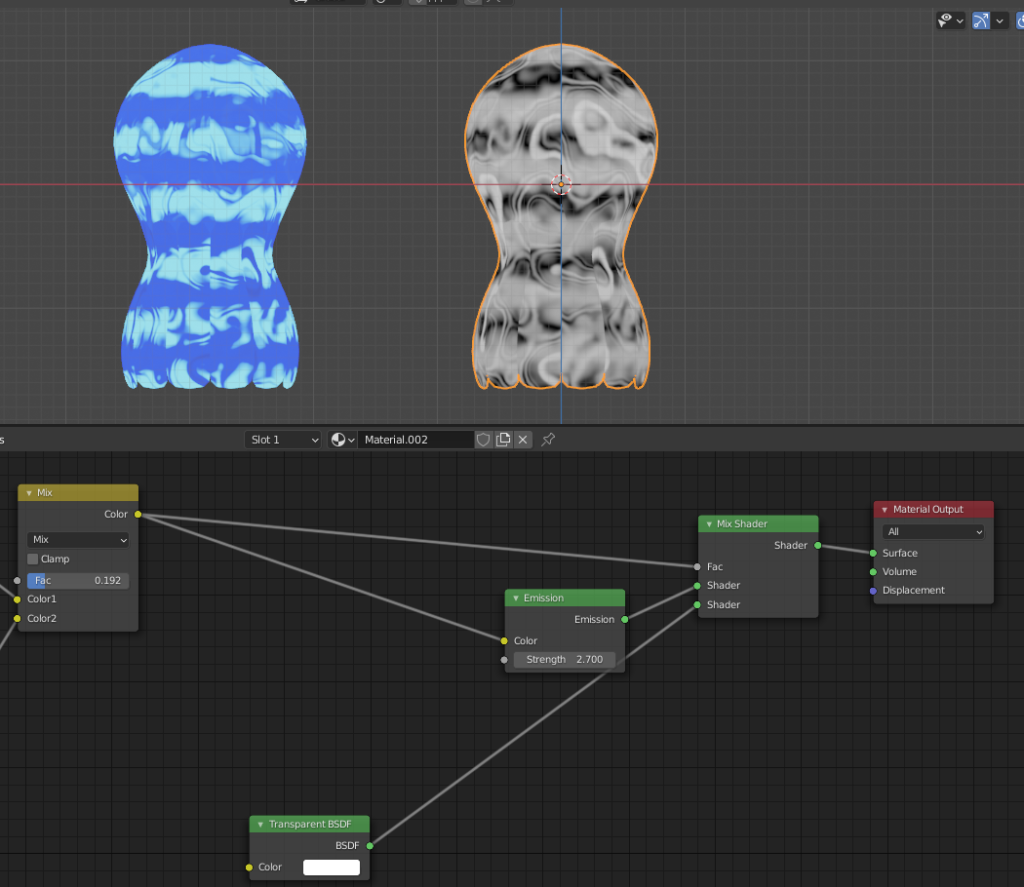
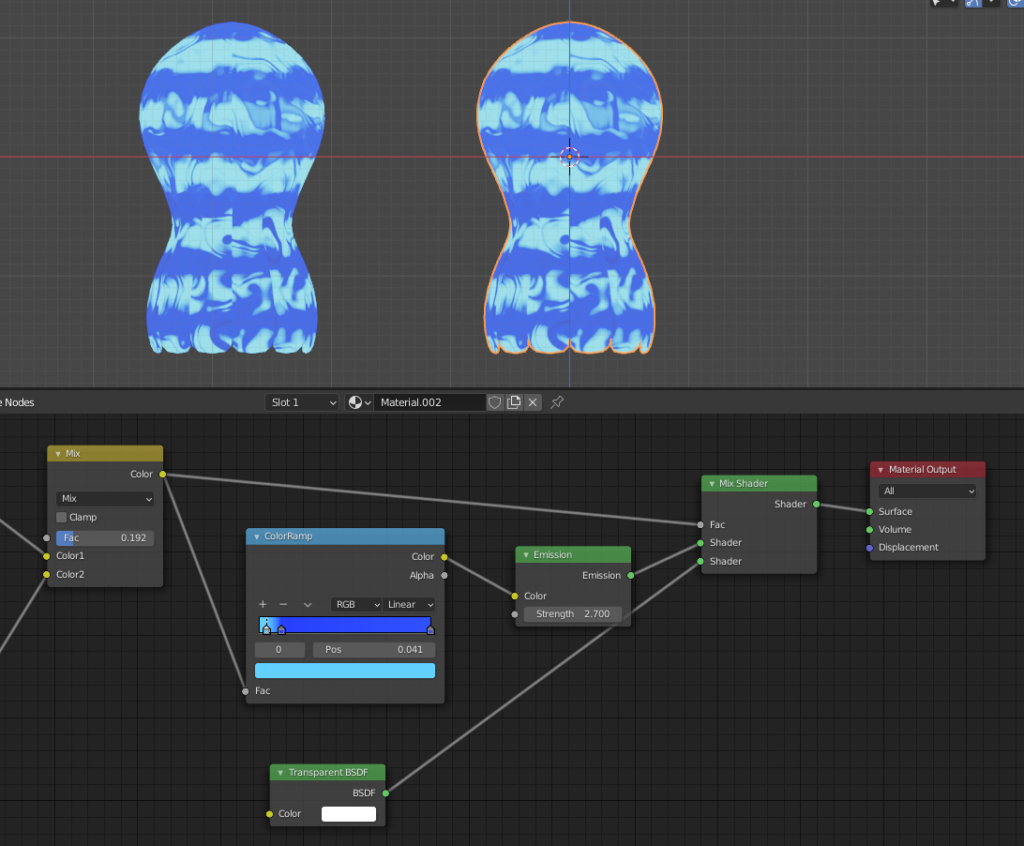
To make it glow, I added a Converter > Color Ramp node. Adjusting the colors allows you to create the desired effect.
- I set the left end of the ramp to light blue and the right end to a darker blue. This made the light blue areas glow while the other parts appeared as a translucent blue.
Final Result
This completes the jellyfish material! 🎉
Animation
Using the techniques taught in Ume-chan’s course, I created an animation combining Soft Body and Particles.
As mentioned in my previous article, Clouds Seen from an Airplane, I also added animation to the pattern by keyframing the Texture Coordinates. This added a dynamic touch to the glowing jellyfish! 😊
That said, as I previously mentioned, having too many vertices in the model significantly increased the time required to bake the particle simulations, which is something to keep in mind for the future. 💦 (Lesson learned!)
Recommended Course
For those interested in creating animations in Blender, I highly recommend this course, as it offers a great way to learn the necessary skills and techniques! 😊
Here’s the link: 2021 Latest Edition: Learn Physics Animation by Creating
AD
Conclusion
Through the process of creating jellyfish patterns, I learned various ways to combine Material Nodes.
The world of Material Nodes is incredibly deep and fascinating, so I plan to continue exploring and learning while having fun! 😊
Reference Videos and Websites
Blender Tube: “How to Create Stained Glass in Blender | Procedural Material Tutorial“
Taka: “How to Create Realistic Rust Material | Procedural Modeling [Blender Tutorial]“
SasaraBch: “Blender O01-005 | NODE WRANGLER (Free Built-in Add-on Explanation)“
Special Mention
The inspiration to create jellyfish patterns came from Ume-chan’s Physics Animation Course. You can check out the course here:
https://www.udemy.com/course/2021-ass/?referralCode=E719AEB3A5C765F1FDAA
AD
