【Blender 4.1】How to Create Dragon Scales
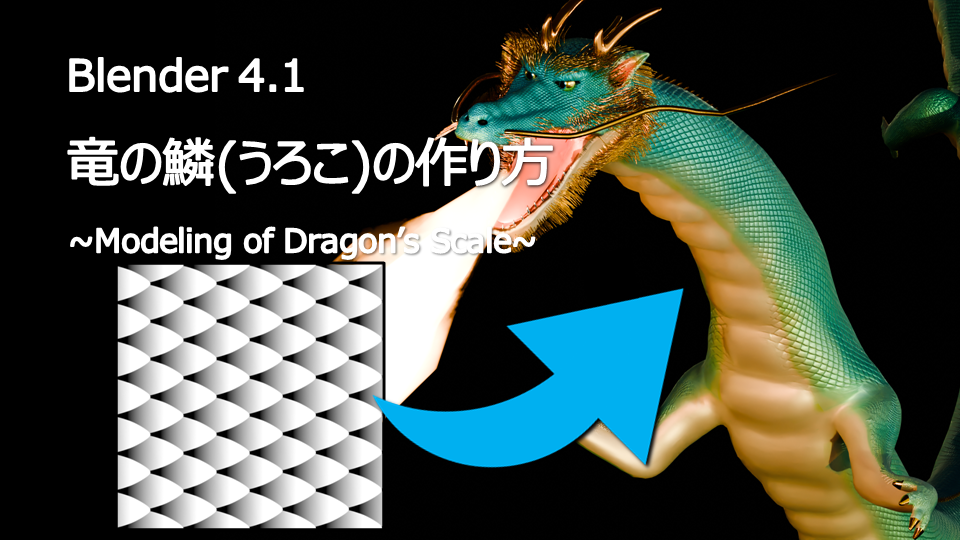
Since 2024 is the “Year of the Dragon" according to the zodiac, I decided to model a “dragon" using the 3D CG software Blender at the end of 2023 for my New Year’s greeting cards.
The basic modeling techniques and the process of adding fur are the same as the “rabbit" series I created last year, so I’ll skip over those. However, this time, I worked on creating scales for the first time, so I’ve put together a simple guide on how to make them.
These techniques can also be applied to modeling next year’s zodiac animal, the “snake" 🐍. Feel free to use this as a reference if it helps!
If you have any feedback or questions, please reach out to me on my Twitter account, Klala (https://twitter.com/klala_lab) 😊
2024年の干支の竜(辰)です🐉
— クララ/Klala (@klala_lab) December 2, 2023
ヒゲに苦戦しましたが、なんとかイメージを形にできました😅#b3d #blender3d #3dcg https://t.co/OWYJ9mPp8i pic.twitter.com/Zj7RYxab0e
AD
Process for Creating Scales
The method for creating scales introduced this time follows these steps:
- Creating a Texture Brush
- UV Unwrapping
- Texture Painting
In summary, the process involves creating a texture brush shaped like scales, then using texture painting to add the scales’ bumps and details onto a UV-unwrapped mesh.
Details on “UV Unwrapping" and “Texture Painting" were covered in previous articles, so please refer to those for more information. This article will focus specifically on how to create the texture brush.
Let’s go step by step through the process.
Creating a Texture Brush
We’ll start by creating a black-and-white image with a scale pattern, like the one shown here.
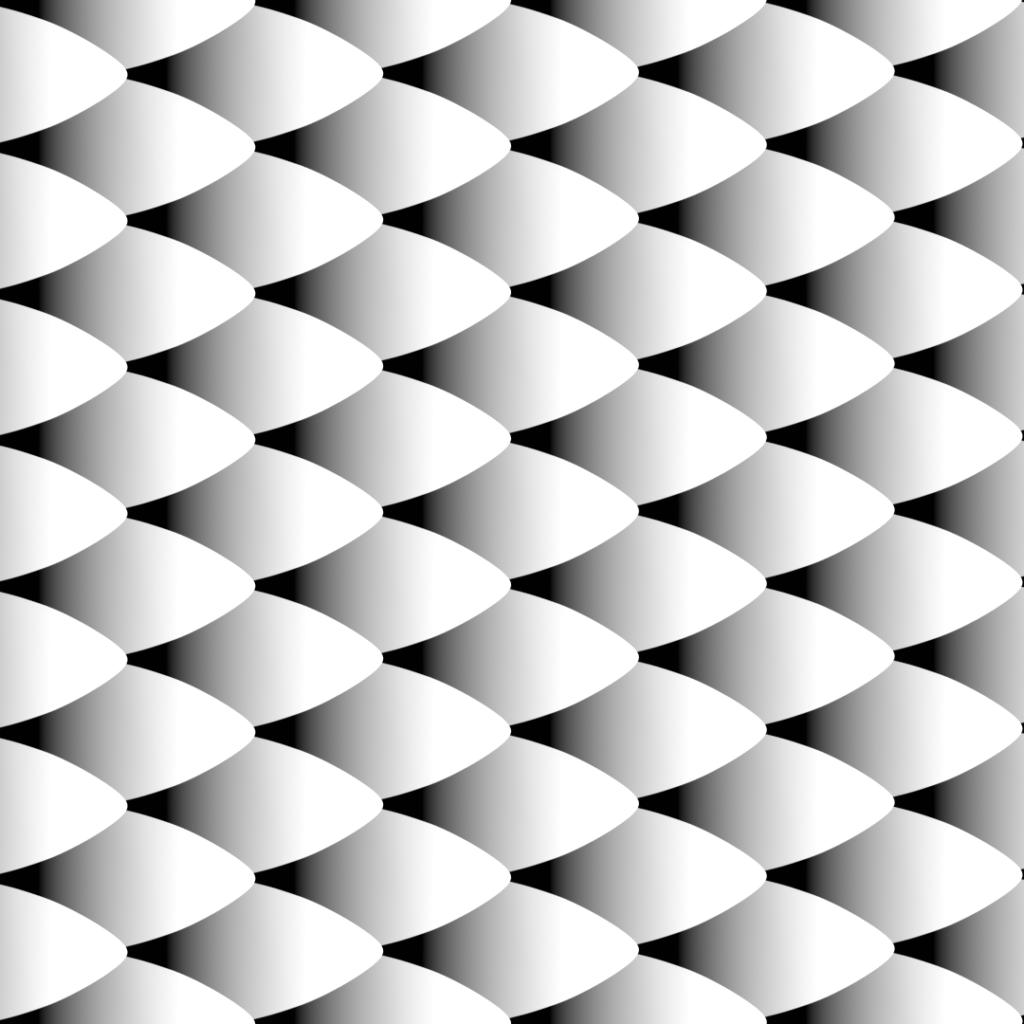
You can use any tool of your choice. Drawing software like Clip Studio Paint or GIMP works fine, but in this tutorial, I’ll show you how to create it using Blender.
Open Blender and create a new project.
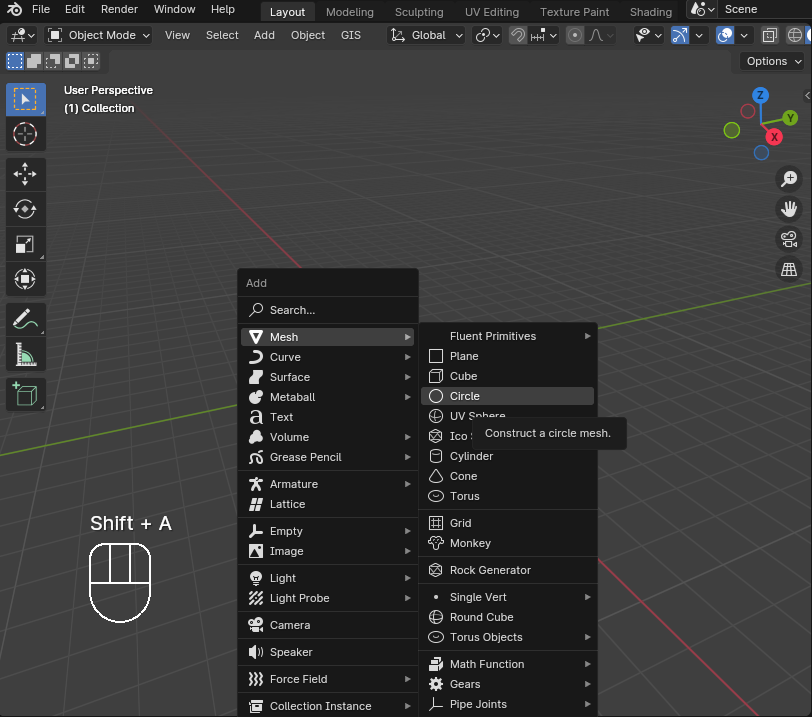
Press Shift + A, then go to Mesh → Circle to add a circle.
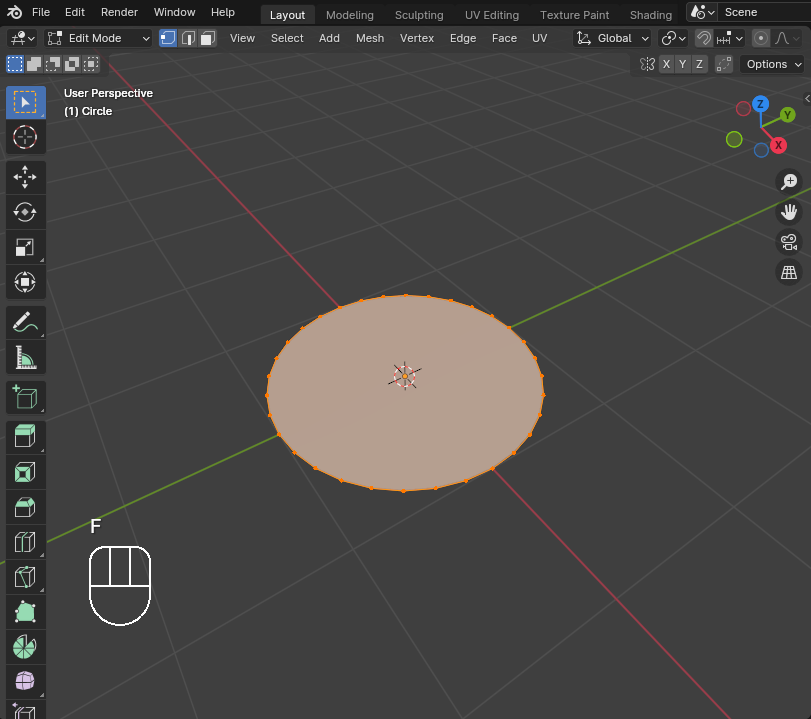
Press the Tab key to switch to Edit Mode.
Press the F key to fill the circle with a face.
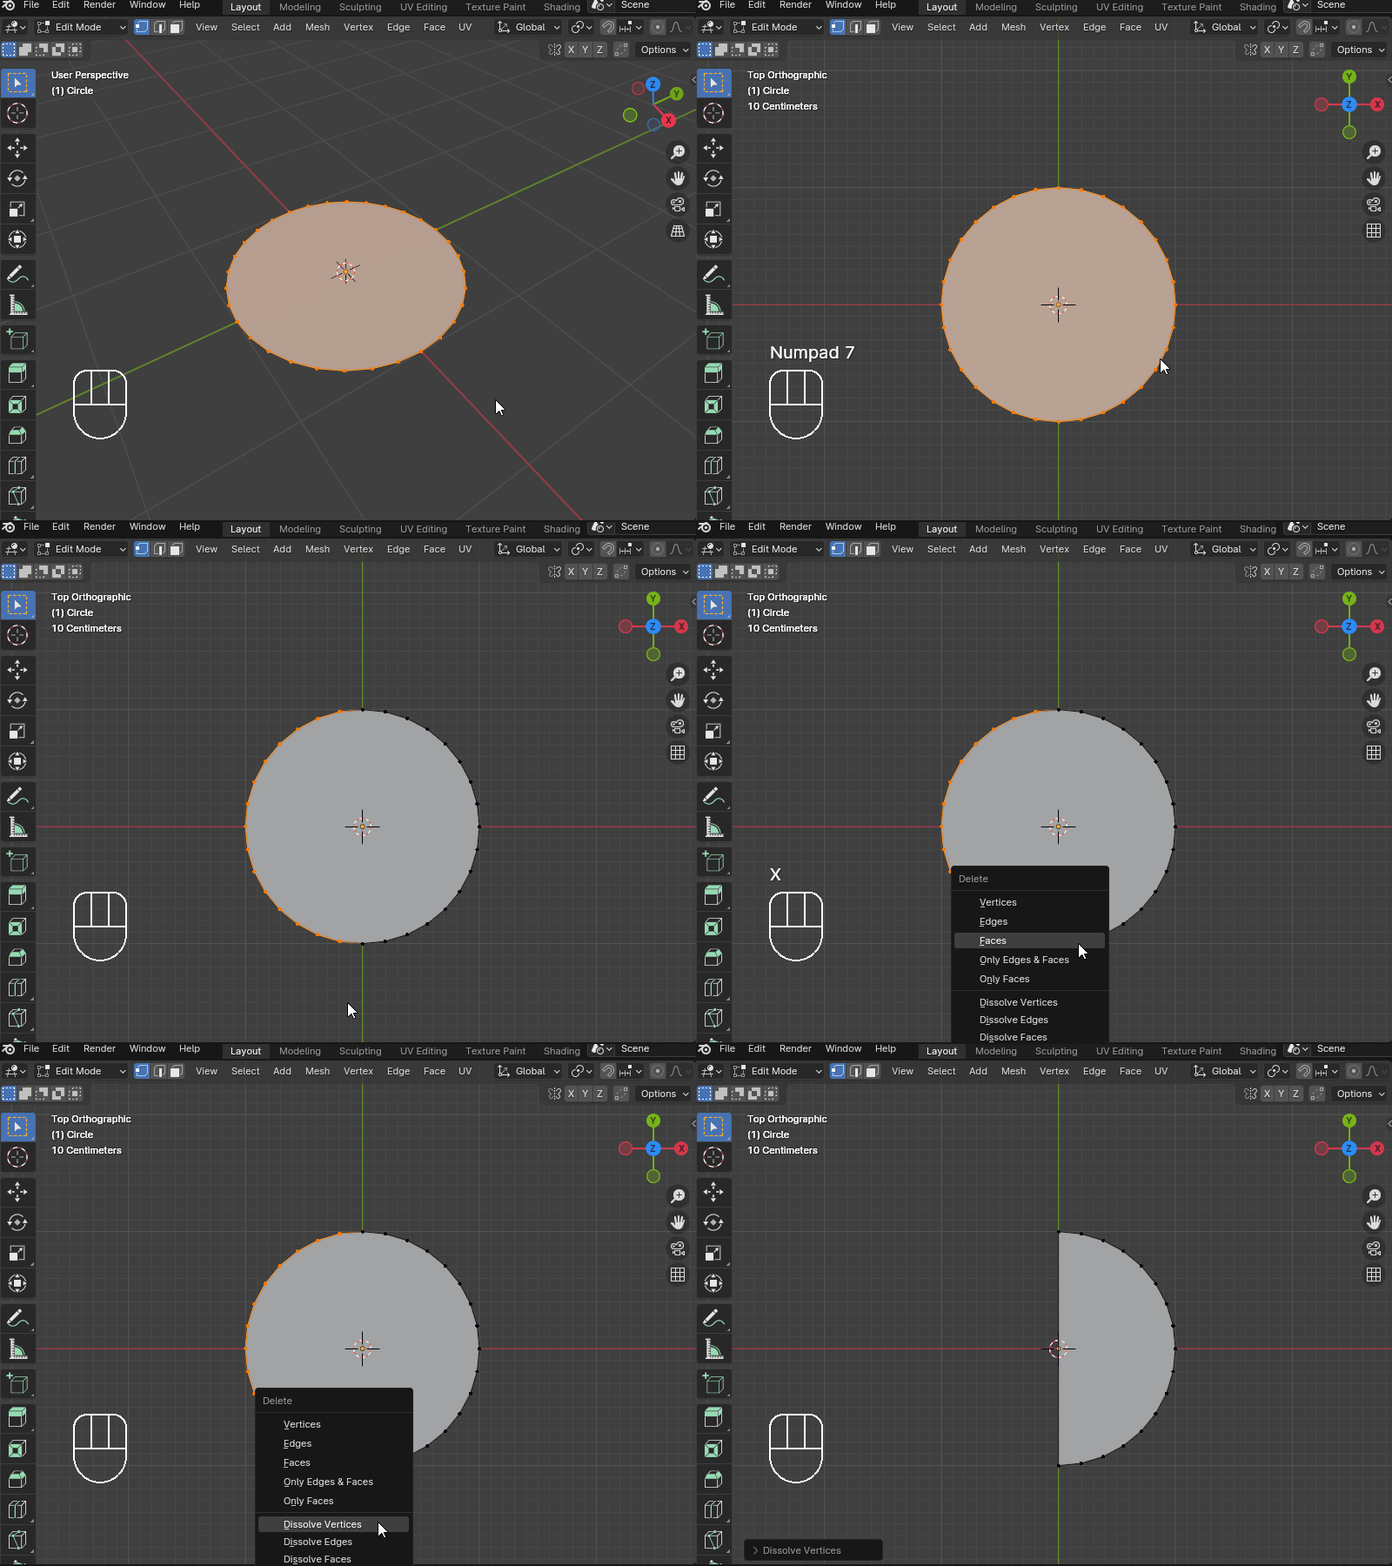
Select the vertices on the left half of the circle.
Press the X key and choose Dissolve Vertices to turn the circle into a semicircle.
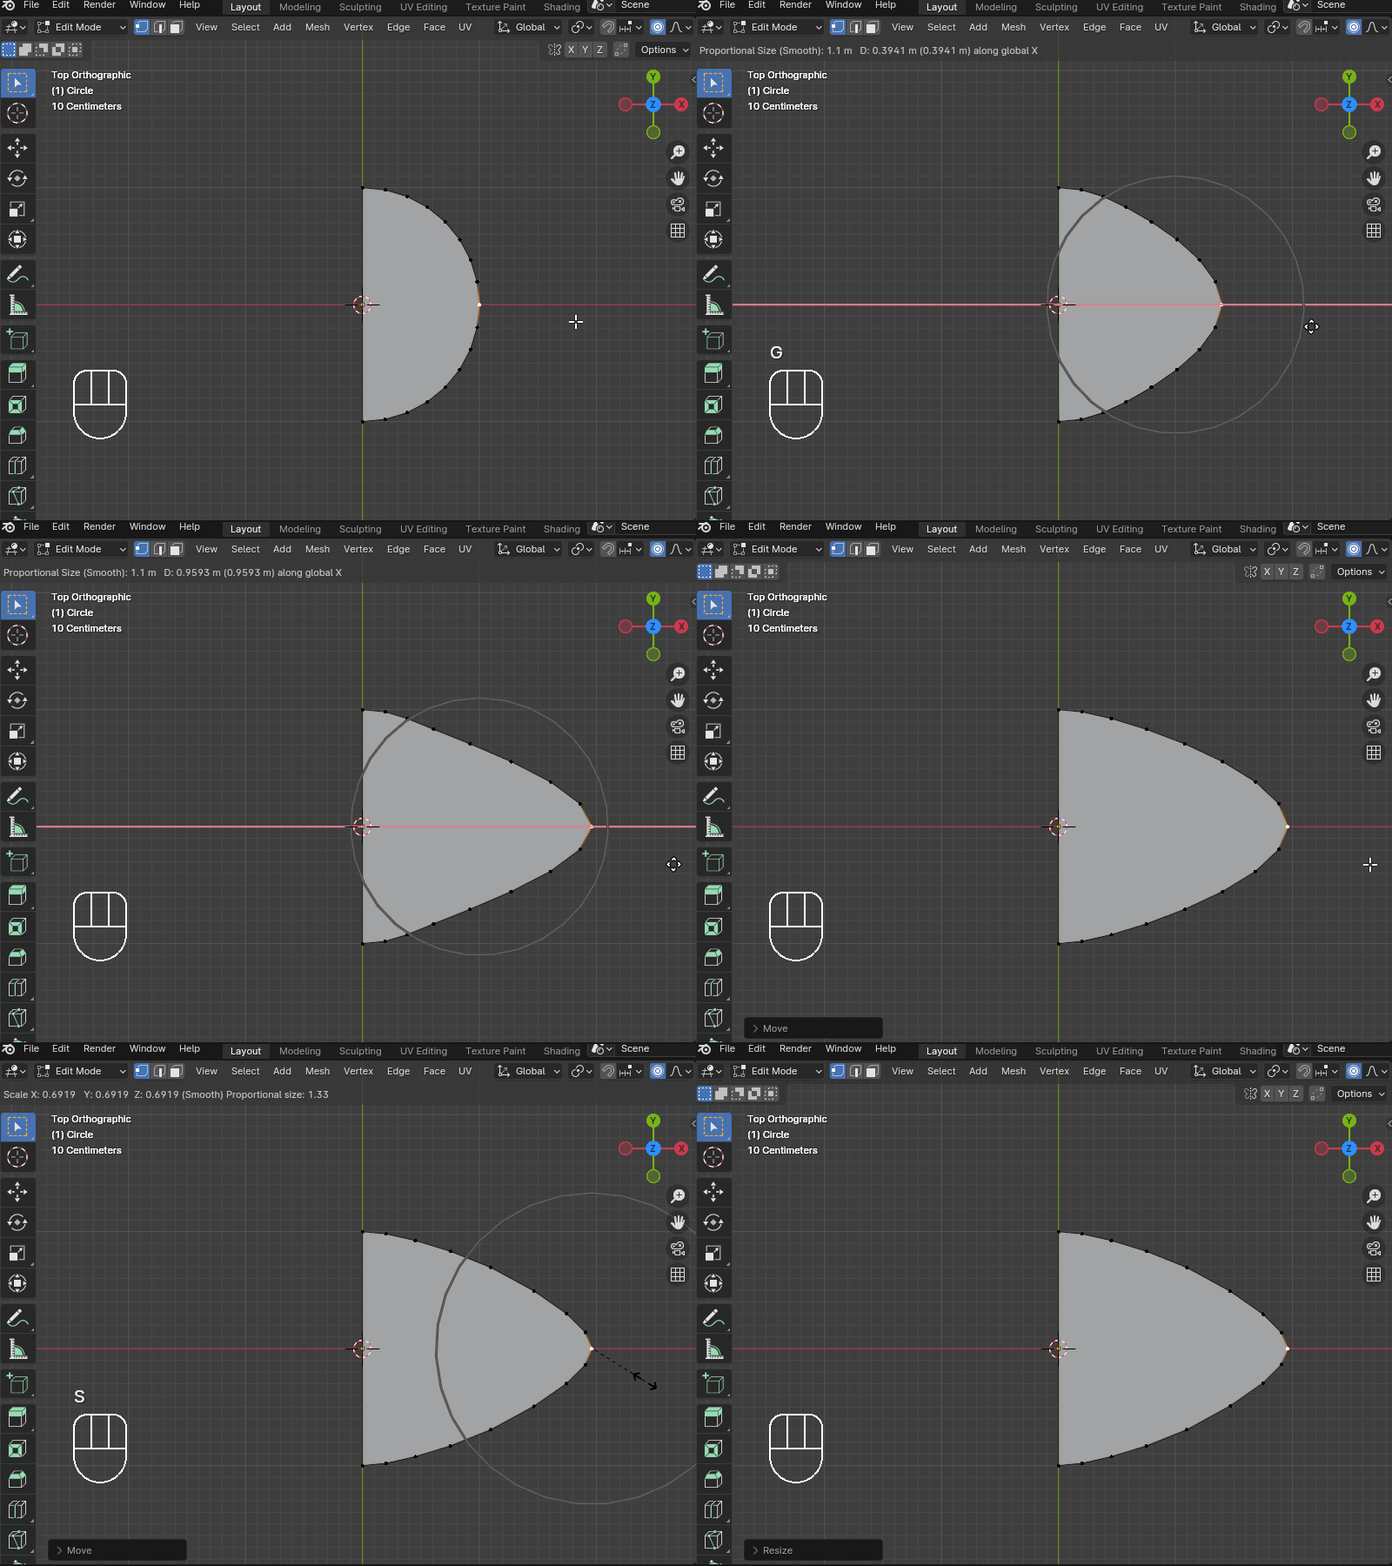
Select the vertices of the semicircle.
Enable Proportional Editing and use the S key to scale and the G key to move the vertices, shaping the semicircle into a scale-like form.
Select the edge at the base of the scale.
Press E to extrude and then X to extend it in the direction opposite to the tip.
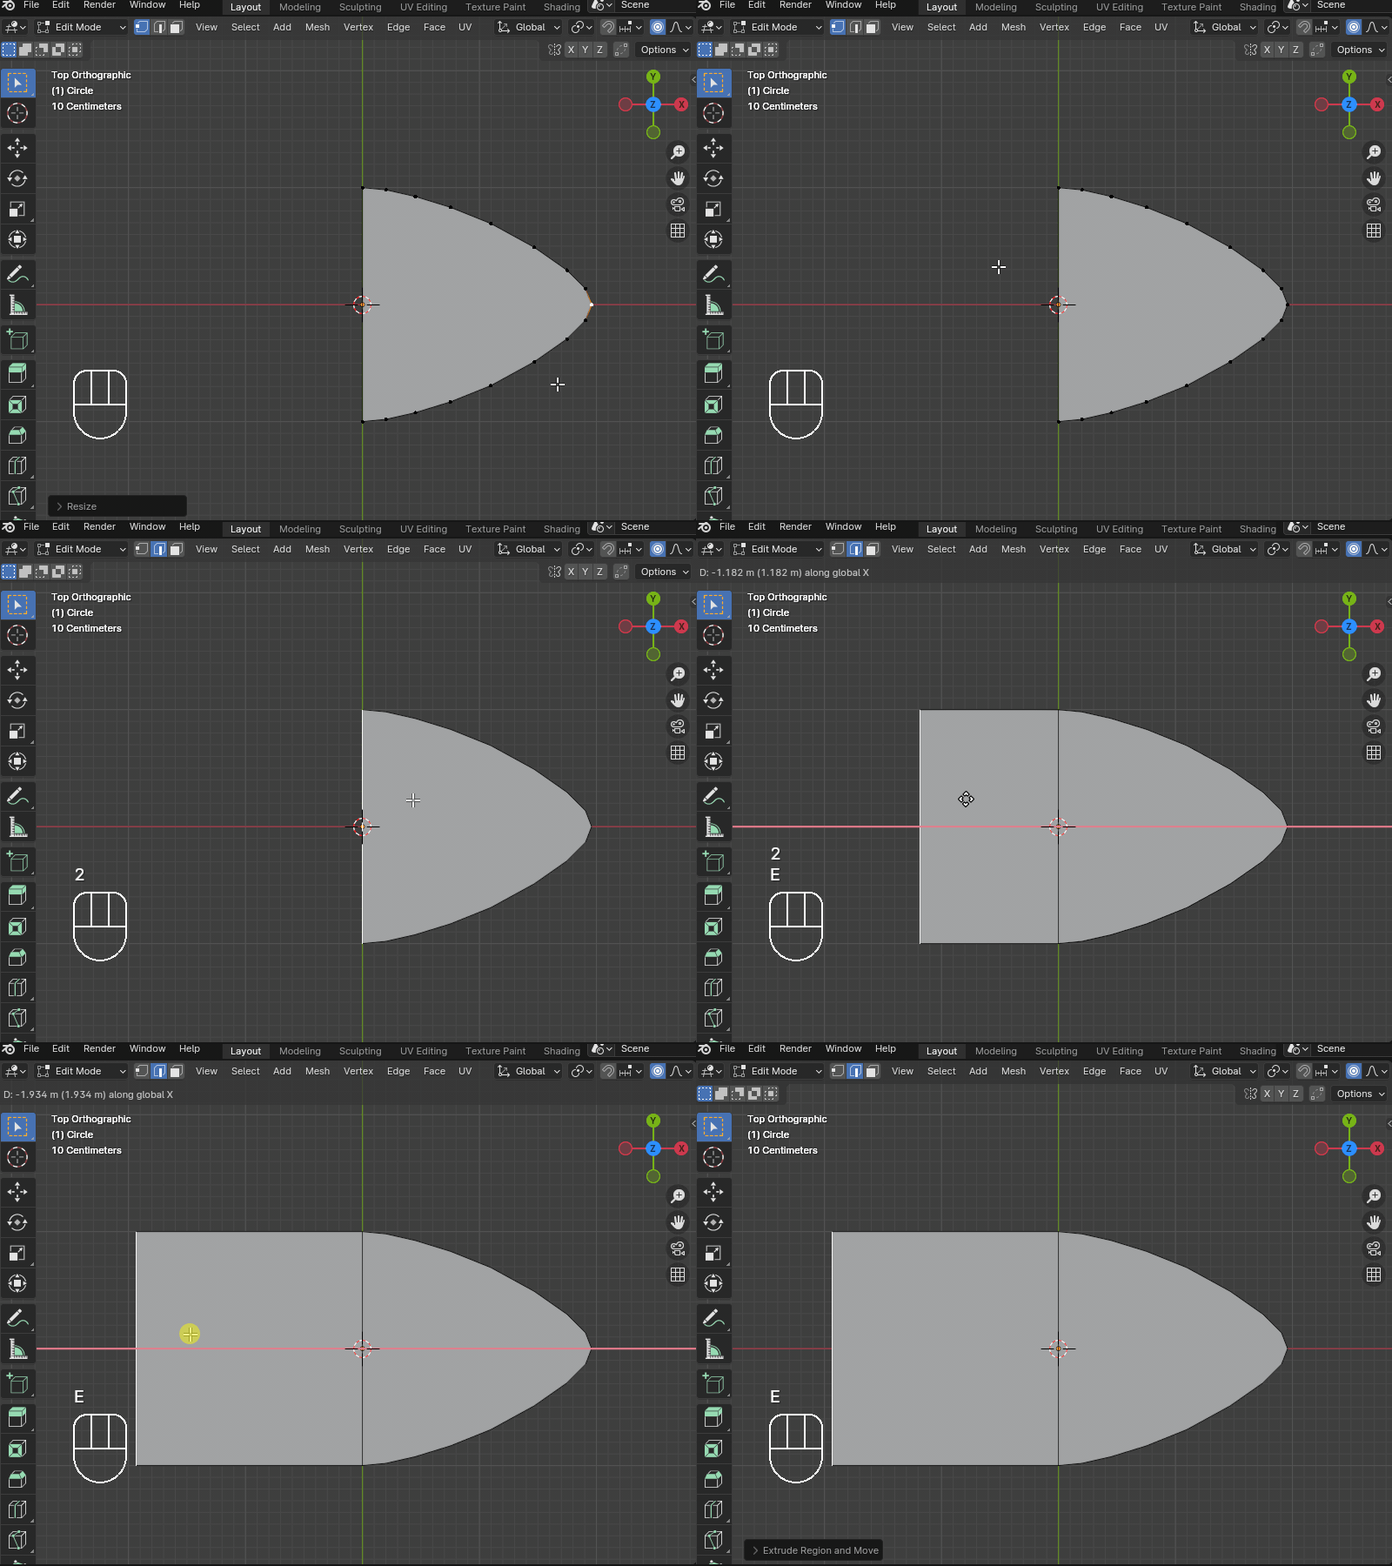
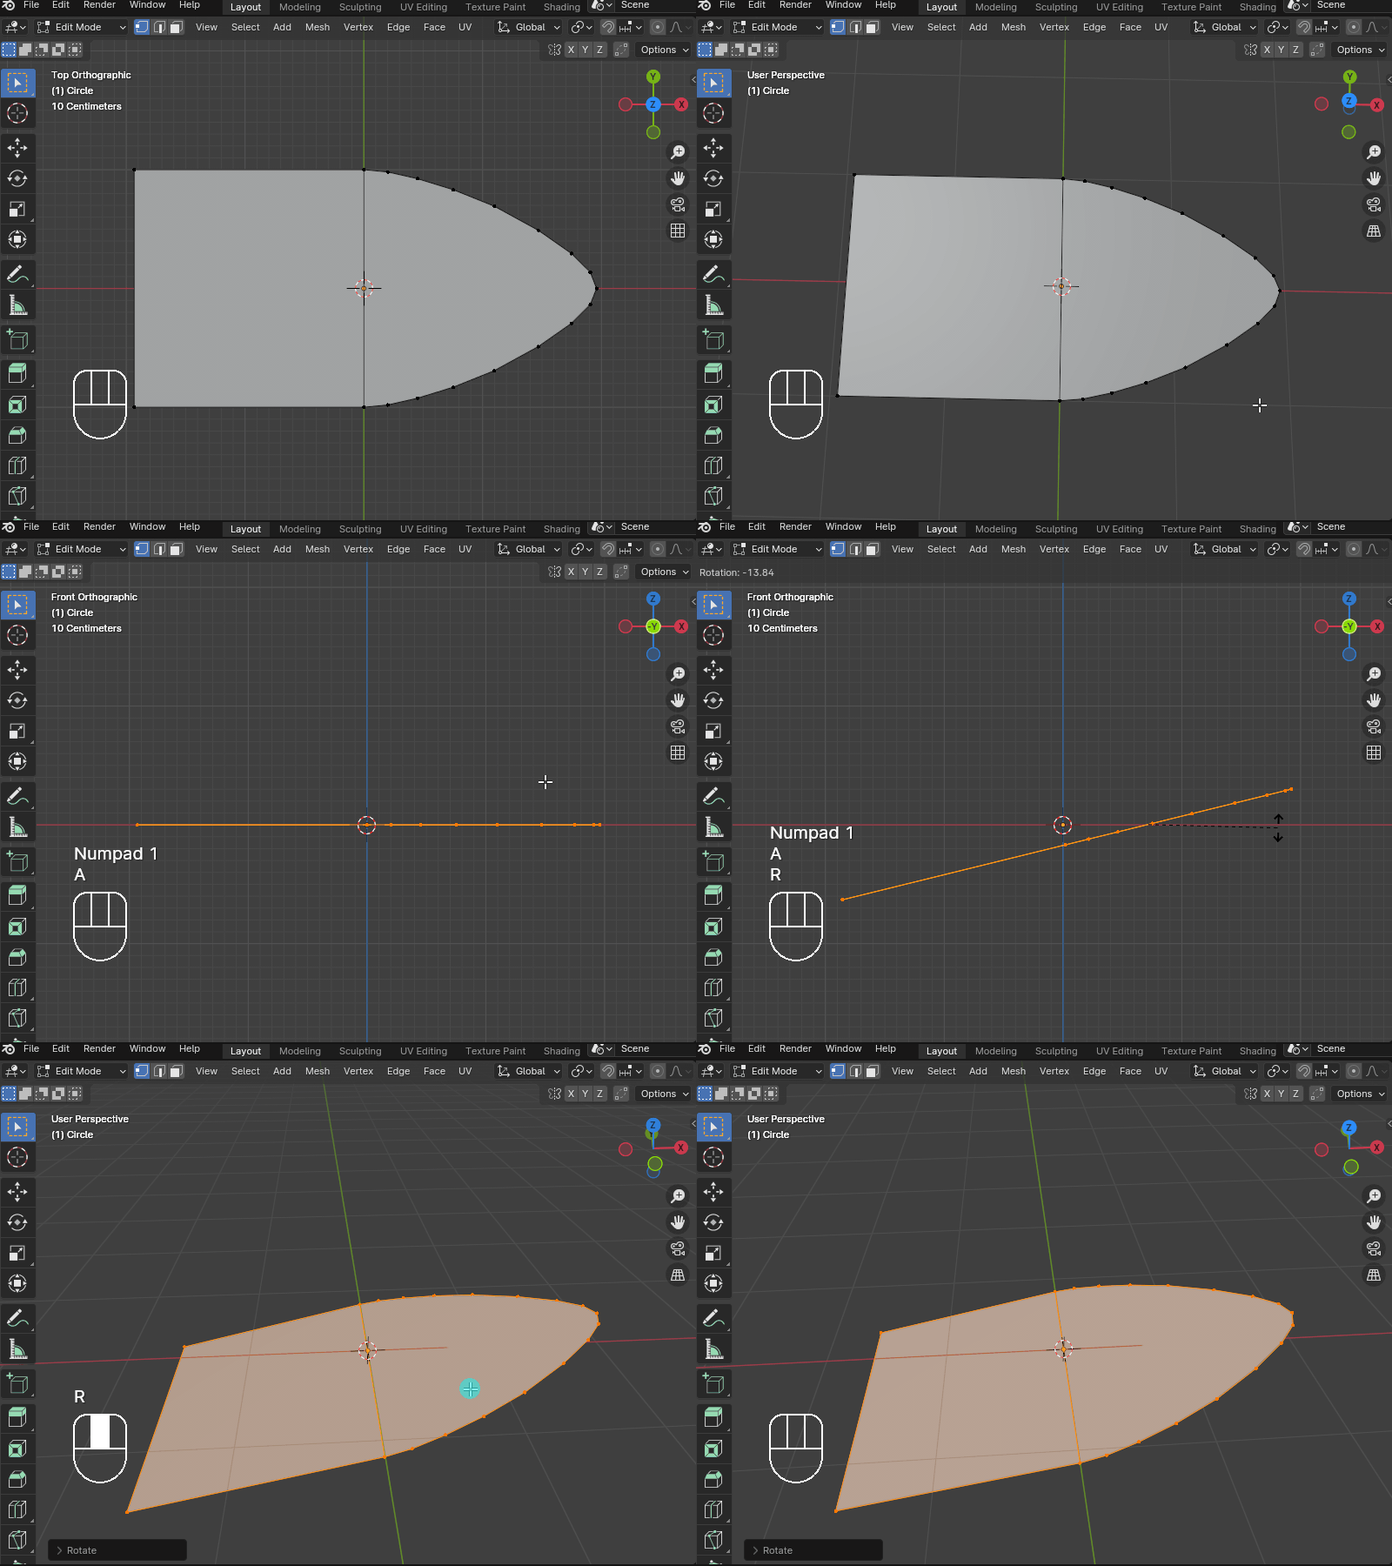
Select all the vertices.
Press R to rotate, then Y to tilt the scale so that the tip is pointing upwards.
Now, you have created one scale!
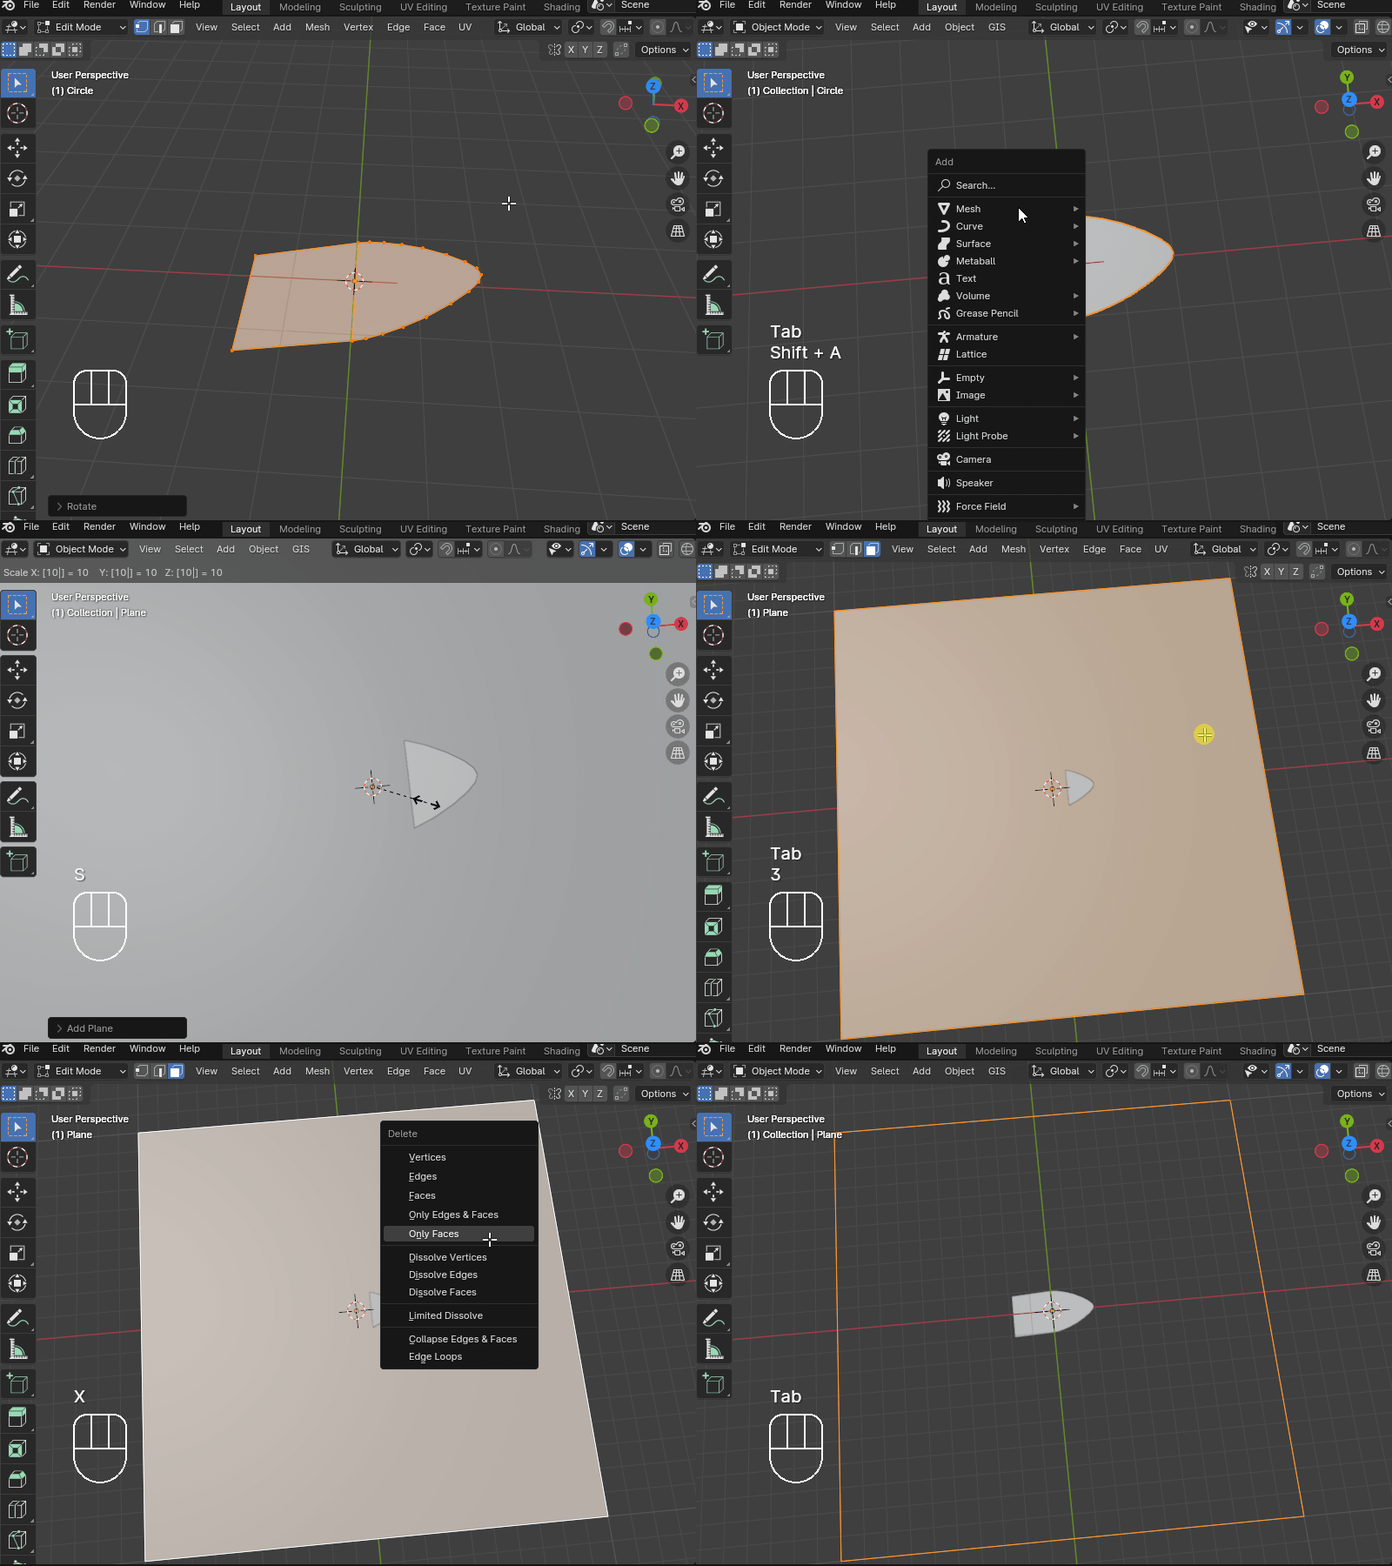
Press the Tab key to return to Object Mode, then go to Mesh → Plane to add a square.
Press S and scale it up by a factor of 10.
Press the Tab key to switch back to Edit Mode, then press X and select Only Faces to delete the faces, leaving only the edges.
This will define the boundary for the brush you’re going to export.
Switch to Object Mode and select the scale object.
Use two Array Modifiers to arrange the scales neatly within the square mesh.
Adjust the offset of the arrays so that the scales neither overlap too much nor are spaced too far apart, while making sure they fit perfectly along the edges of the square. (This step can be a bit tedious!)
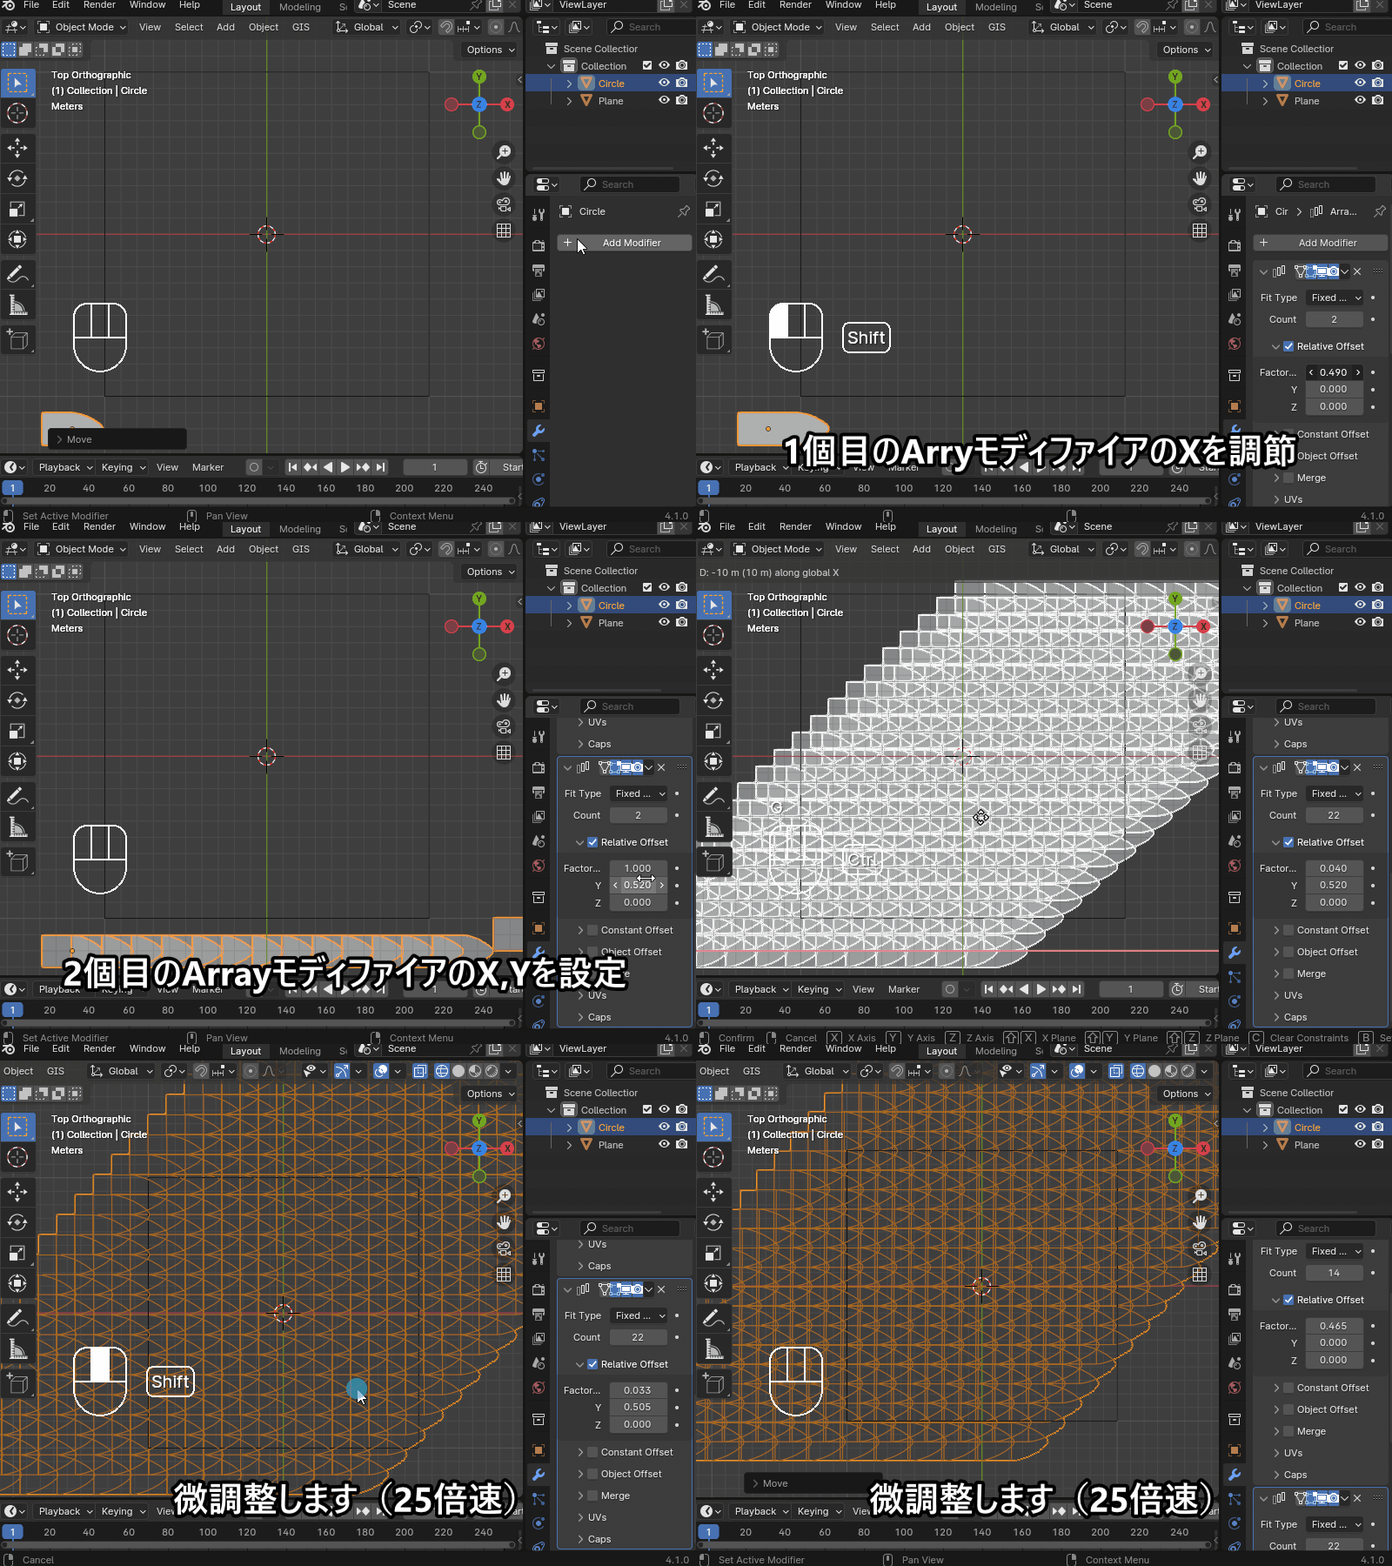
Check the top, bottom, left, and right edges of the square.
If the areas marked with circles (〇) and squares (□) in the image repeat correctly, then everything is set!
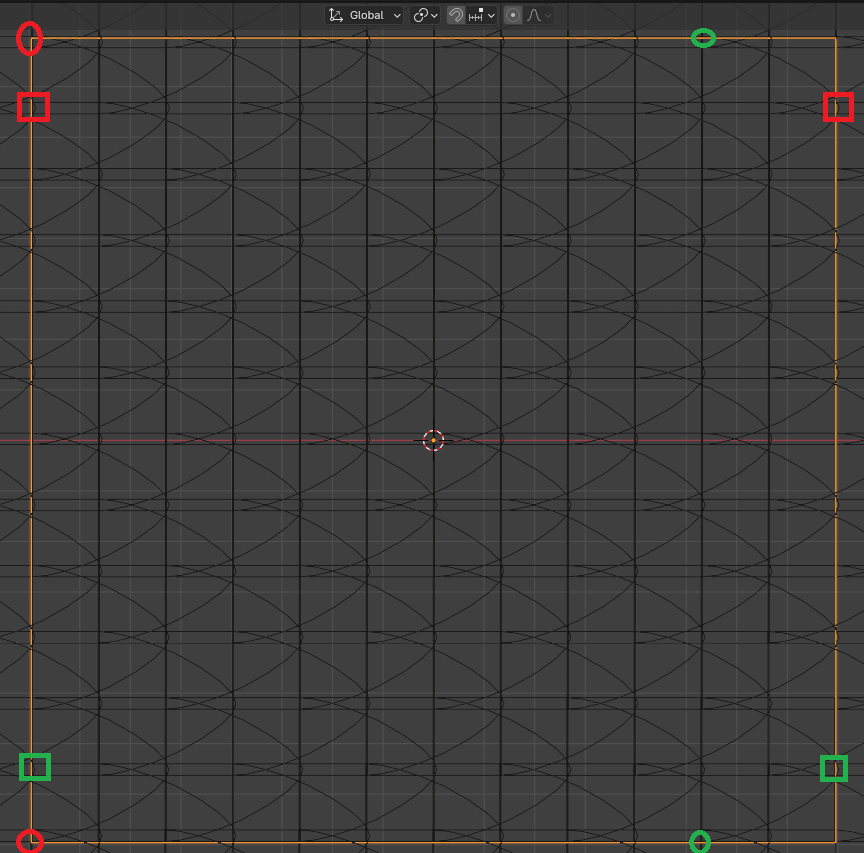
Now that the mesh object for the scale brush is complete, let’s move on to setting up the material.
Open the Shader Editor and set up the material nodes as shown here.
This will make the tip of the scale white in the positive Z direction and black in the negative Z direction.
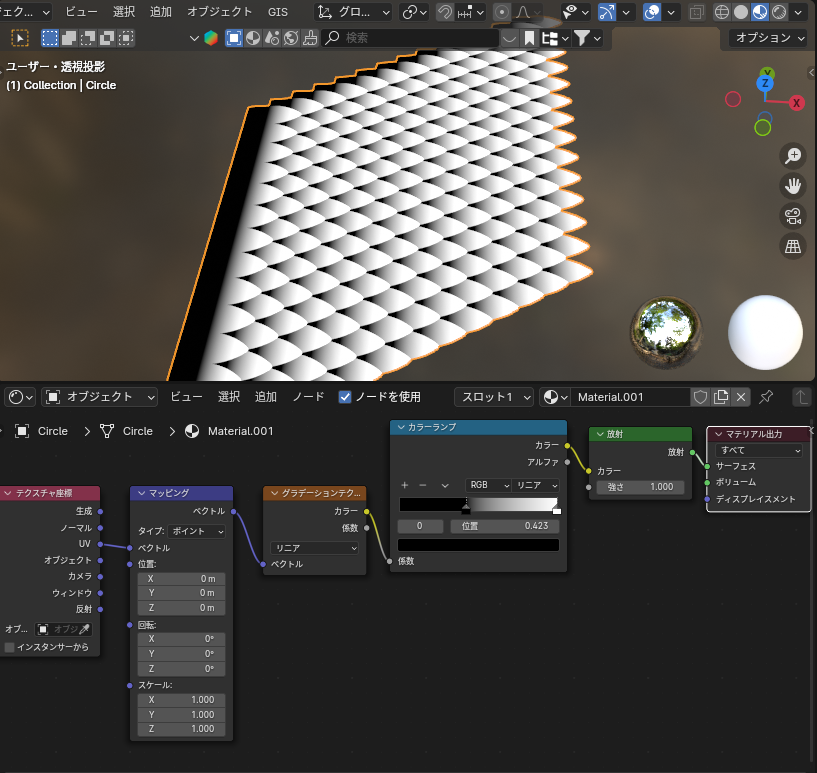
Finally, add a camera and set up the rendering.
Set the resolution to 2048 x 2048 for the output.
Once everything is set, you can render the image to create your scale texture brush!
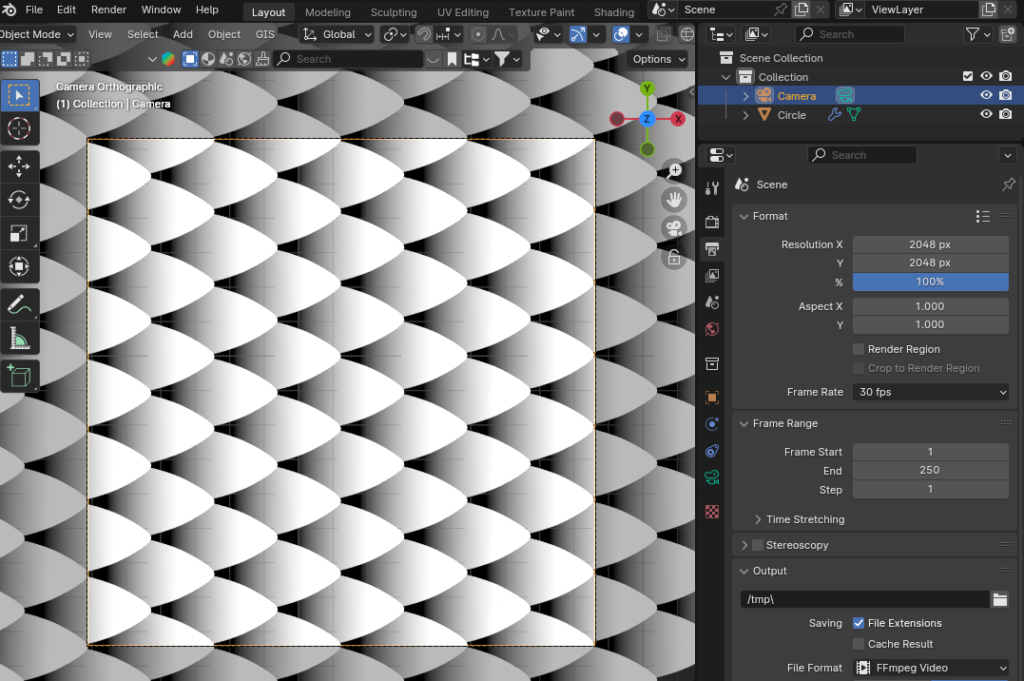
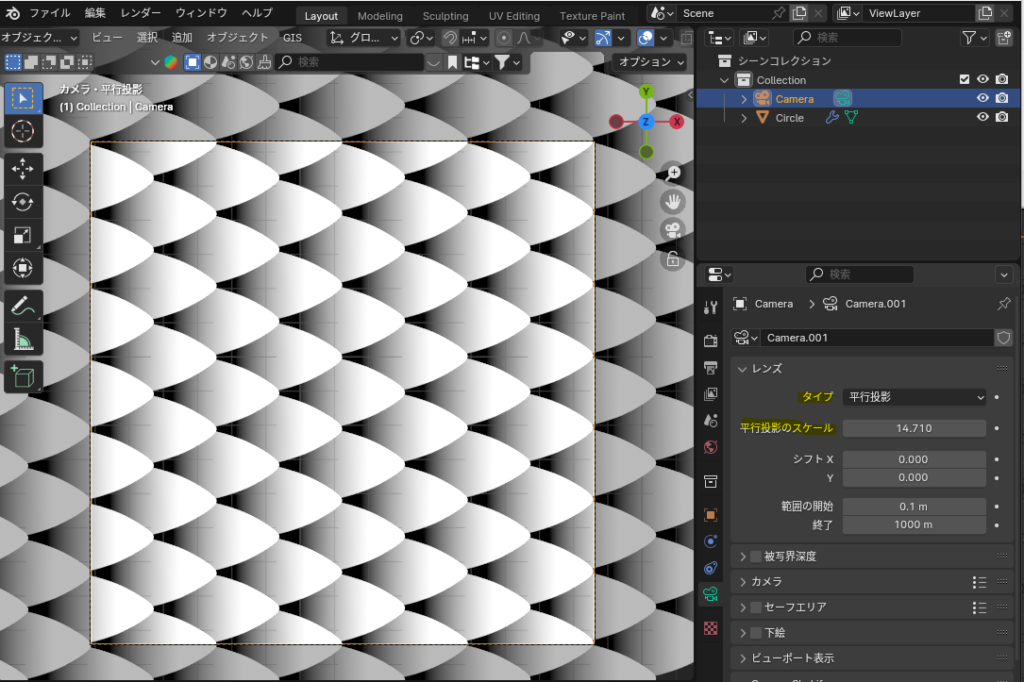
Set the lens type of the camera to Orthographic (Parallel Projection).
Adjust the camera’s position and projection scale so that the camera frame overlaps perfectly with the square mesh.
This ensures that the scale pattern is captured correctly in the render.
Open the Render Properties tab, set the renderer to Eevee, and change the Color Management look to Standard.
This will give you a more accurate and consistent color representation for your rendered image.
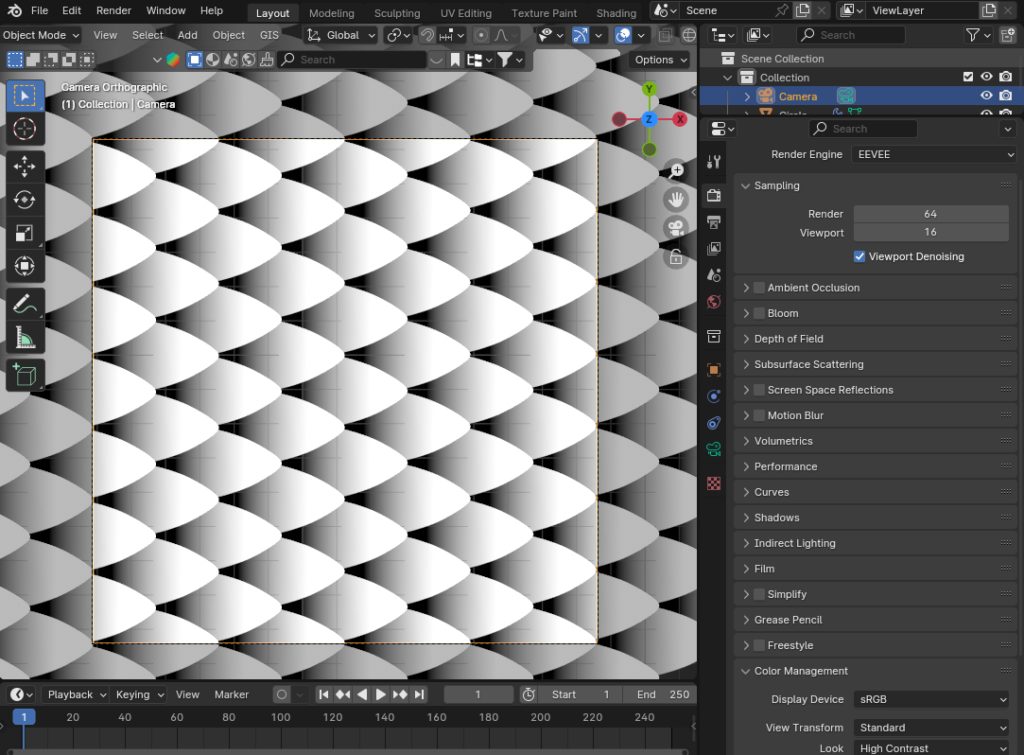
Once the rendering is complete, save the image.
You will now have the texture for the scale brush, as shown at the beginning of the article!
UV Unwrapping
Before adding the texture, we need to perform UV Unwrapping.
UV unwrapping is the process of unfolding a 3D mesh object into a 2D UV coordinate system, as shown here. The result of this unwrapping is called a UV map.
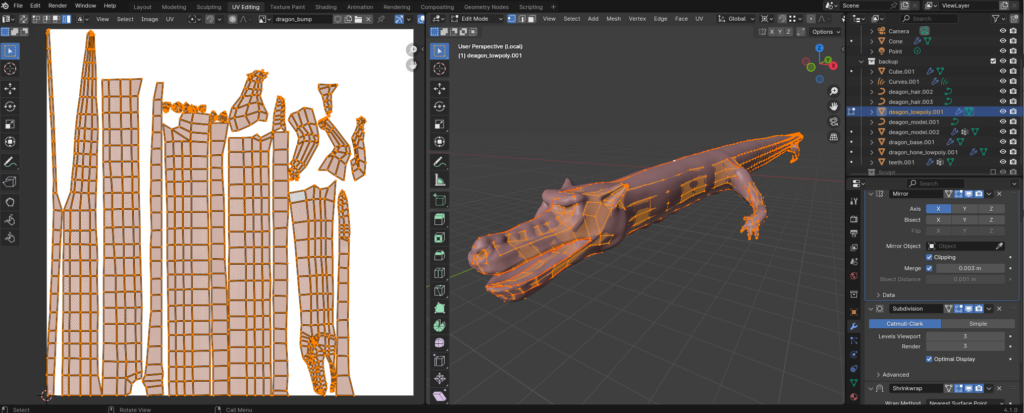
For a detailed explanation of how to perform UV unwrapping, please refer to the article I previously shared.
AD
Texture Painting
Once the UV unwrapping is complete, use Texture Painting to add the bumps and details to the scales.
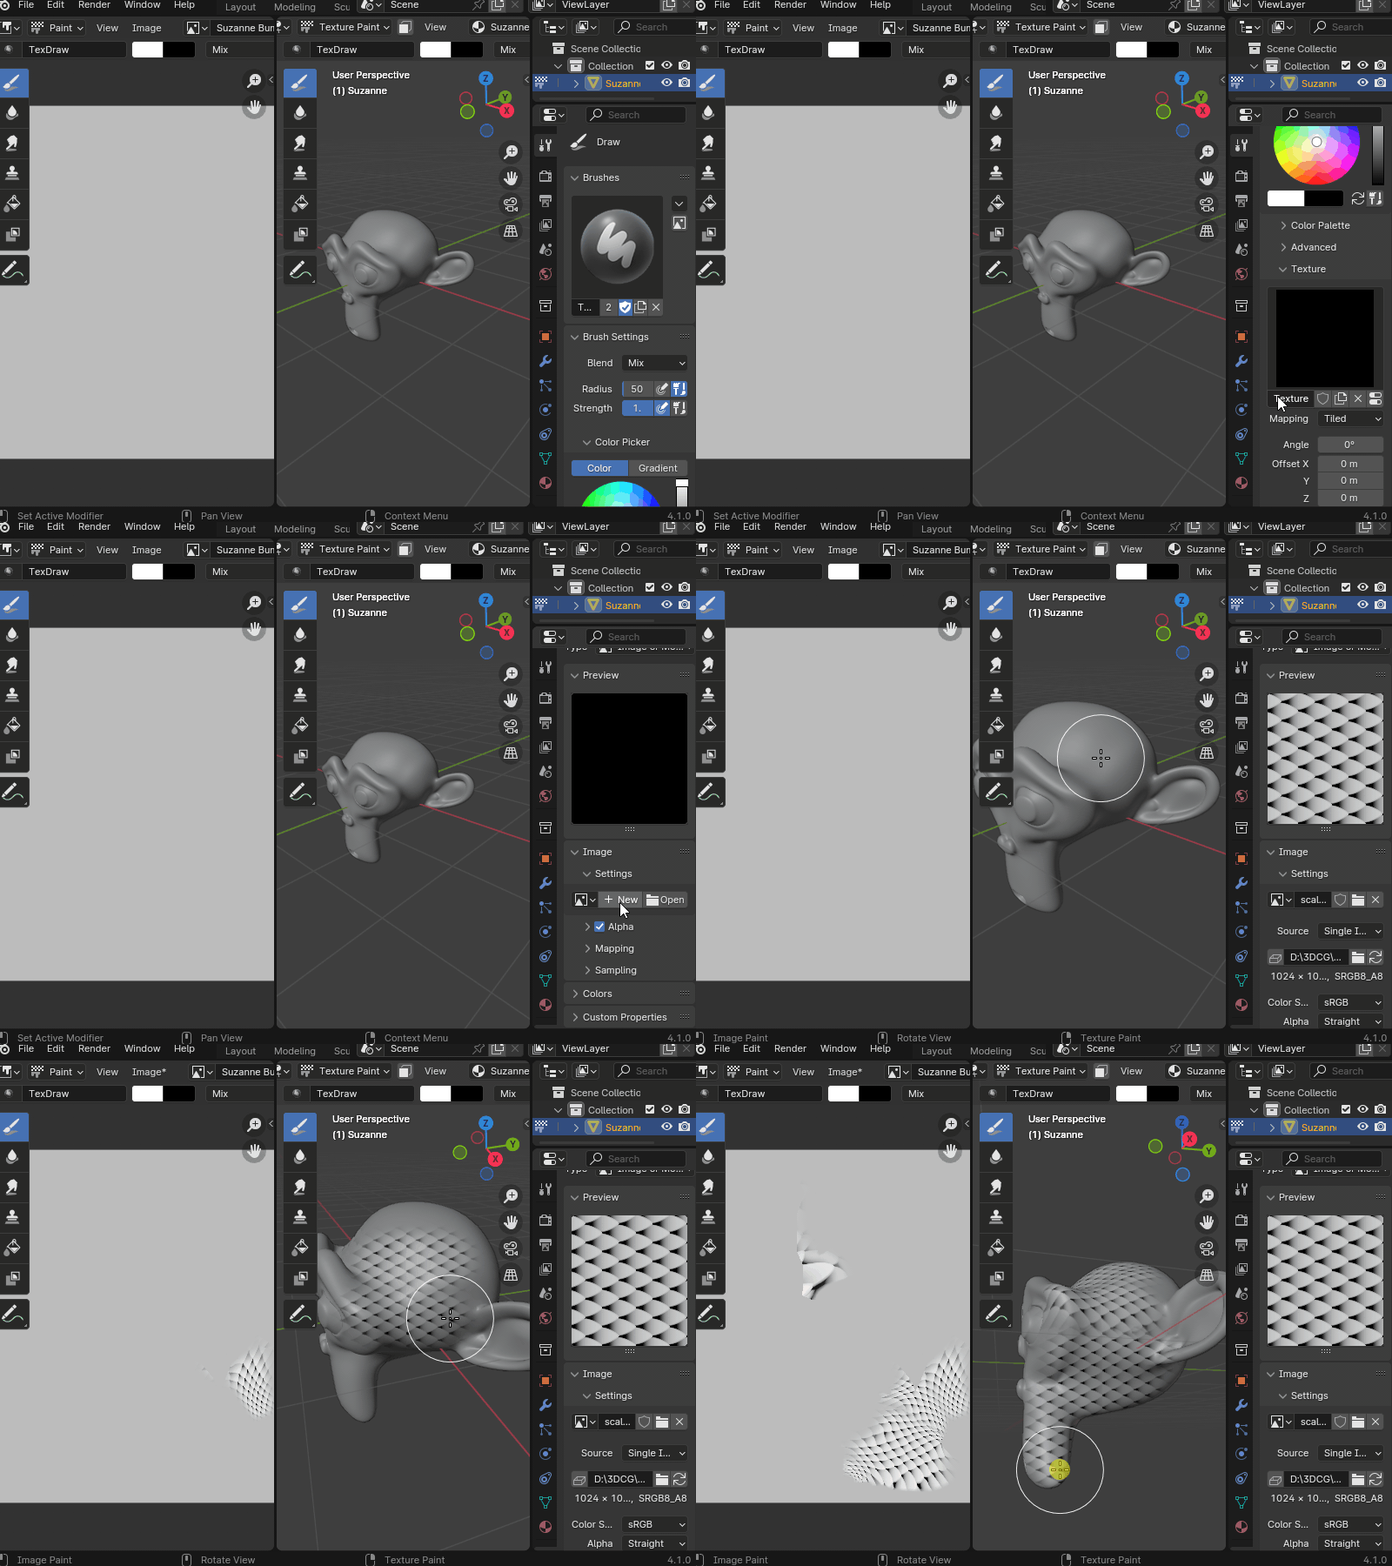
To add bumps, go to the Texture Slots and add a Bump texture. This will give the surface the desired depth and texture.
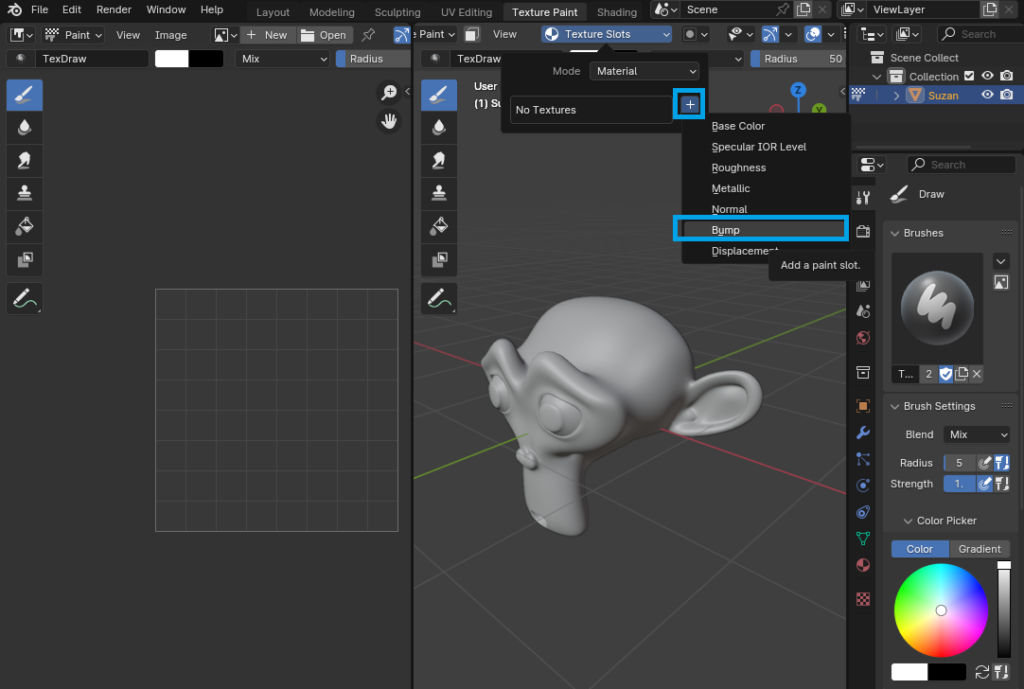
Set the texture size to 2048 x 2048 for optimal detail and quality when painting the scales.
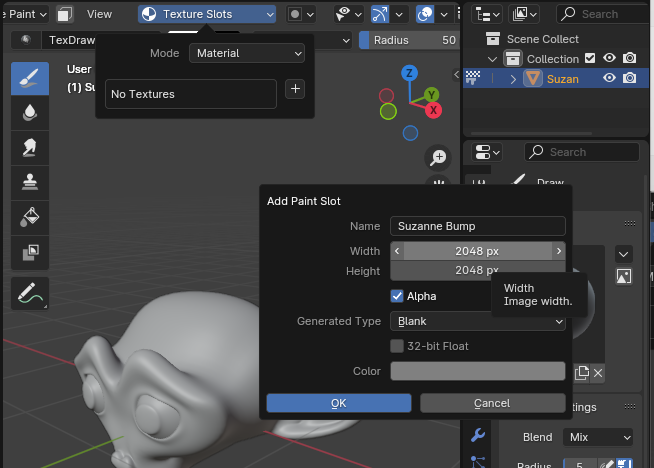
From the brush tool settings, select Texture, and then choose the texture brush you created earlier. As you paint, the scale pattern will be applied to the 3D model.
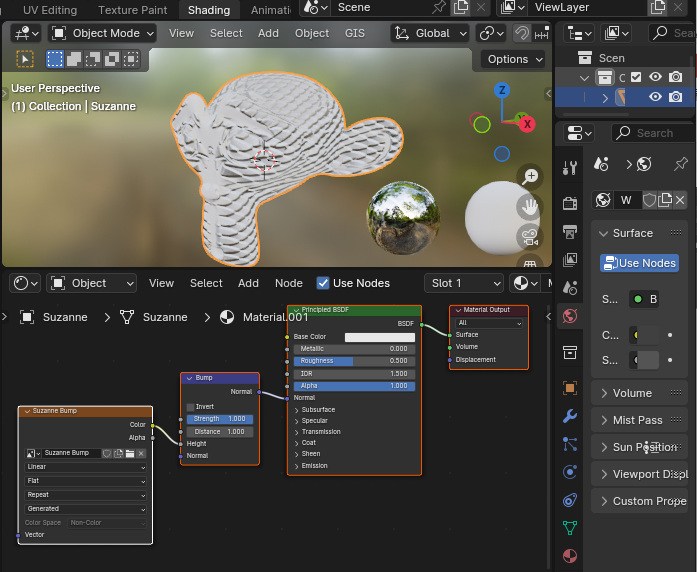
In the Shader Editor, you’ll see that the Bump Map has been added.
The black and white colors in the bump map represent the surface’s depth and bumps, with black indicating recessed areas and white indicating raised areas.
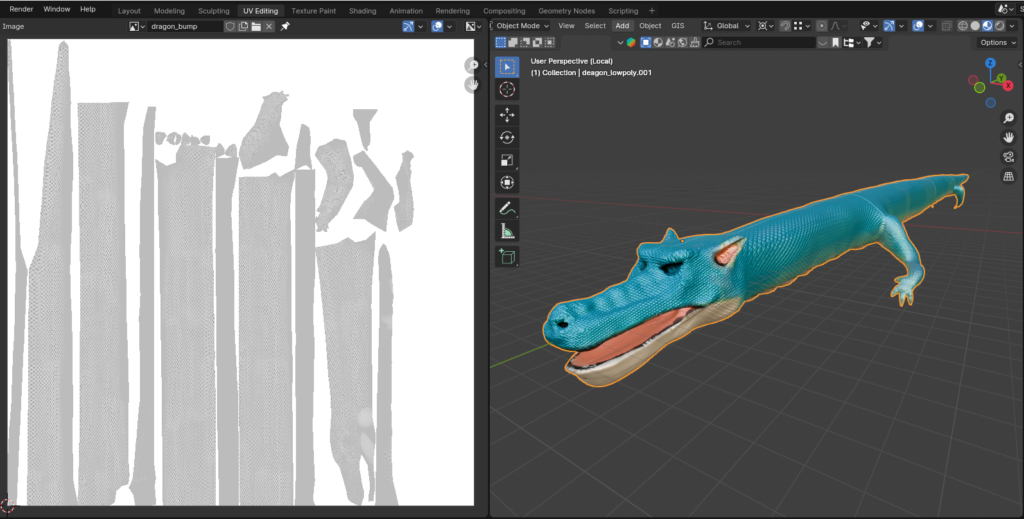
As I mentioned in a previous article, make sure NOT to forget to save the texture after painting, when working with bump maps.
Once you’ve completed the base color painting, the final result will look like the one shown here.
For a more detailed guide on Texture Painting, please refer to the article I shared previously. It should provide additional insights and steps for the process.
AD
Summary
I’ve summarized the process of creating dragon scales.
By using the texture brush introduced in this tutorial, you can create not only scales but also various surface details like skin, tree bark, and more.
I hope this guide serves as a helpful reference for your future projects.
Reference Tutorials
For a detailed explanation of the basics of Texture Painting, I recommend checking out the article on CGBox:
CGBox – Blender Texture Painting
Additionally, the knowledge I gained from the Udemy tutorial by Enigma titled “[BlenderPerfectCourse] Hercules Beetle Edition" was extremely helpful for texture painting the dragon model. This tutorial offers insights into the workflow of a professional CG artist. If you’re interested in learning professional techniques, I highly recommend giving it a try:
AD
