【UE 5.4】Created a World Background: ‘Imaginary Island’
I wanted to freely move models created in Blender within a world, so I started experimenting with the game engine Unreal Engine 5 (UE5).
UE5’s biggest appeal is its ability to render stunning graphics in real-time (real-time rendering).
This time, I took Ume-chan’s Udemy course,“Unreal Engine 5 Basics: Background and Natural Landscape Creation for Beginners”, and used it to create a world background called Imaginary Island in UE5.
While building the world and rendering videos, I incorporated my own unique touches, and I’ve summarized what I learned here for reference. If you’re interested in UE5, I hope this will be helpful! 😆
Additionally, I’ll introduce how to add assets using the newly added Fab add-on, released in October 2024.
For feedback or questions, feel free to reach out to me on Twitter (https://twitter.com/klala_lab). 😊
AD
You’ll get a sense of the incredible real-time rendering capabilities of UE5, so if you haven’t tried UE5 yet, be sure to check out this article. It explains how to download and explore a sample project—definitely worth a try!
How to Install UE5
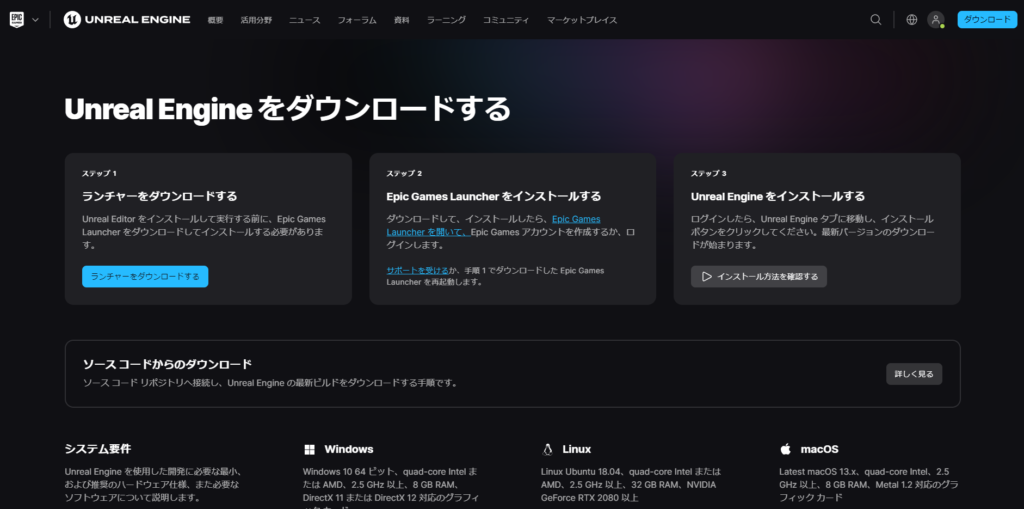
To get started with Unreal Engine 5, download the Epic Games Launcher from the official Unreal Engine website.
Through this application, you can select the version you wish to use and install it as shown below.
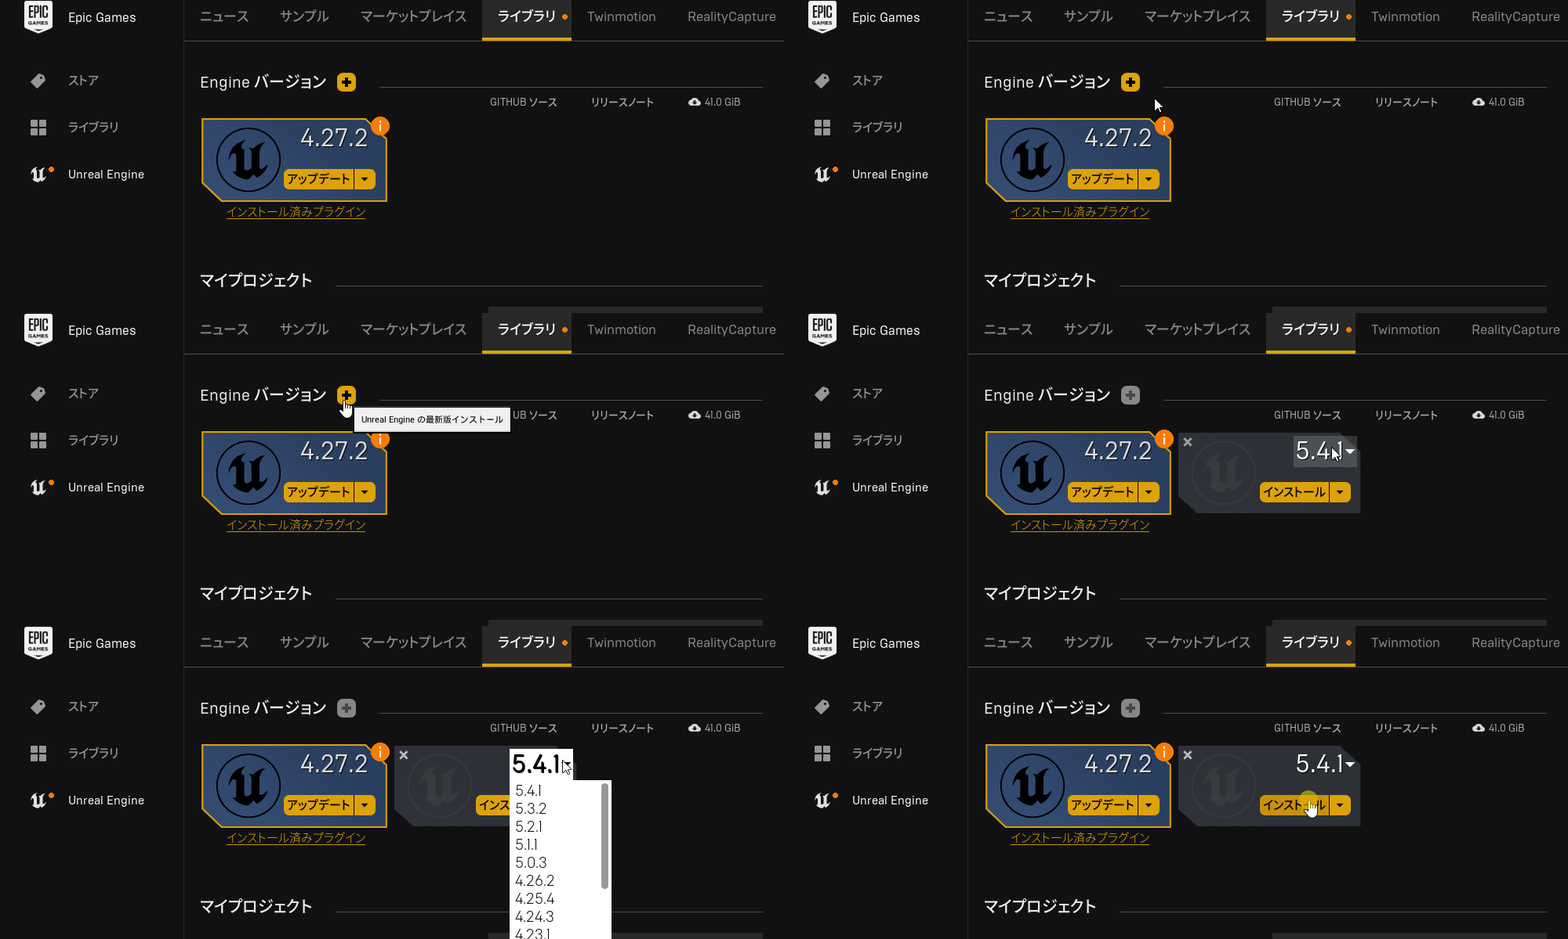
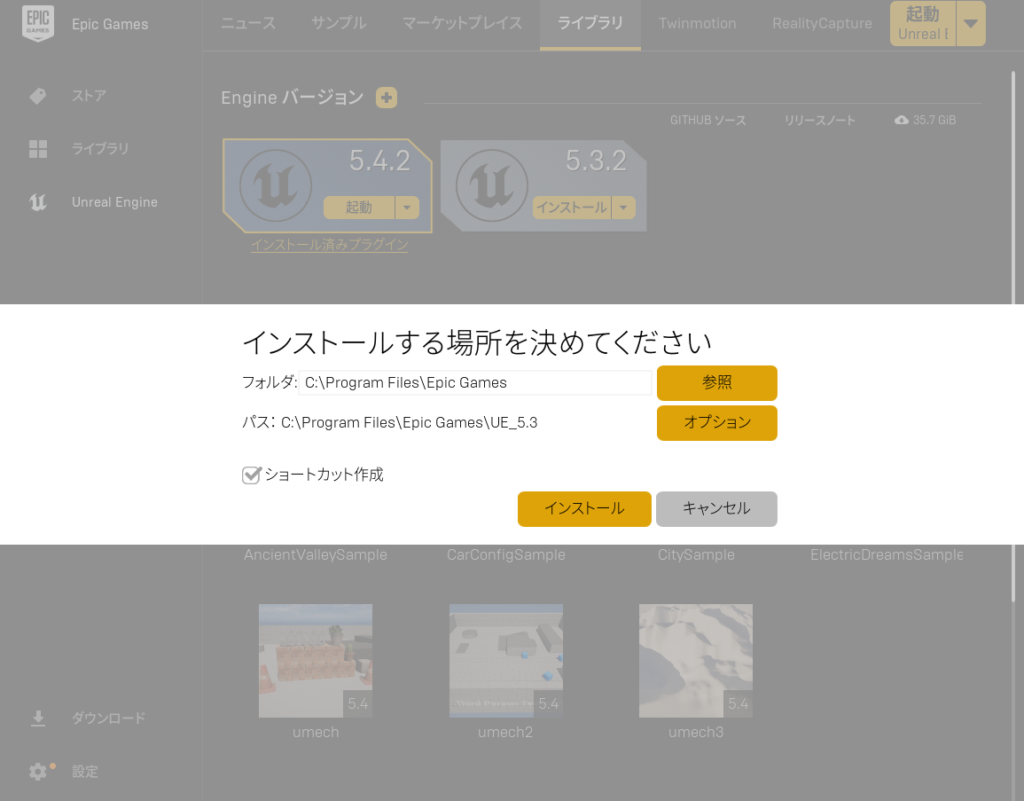
After agreeing to the license terms, set the installation folder and proceed with the installation.
For more detailed instructions on downloading and installing UE5, refer to the official Unreal Engine article:
Additionally, this article by CGBOX provides a helpful guide on installing UE5. Be sure to check it out as well:
CGBOX: How to Export Models from Blender to Unreal Engine 5
Reference Tutorial
I enrolled in Ume-chan’s Udemy course: “Unreal Engine 5 Basics for Landscape and Environment Creation".
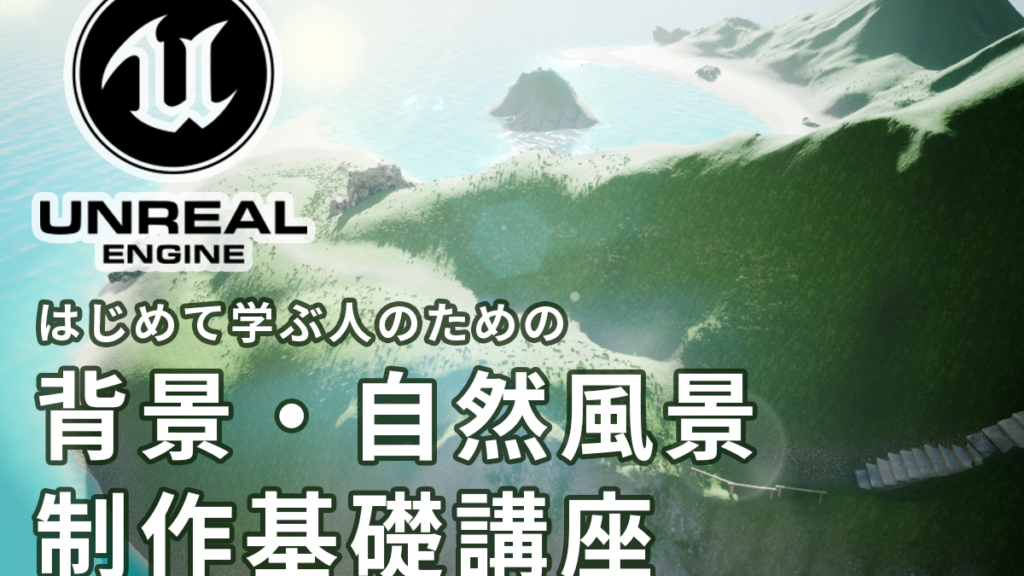
This course is perfect for beginners aiming to become environment designers who are using Unreal Engine for the first time.
It includes a review text and teaches how to create your own world using the landscape tools. It’s highly recommended for users of 3D tools like Blender and doesn’t require knowledge of Blueprints.
Final Image
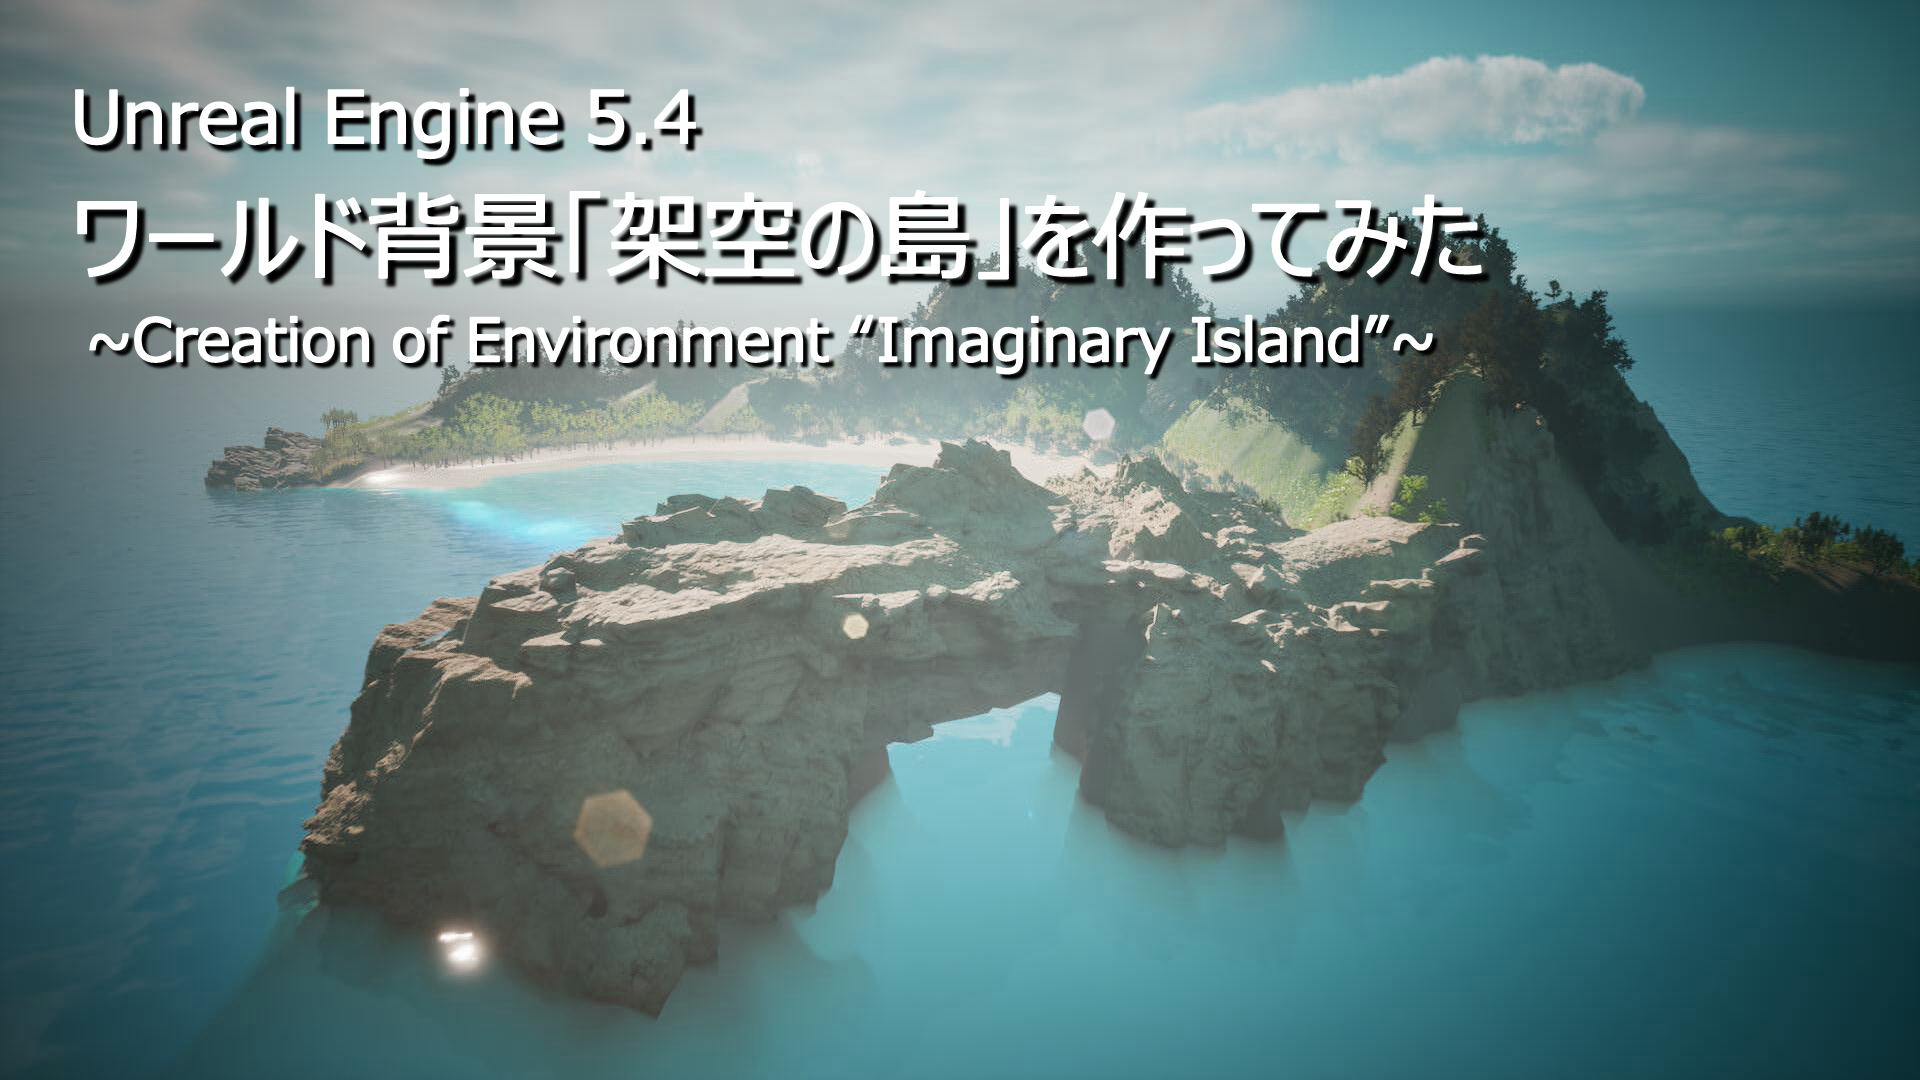
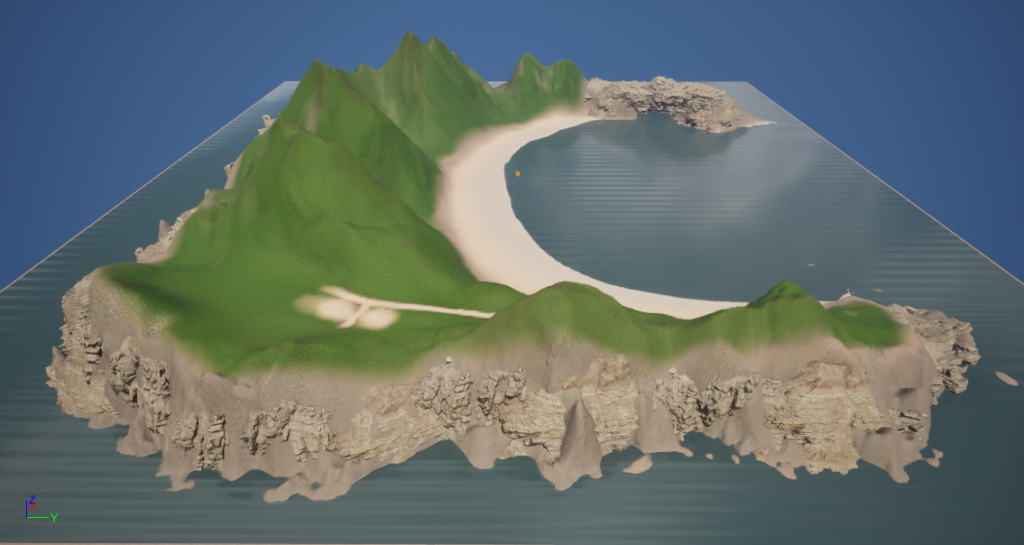
The project I created this time is “Imaginary Island."
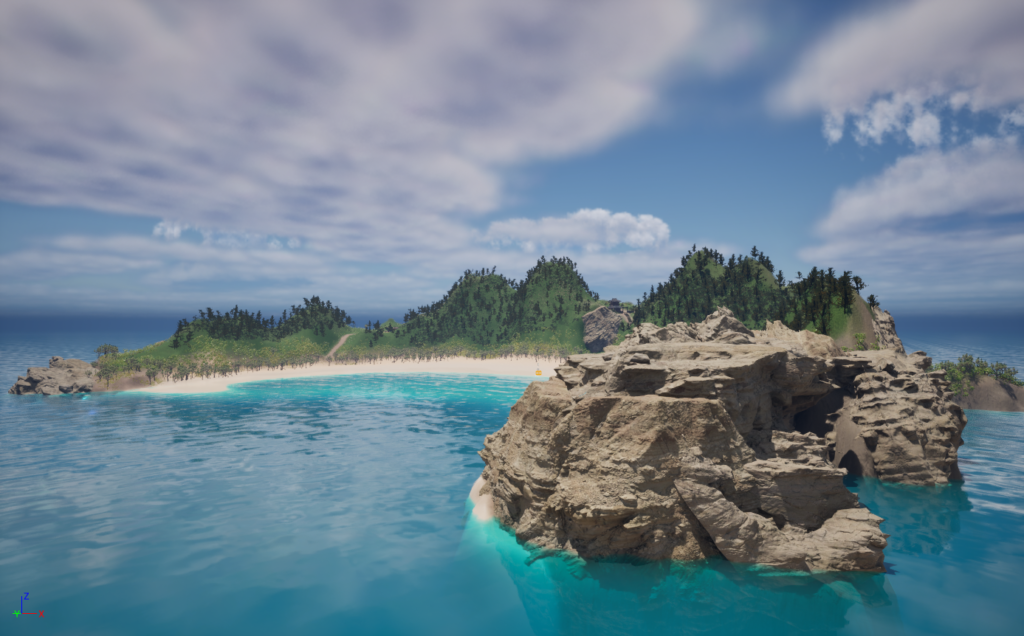
Here’s an image of the completed island:
With UE5, you can:
- Render with realistic lighting and apply post-processing
- Sculpt and paint landscapes
- Freely place assets
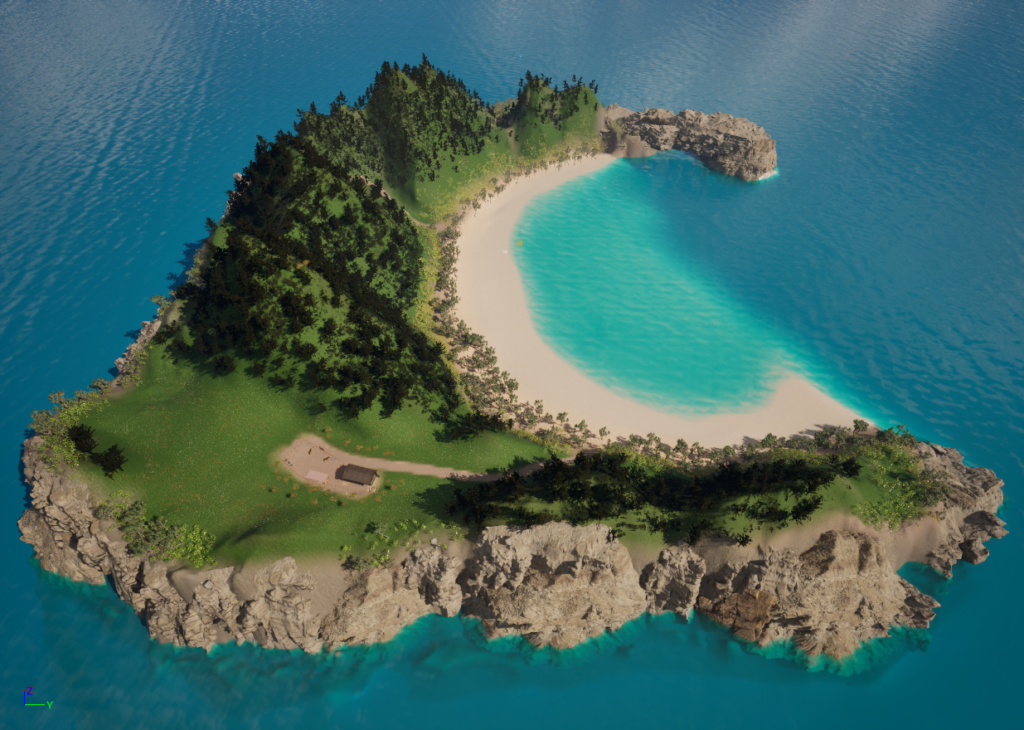
Moreover, you can control a character to freely explore the island, as shown below!
World Creation Process
Let’s review the workflow I followed while creating the island, based on the course content.
By following the steps explained in the tutorial, I progressed through the following UE5 environment creation workflow:
- Gather references and create an image concept
- Sculpt the landscape
- Paint the landscape
- Place assets (e.g., rocks, stairs)
- Add foliage (e.g., grass)
- Create the ocean
- Set up lighting
- Apply post-processing
- Create camera keyframes
- Render the scene
I will reflect on each step, explaining what I considered during the creation process and how I configured the settings.
If you’d like a more detailed walkthrough of the creation process, I highly recommend taking the Udemy course mentioned in the “Reference Tutorial" section:
“Unreal Engine 5 Basics for Landscape and Environment Creation" by Ume-chan!
Reference Gathering and Concept Creation
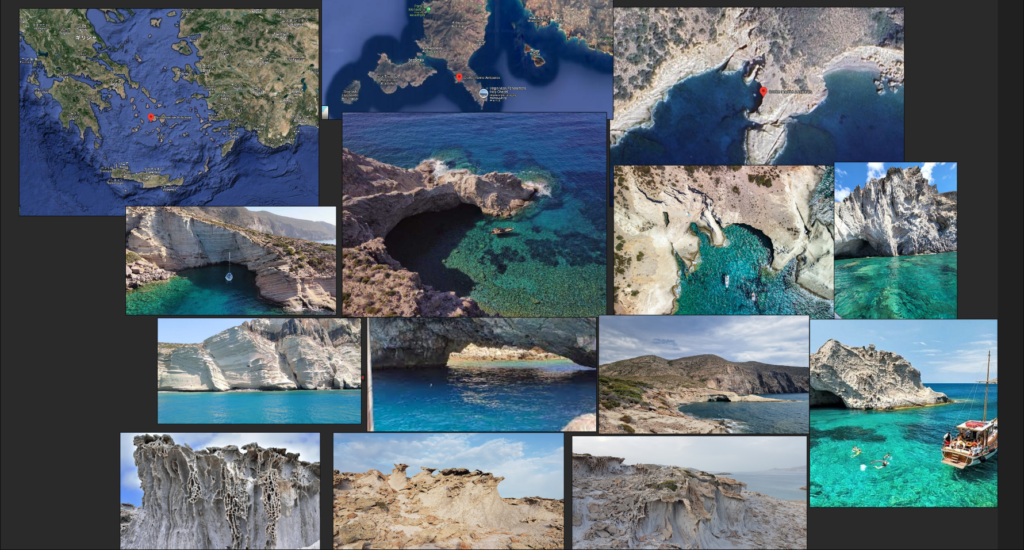
In the initial section of the course, instead of diving straight into UE5, I first learned to gather references (such as real-life island images) through image searches and create rough concepts using drawing tools.
For this project, I collected images of islands resembling “rocky, rugged landscapes with clear blue waters, like those found in the Aegean Sea near Greece." Using a free reference collection and display tool called PureRef, I organized these images, as seen in below:
These references later guided me when sculpting the landscape and placing rock assets in UE5.
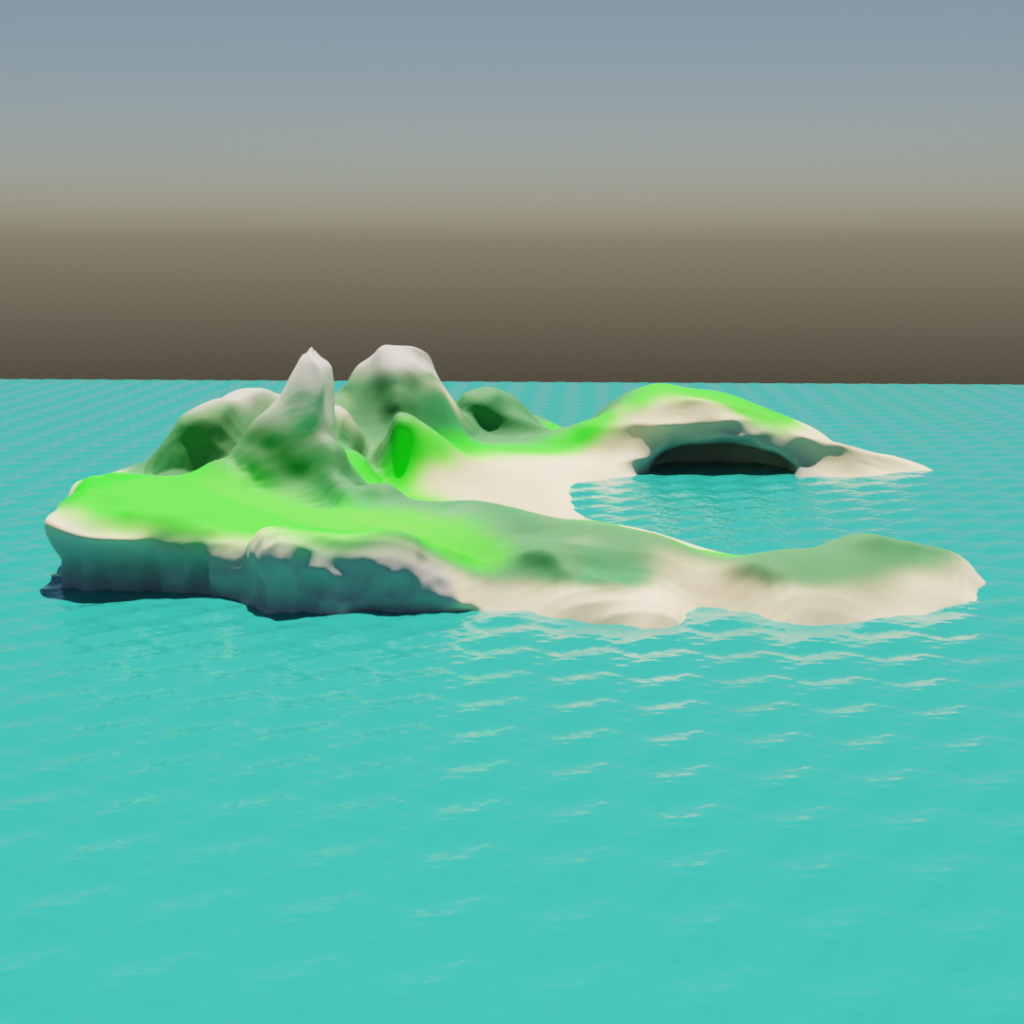
Island Shape Concept
For the shape of the island, I envisioned a design where a sandy cove lies at the center, surrounded by towering cliffs along the outer edges.
To begin, I created a rough collage image like this:
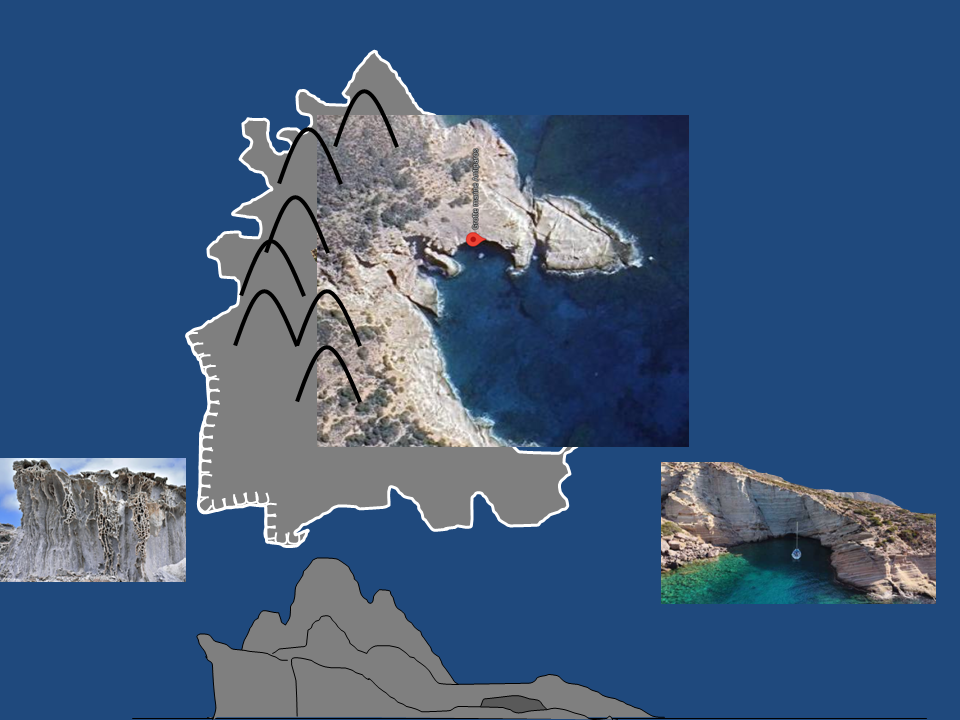
Image description placeholder
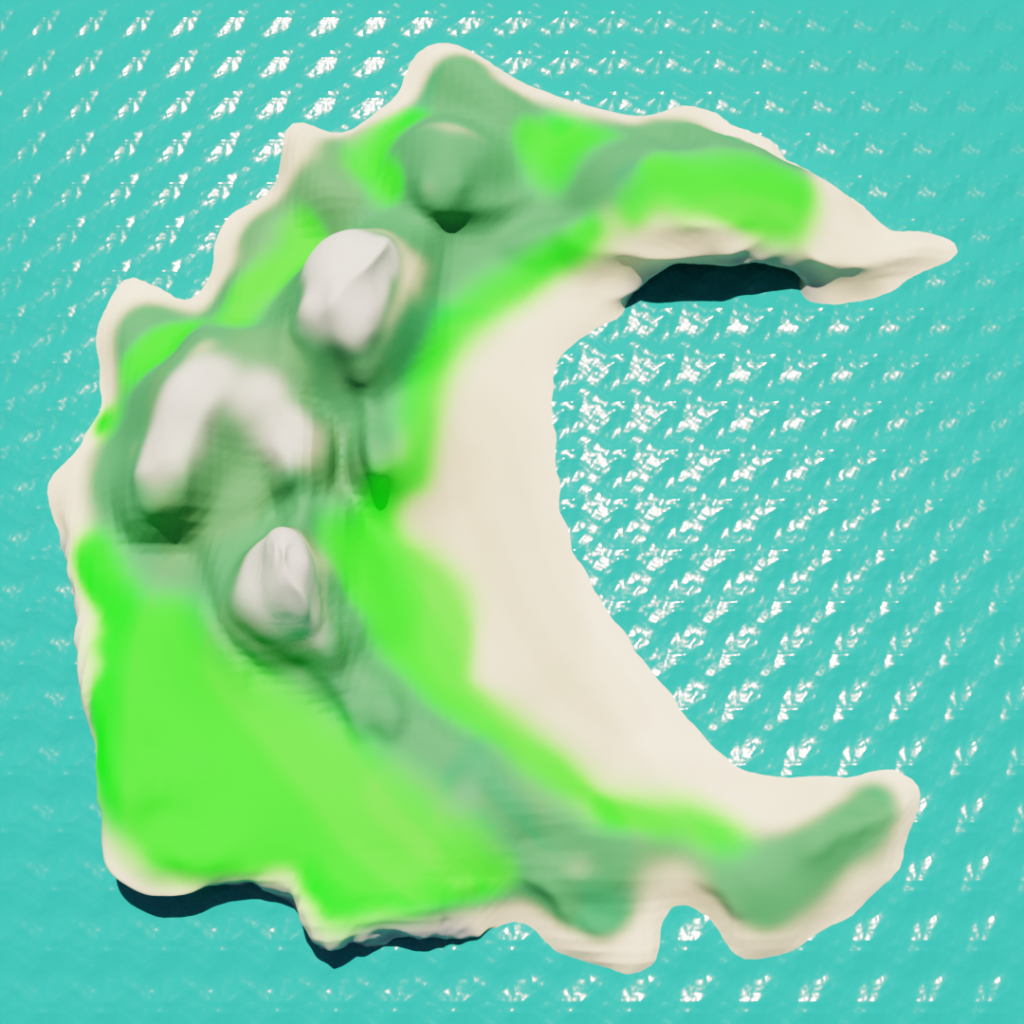
Building upon this collage, I crafted a low-poly model using the 3D software Blender to solidify the concept in three dimensions.
Landscape Sculpting and Painting
Using the concept I created earlier, I began crafting the landscape in UE5.
UE5’s Level Editor includes a Landscape Mode, which allows for flexible terrain creation. With tools like Erosion and Noise, I sculpted a flat mesh into a more complex terrain, as seen in this example:
External Tools for Landscape Creation
If you’re looking for an easier way to create detailed terrains, you might explore paid tools like World Creator, World Machine, or Gaea.
These tools simplify the process of generating intricate landscapes.
For instance, the World Creator official YouTube channel features short films showcasing their capabilities—so realistic, it’s hard to believe they’re CG:
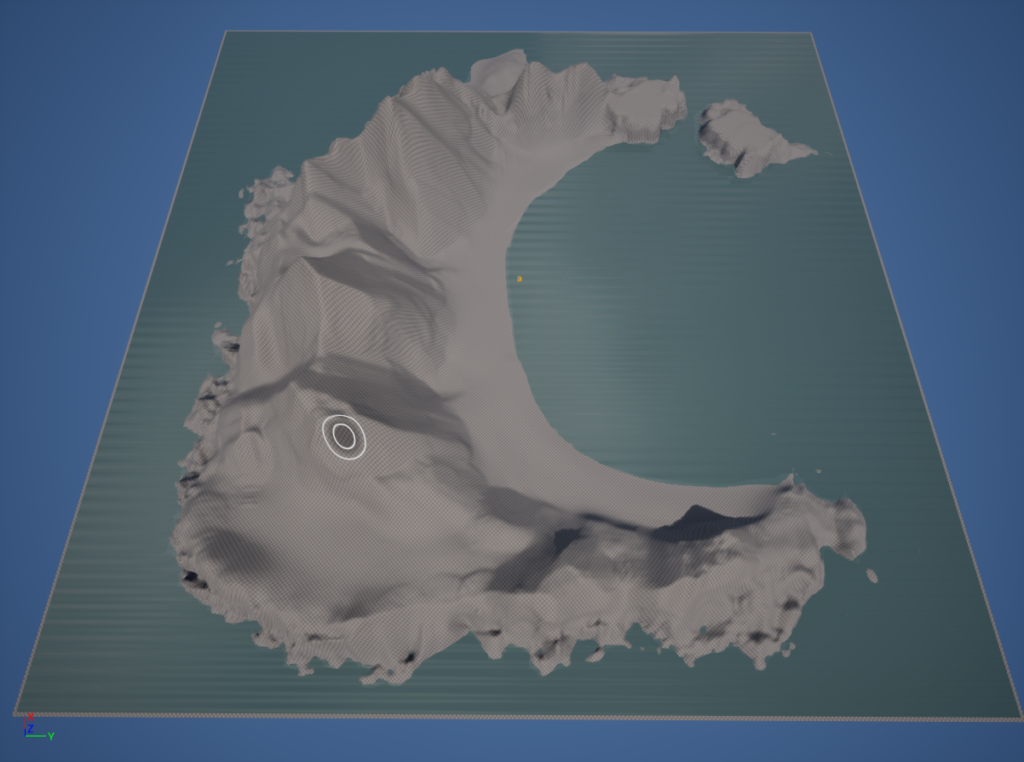
Handling Steep Cliffs
It’s worth noting that landscapes in UE5 can’t handle cliffs with angles greater than 90° or highly complex topologies. To create features like sheer cliffs or caves, you’ll need to use separate assets. While adjustments may be required later, I sculpted the island terrain as shown in this example:
Painting the Terrain
Once the sculpting was done, I painted the terrain using the Landscape Paint feature.
To do this, I downloaded textures such as grass and rock materials from Quixel Bridge (covered in the next section) and assigned them to layers within the Landscape Layer Blend node of the landscape material.
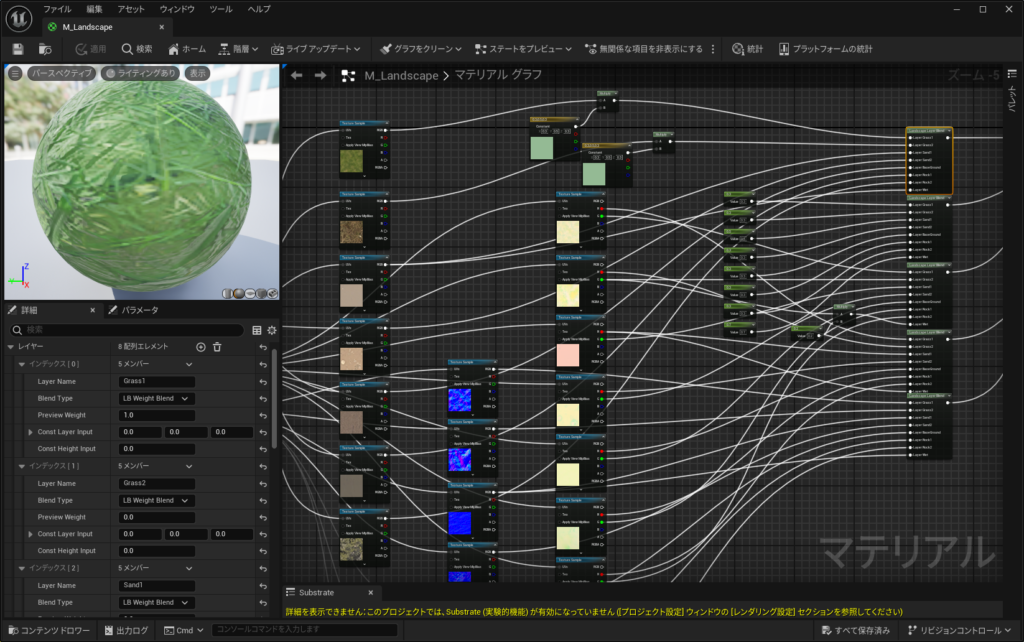
Setting Up Material Nodes
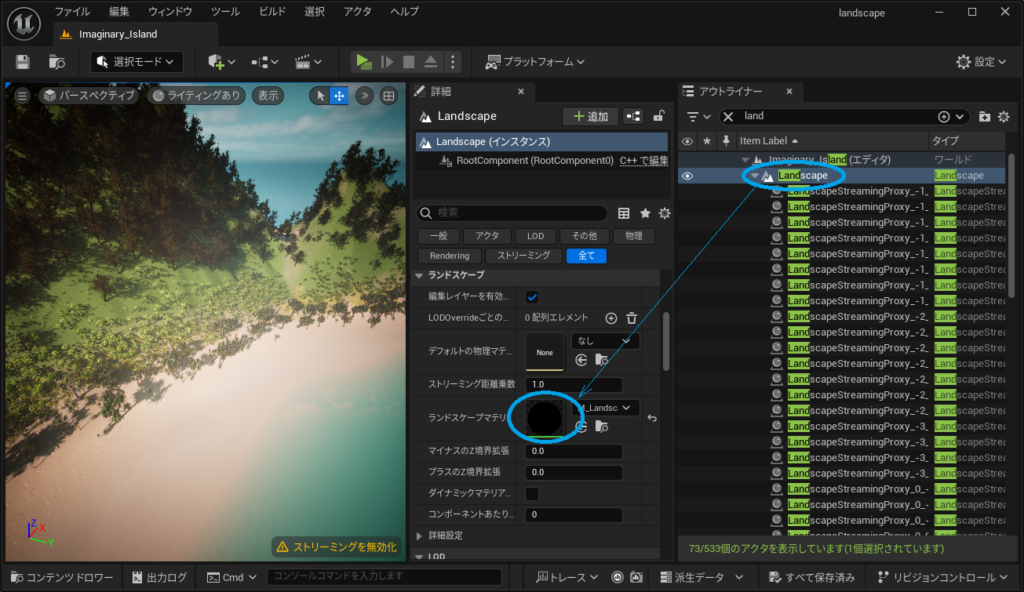
Here’s how I set up the landscape material:
Select “Landscape" in the Outliner, then open the material node editor by double-clicking the Landscape Material field in the details tab.
Base Color, Specular, and other attributes are connected to the Material Output Node (M_Landscape) via the Landscape Layer Blend node.
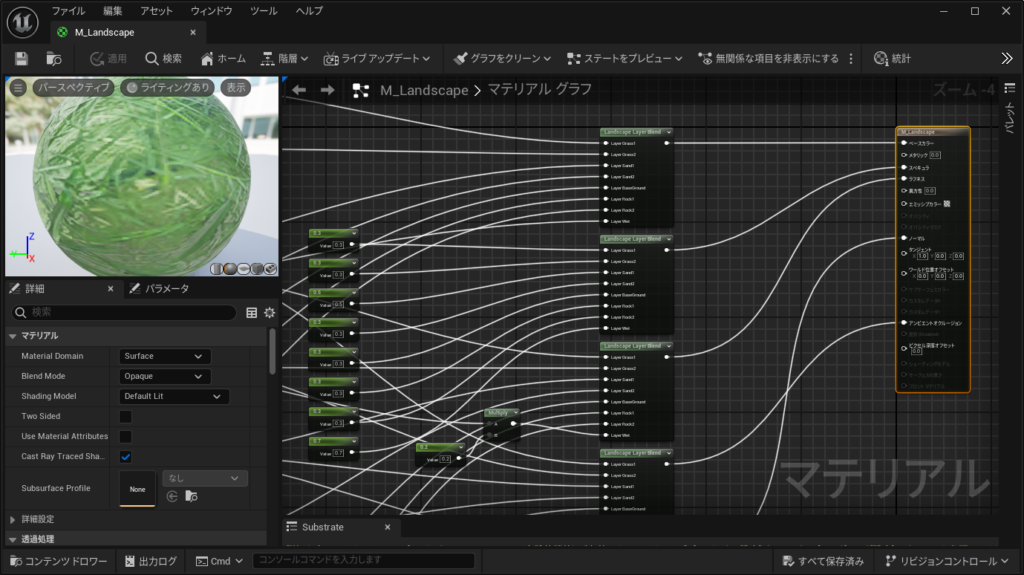
Textures downloaded from Quixel Bridge often include ORM textures, which store Ambient Occlusion (AO), Roughness, and Metallic values in the R, G, and B channels, respectively.
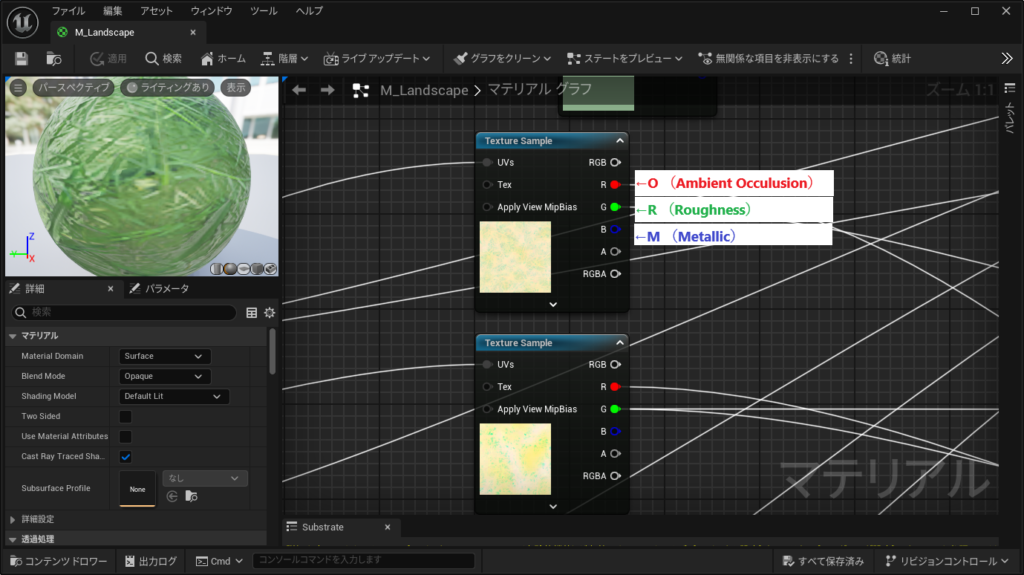
I connected the R and G channels to AO and Roughness inputs, leaving the Metallic channel unused.
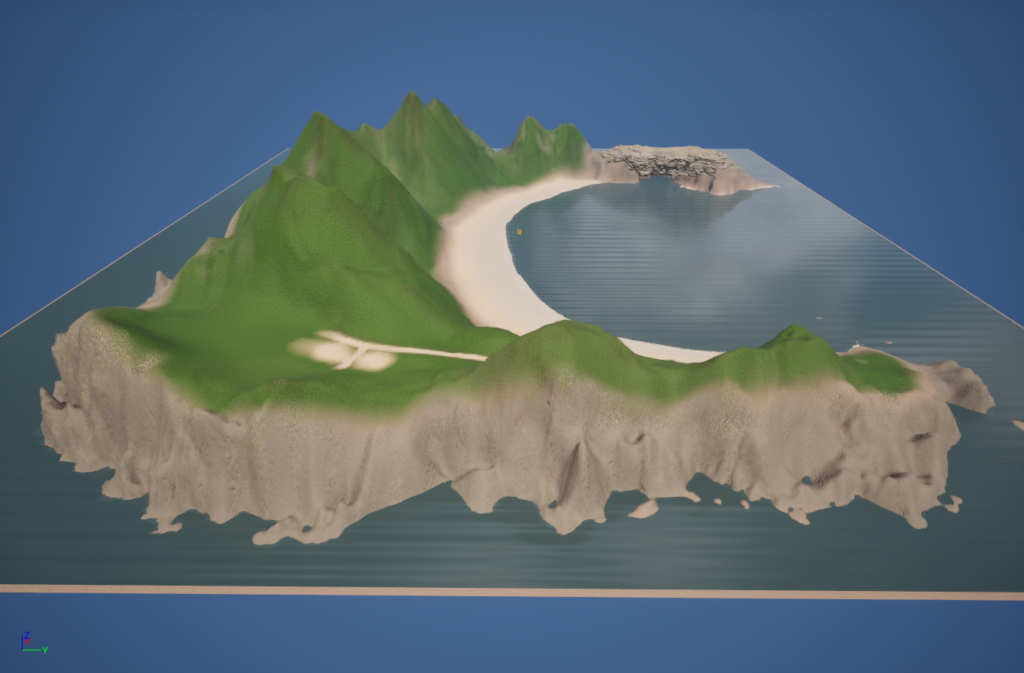
Using a workflow similar to Texture Painting in Blender, I painted the terrain. Each material was applied on separate layers: grass, rock, beach, and shoreline.
Here’s the final result of the painted landscape:
Placing Quixel Assets
With UE5’s Quixel Bridge plugin, you can download and integrate highly realistic assets directly into your project (as of September 2024).
Enabling the Plugin
To activate Quixel Bridge:
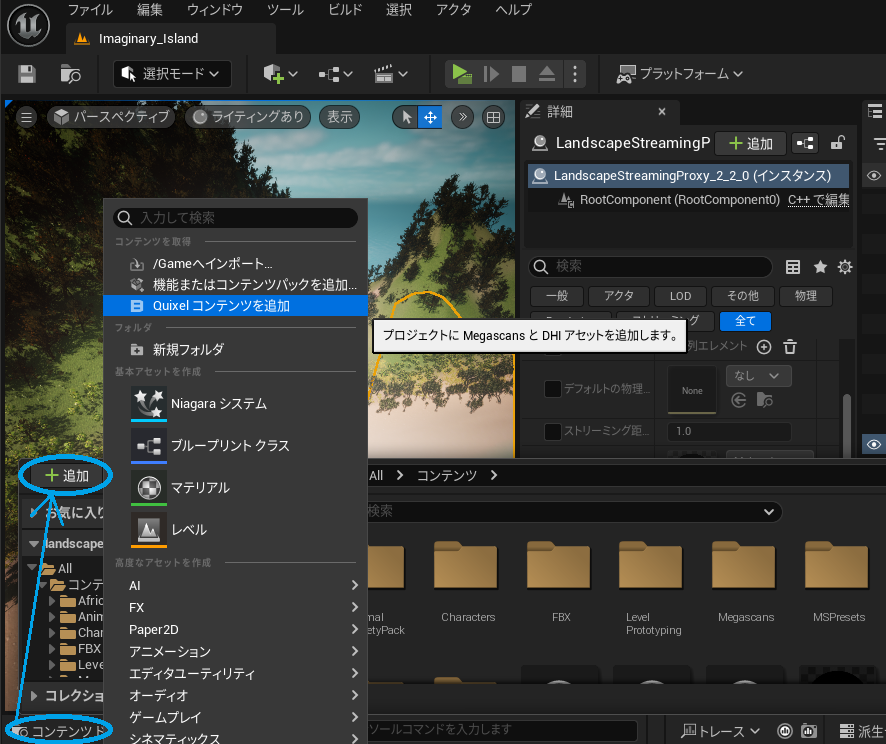
Search for Quixel Bridge and check the box to enable it.
Navigate to Edit → Plugins.
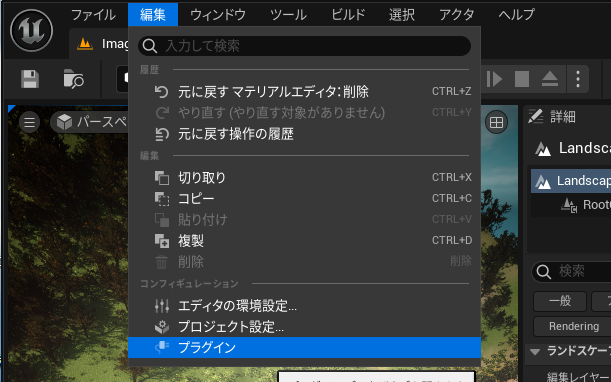

Once enabled, open the Content Drawer or Content Browser, click the + button, and select Add Quixel Content to launch Quixel Bridge.
Adding Assets
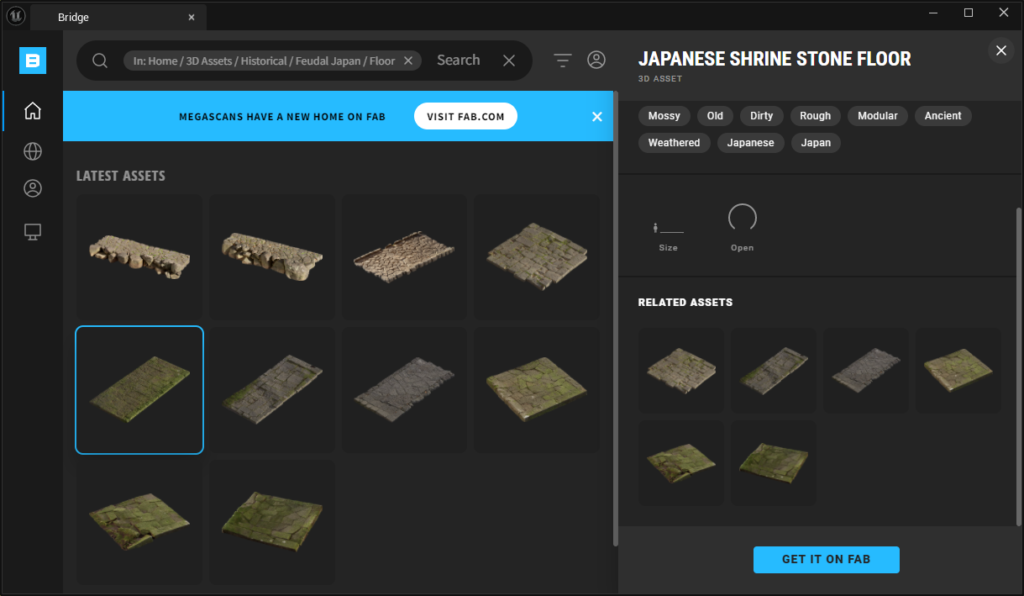
Previously, Quixel Bridge allowed you to browse various asset categories, select the desired asset, choose its quality, and add it to your project by clicking Download → Add.
However, as of October 2024, Quixel Bridge has been merged with the Epic Store into a new platform called “Fab", and assets can no longer be added via Quixel Bridge.
From now on, you’ll need to use Fab to download and integrate assets. Keep this in mind when working on future projects!
AD
How to Add Assets Using the Fab Plugin
While it’s possible to download FBX assets from the Fab website or add them via the Epic Games Launcher library, the easiest and most recommended way to add assets is by using the Fab Plugin.
Installing the Fab Plugin
Choose your desired version of Unreal Engine and install the plugin.
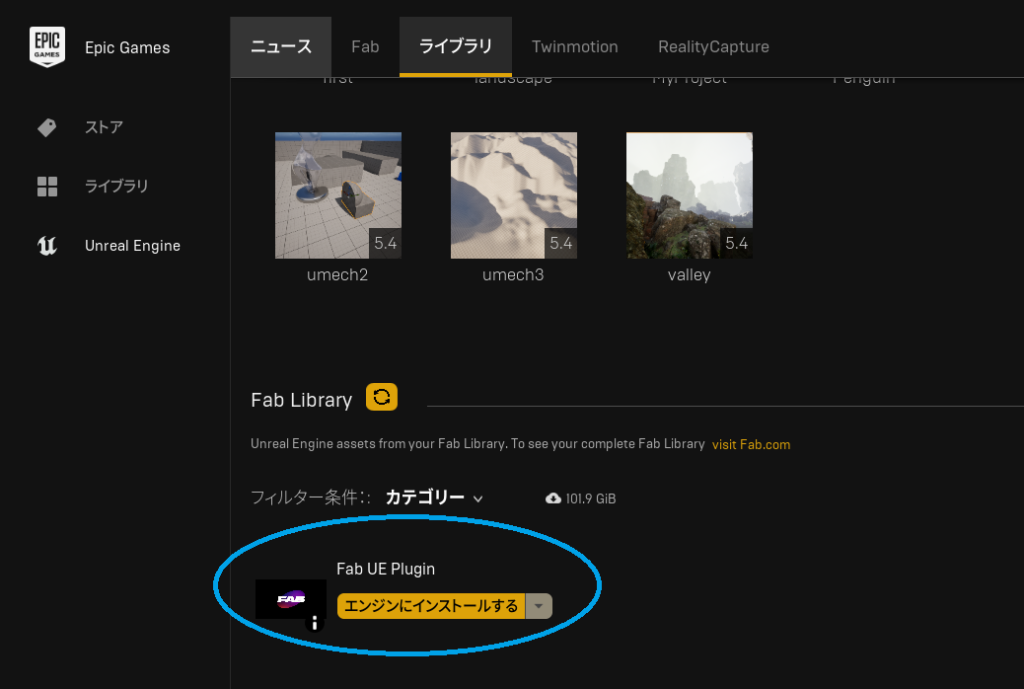
Open the Epic Games Launcher and search for Fab in the Fab Library.
Click on the Fab UE Plugin and select Install to Engine.
Adding Assets to Your Project
Once you launch your Unreal Engine project:
In the Content Browser, you’ll see a new Fab menu next to the + Add button.
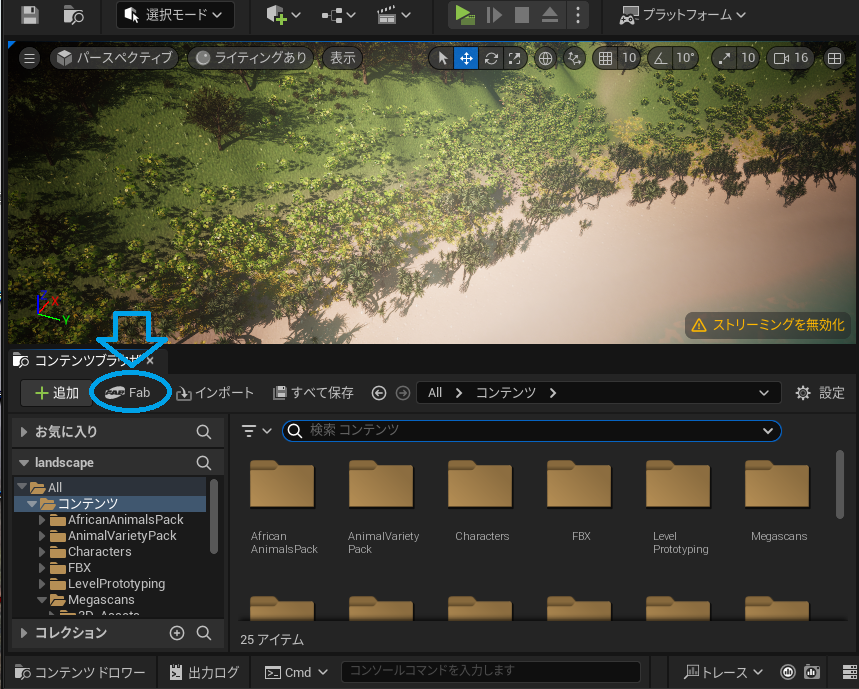
Click Fab, and a new window will open.
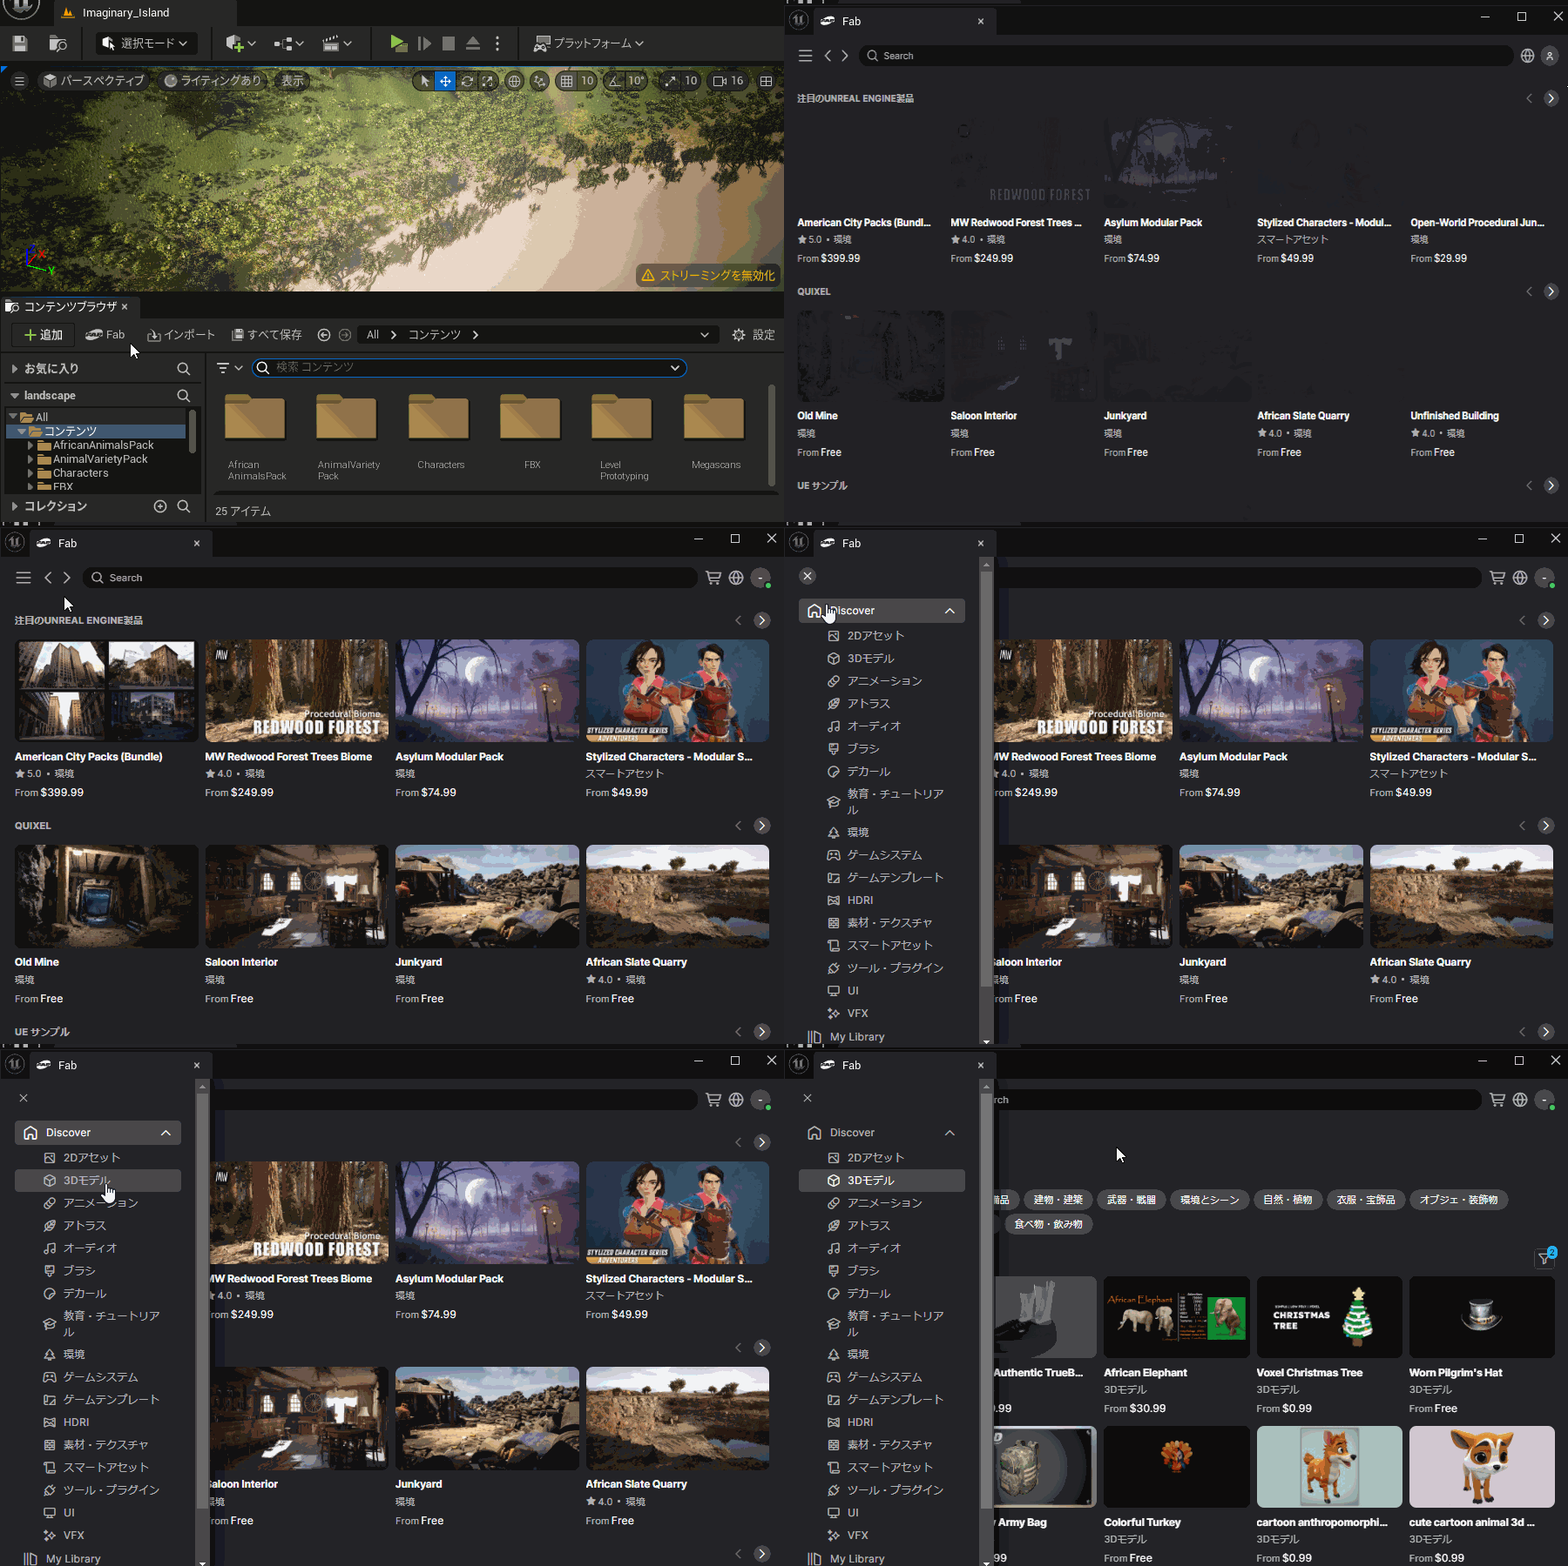
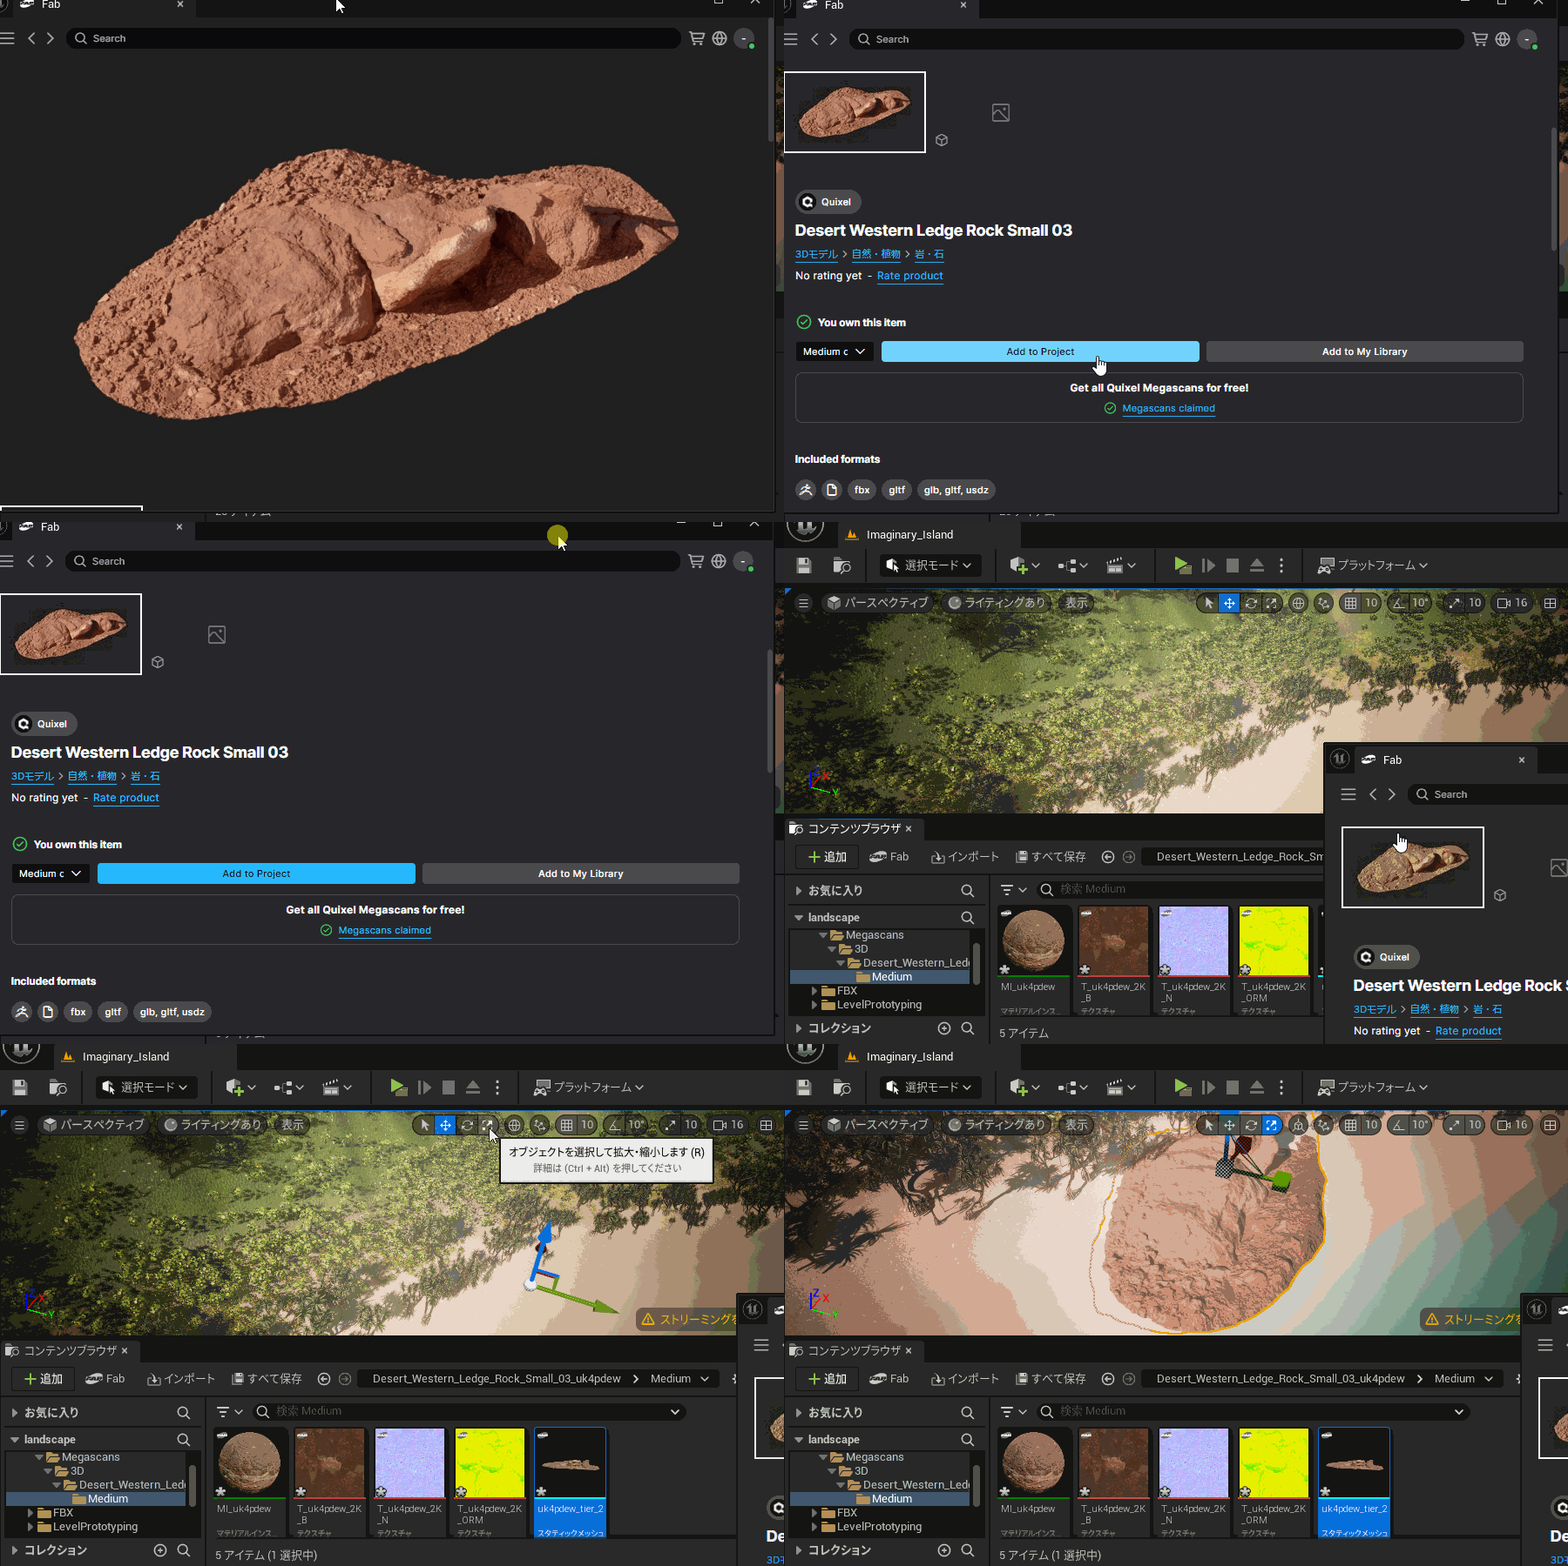
Browse and select the assets you want, and click Add to Project.
The assets will be added to your project’s folder structure. You can then drag and drop them from the Content Drawer into your level.
Important Note
As of 2024, all Megascans assets on Fab are available for free. I highly recommend downloading them while they are still free, as starting from 2025, most Megascans assets (except for a few) will be paid.

Example: Placing Rocks Around the Island
To express cliffs around the island, I placed rock assets from Fab.
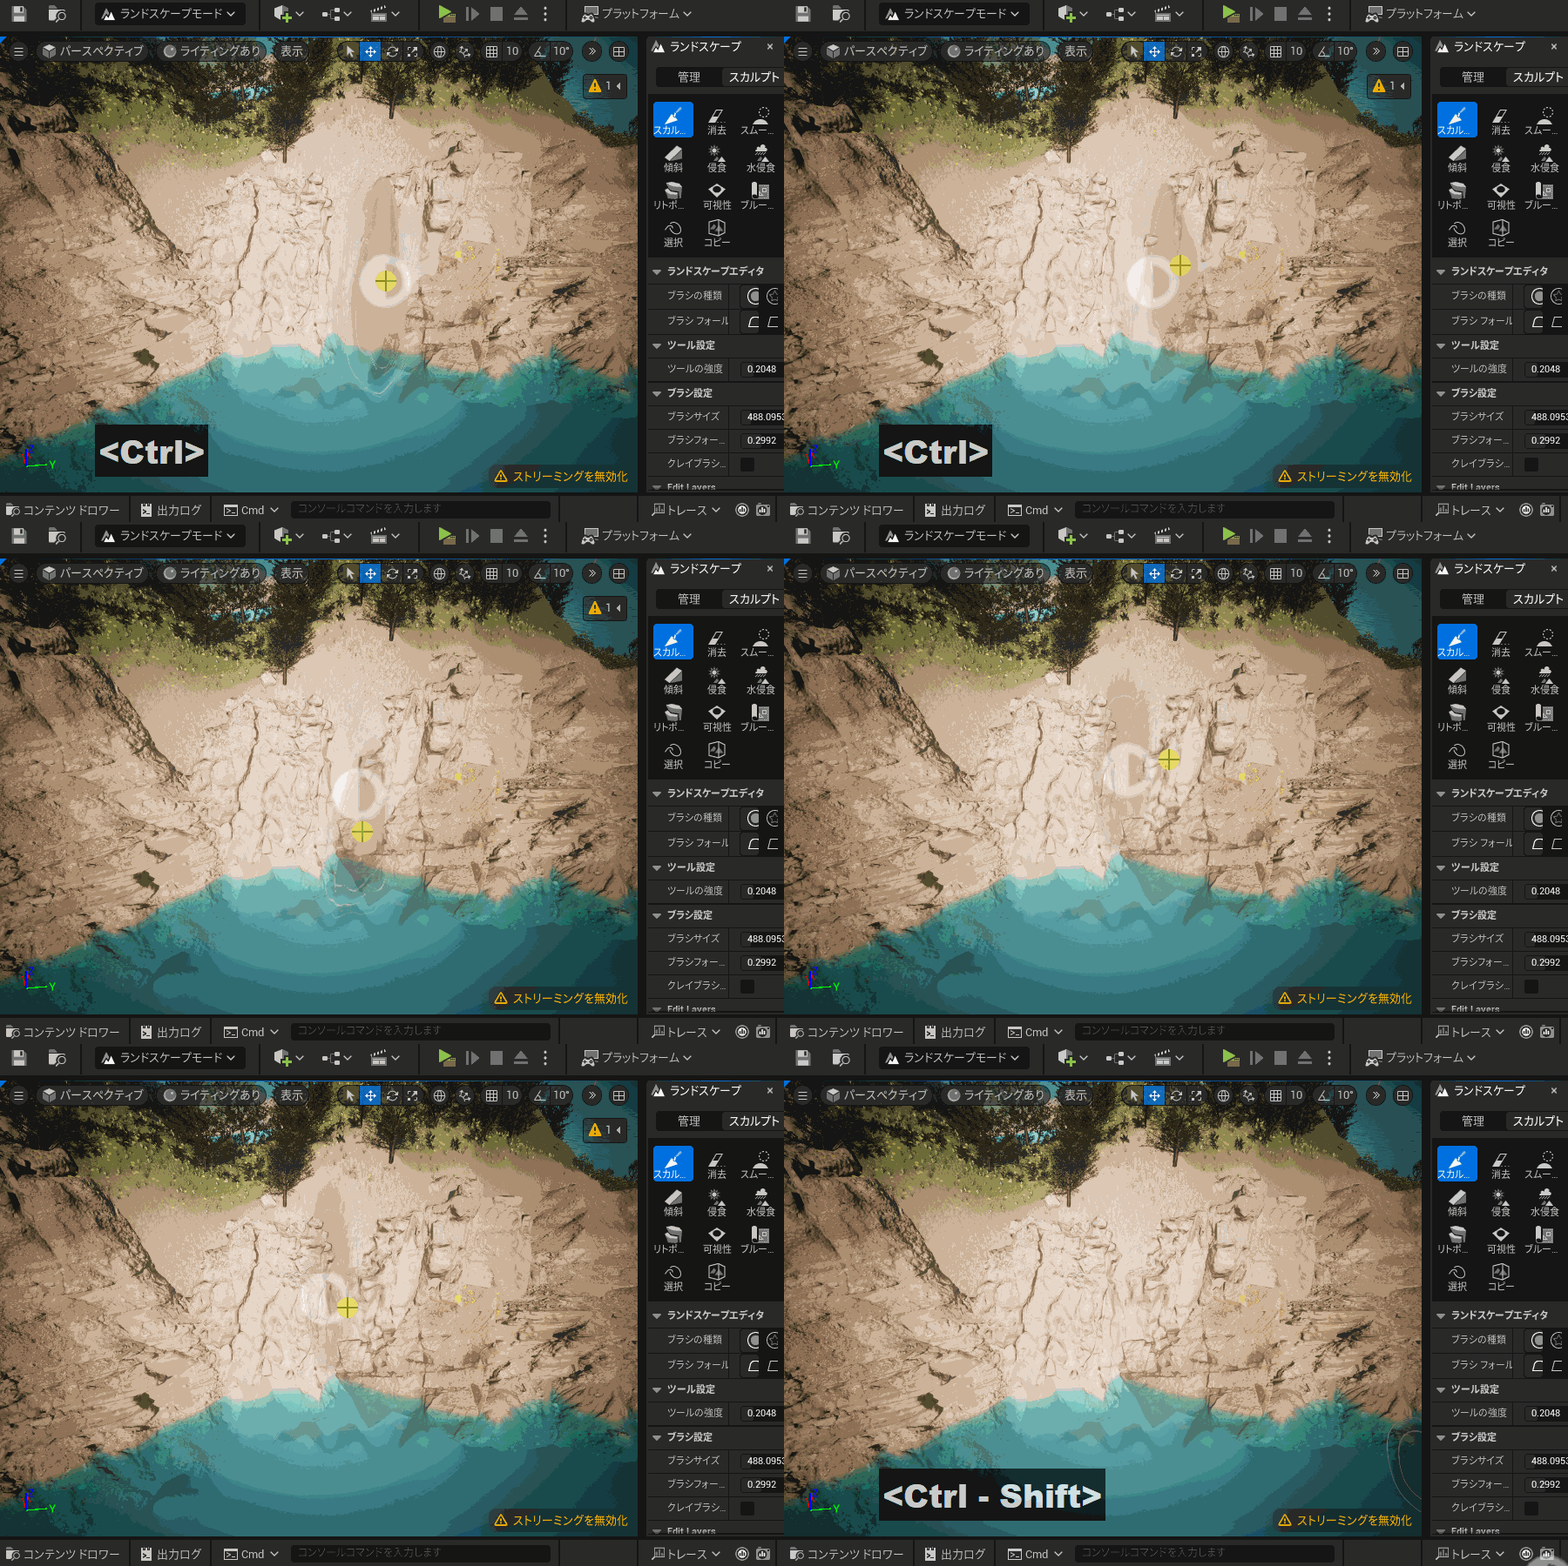
To ensure the rocks’ textures were visible on the surface, I sculpted the landscape using the Landscape Mode with the Shift and Ctrl keys held down, adding subtle indentations with the sculpt brush.
Additionally, I added collision detection (called Collision) to the rocks, since without this, characters would pass through them.
To add collision:
- Select the static mesh of the rock.
- Choose Convex Decomposition → Apply to generate convex collision, ensuring the character can’t pass through the rocks.
This step is essential when creating environments for games!
I also decided to create a shrine on top of the mountain, so I added assets like stone stairs and stone lanterns.
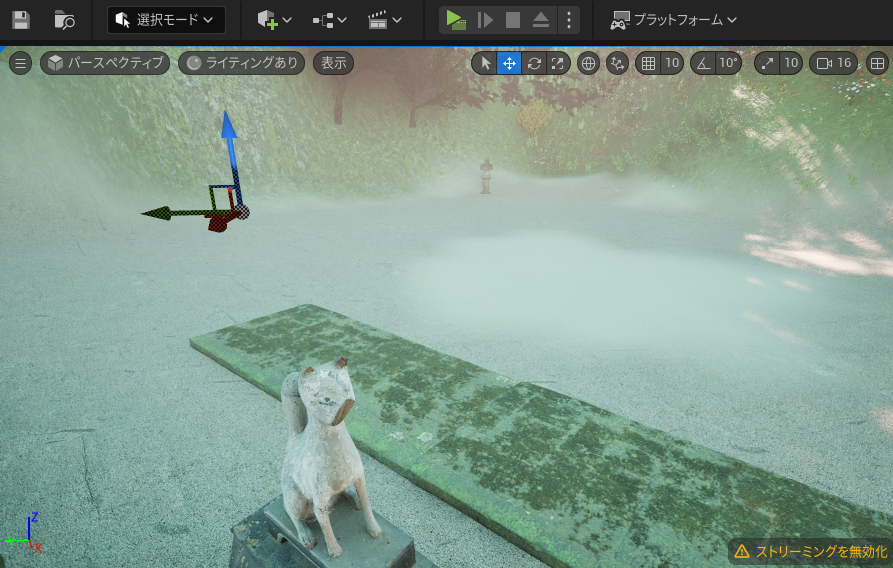
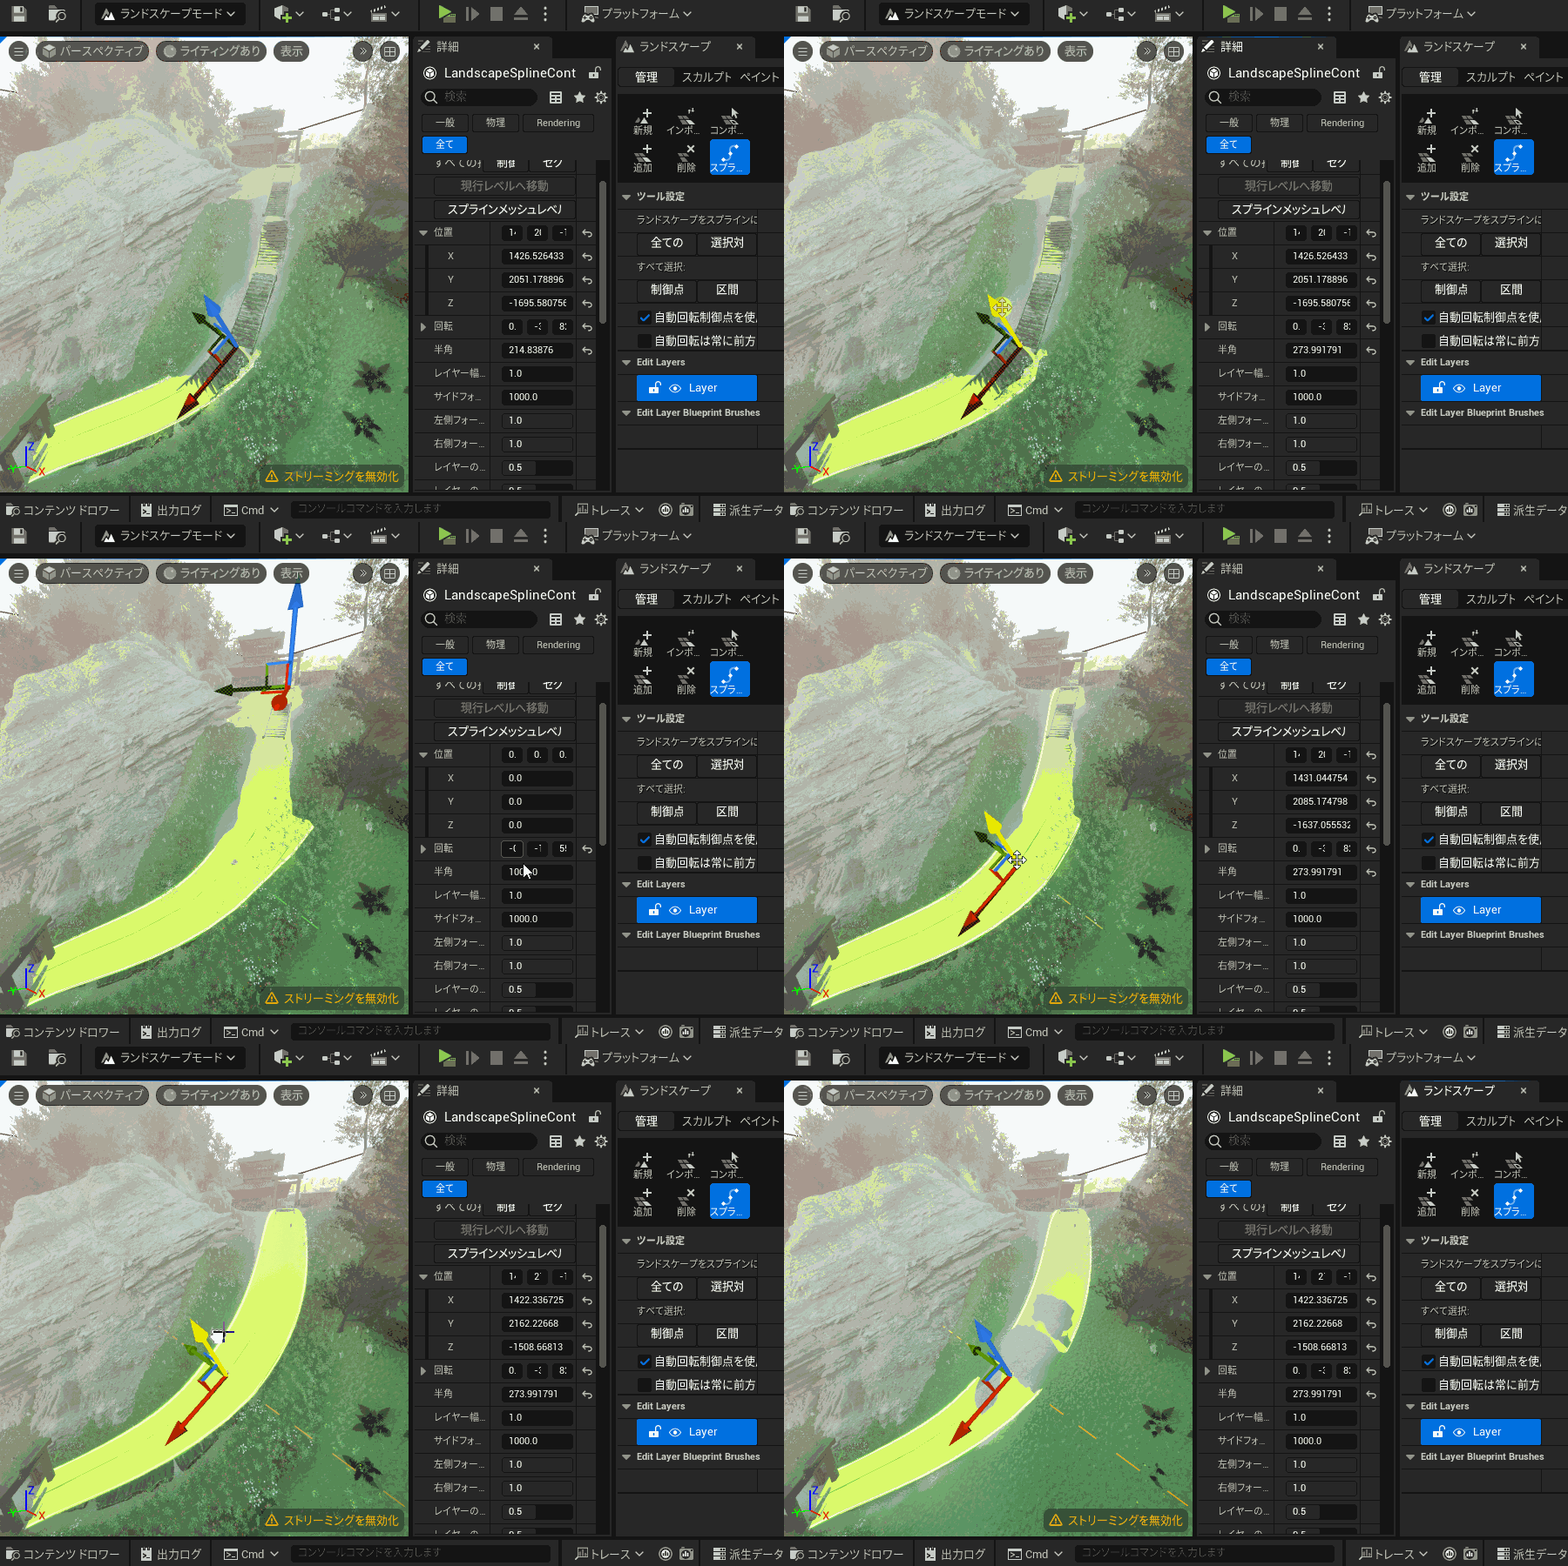
In third-person gameplay mode, the character can only climb slopes with an angle of 45° or less. So, while running Quinn in gameplay mode, I adjusted the angle of the slopes to ensure the character could navigate them.
To create smooth slopes, the Spline feature in Landscape Mode proved to be very useful.
AD
Placing Assets Exported from Blender
For the shrine and small building, I exported assets obtained through the Blender addon Blender Kit as FBX files and imported them into UE5 via the Content Browser.
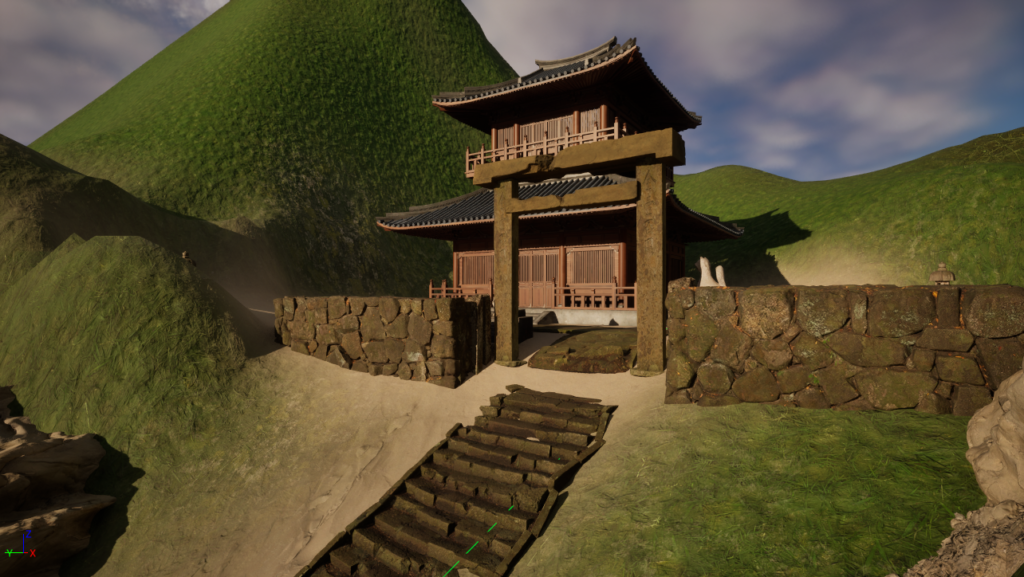
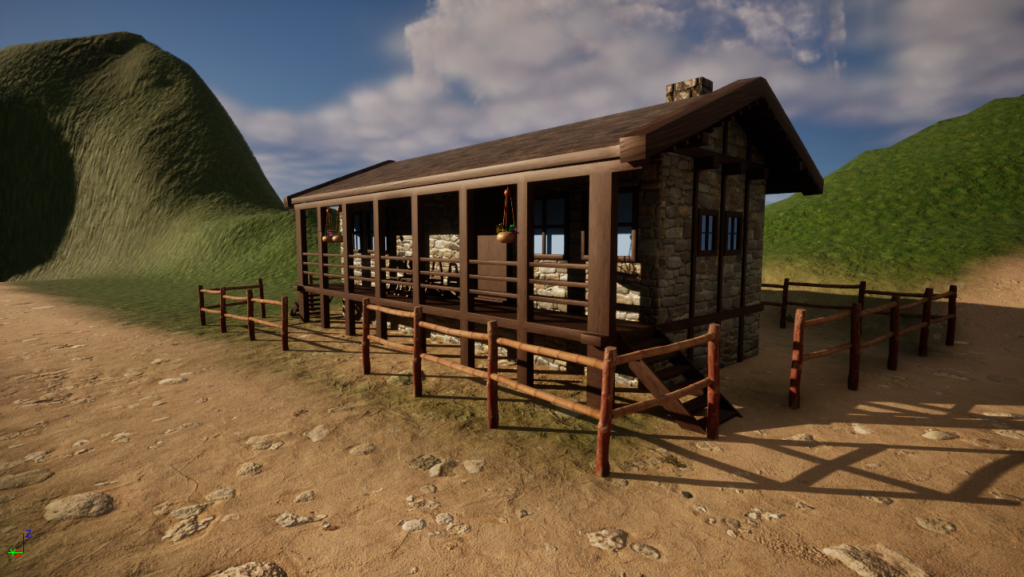
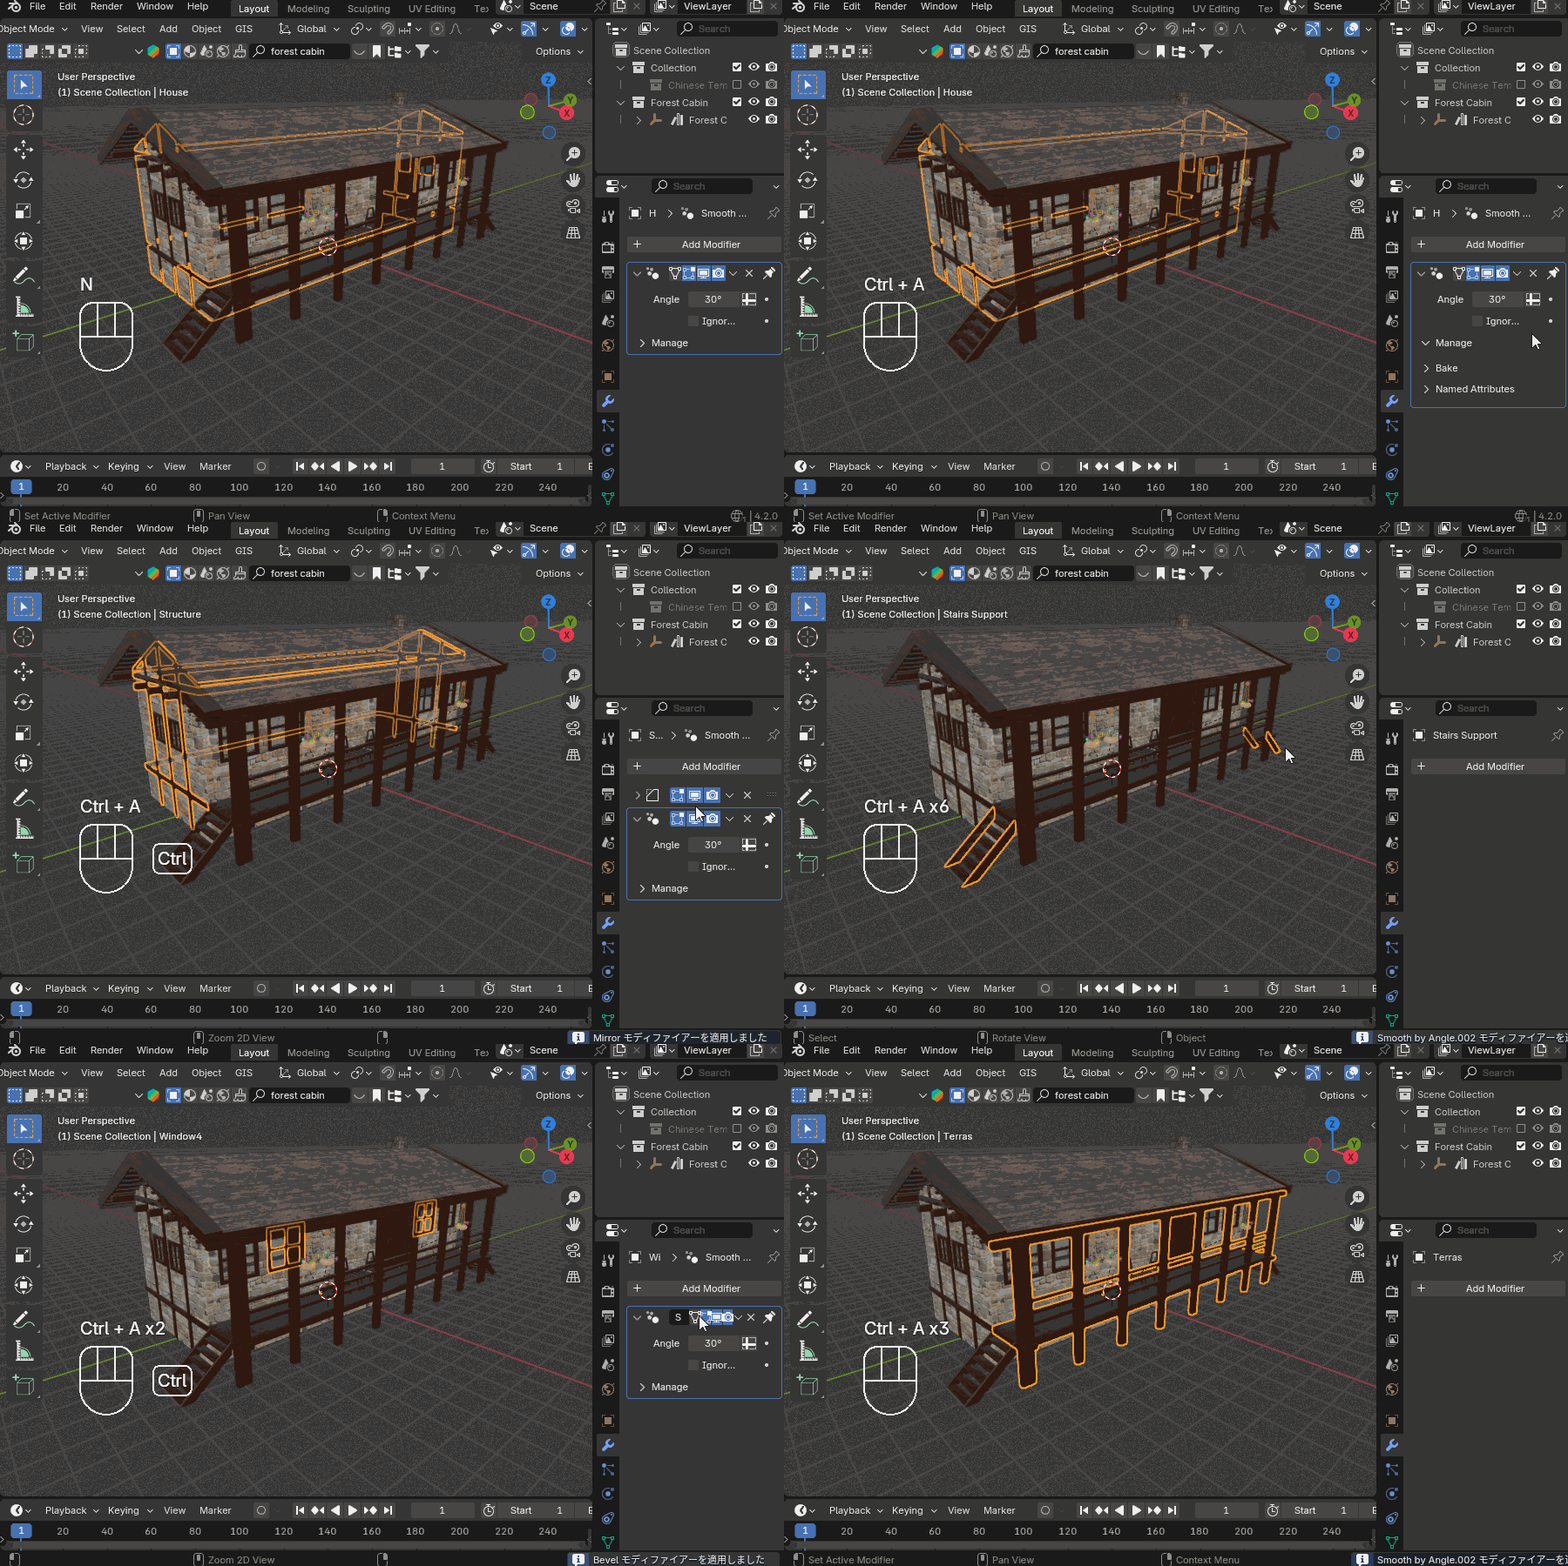
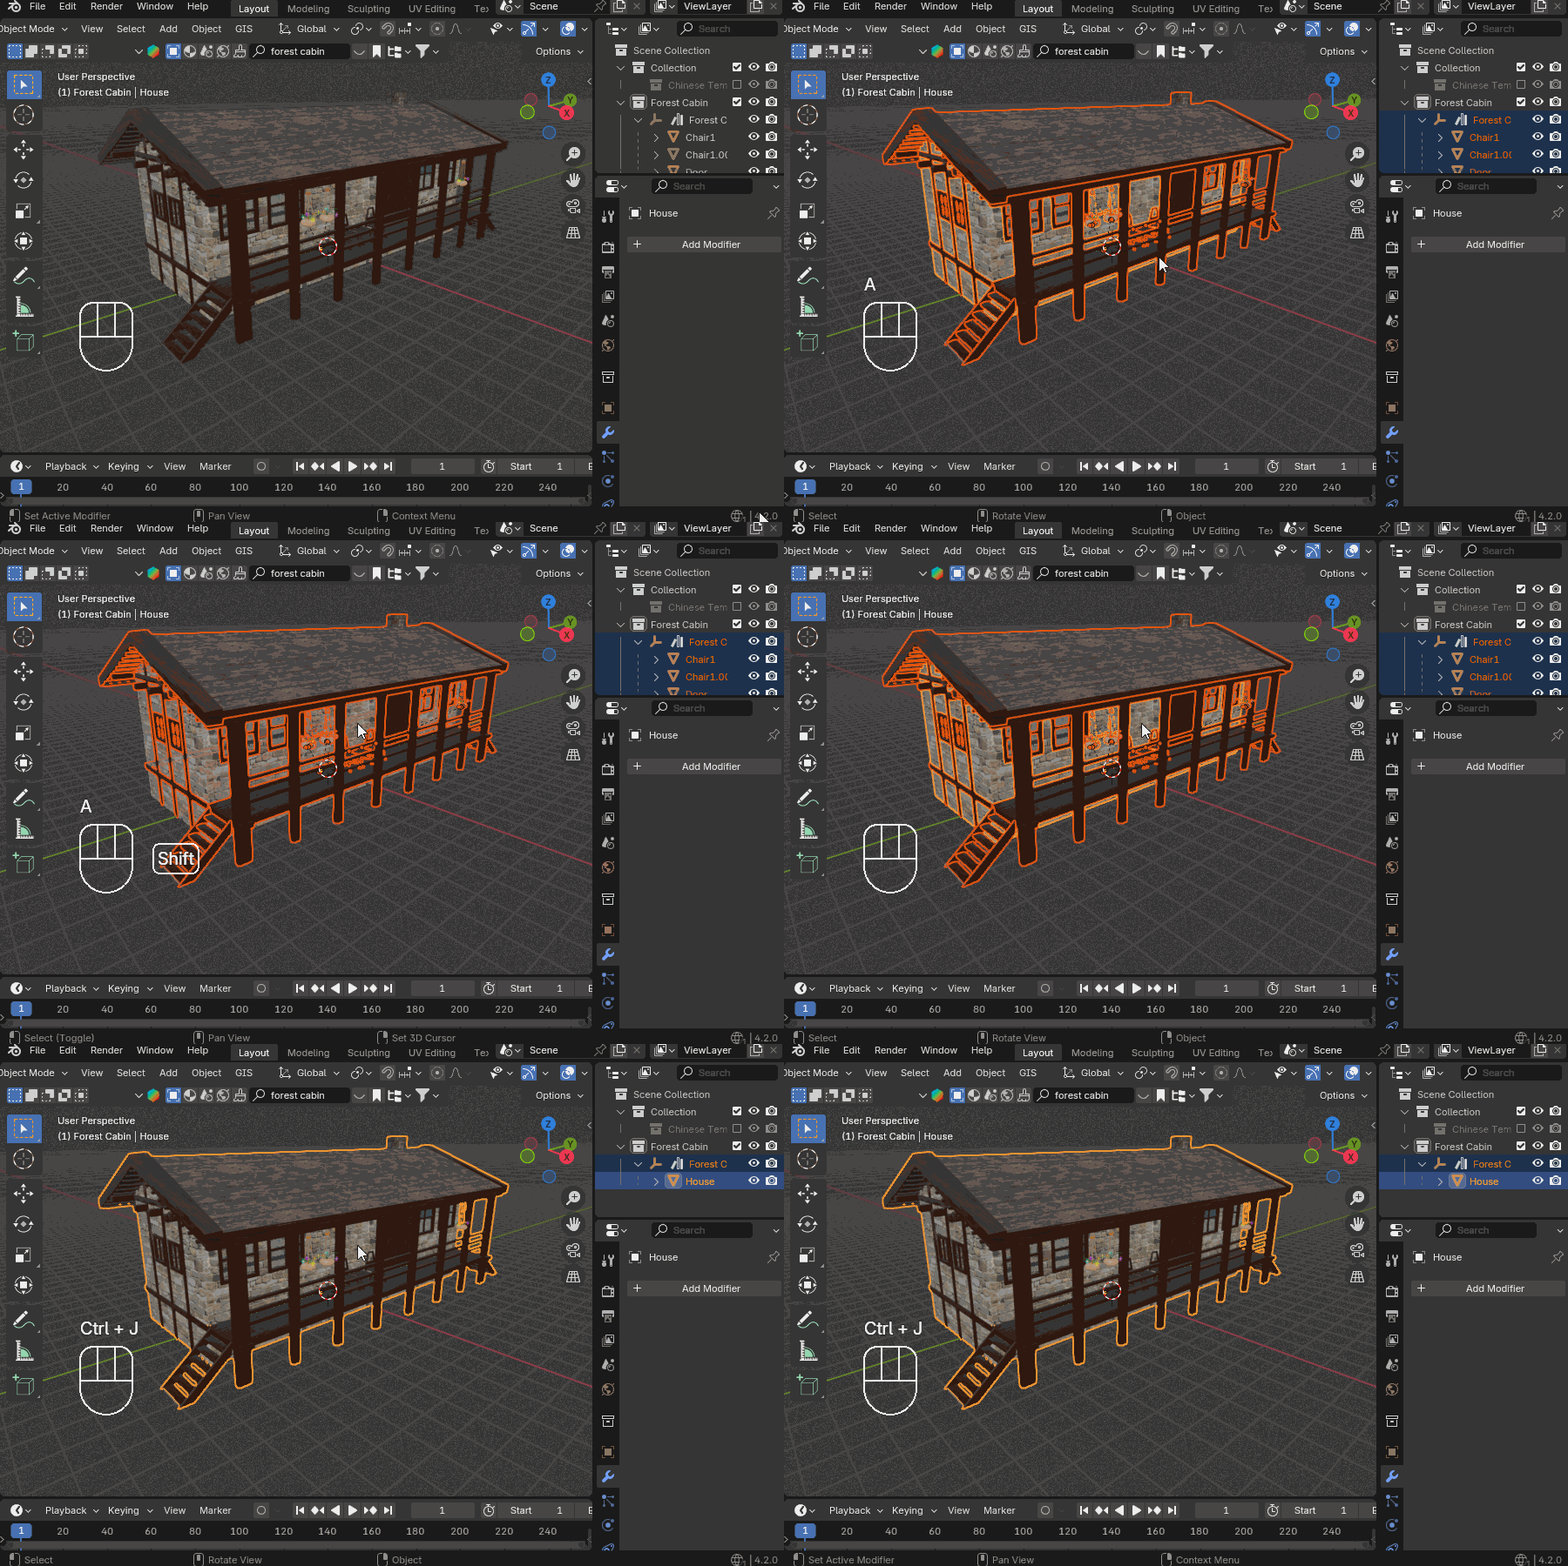
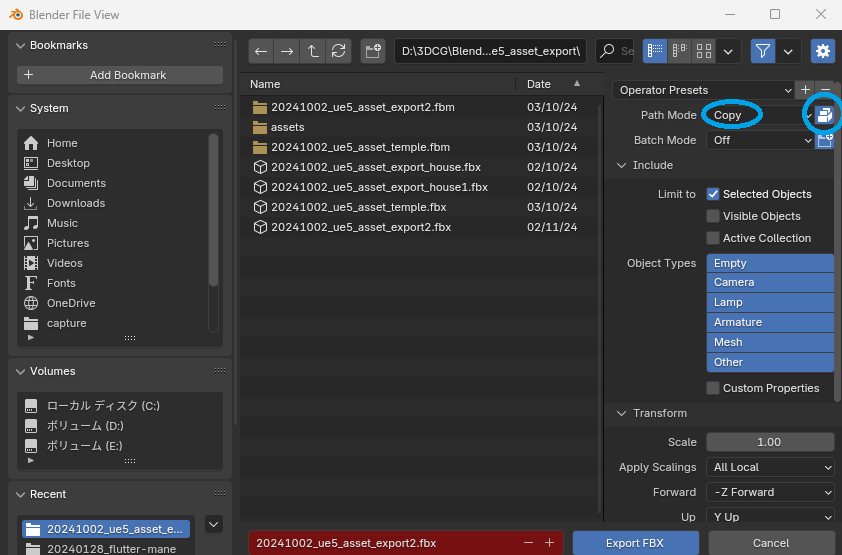
Before exporting an FBX file from Blender, you need to perform the following steps:
- Apply all modifiers and transforms (Ctrl+A).
2. Join all objects into a single object (Ctrl+J).
3. When exporting the FBX, select Path Mode → Copy and check the option to Embed Textures (icon).
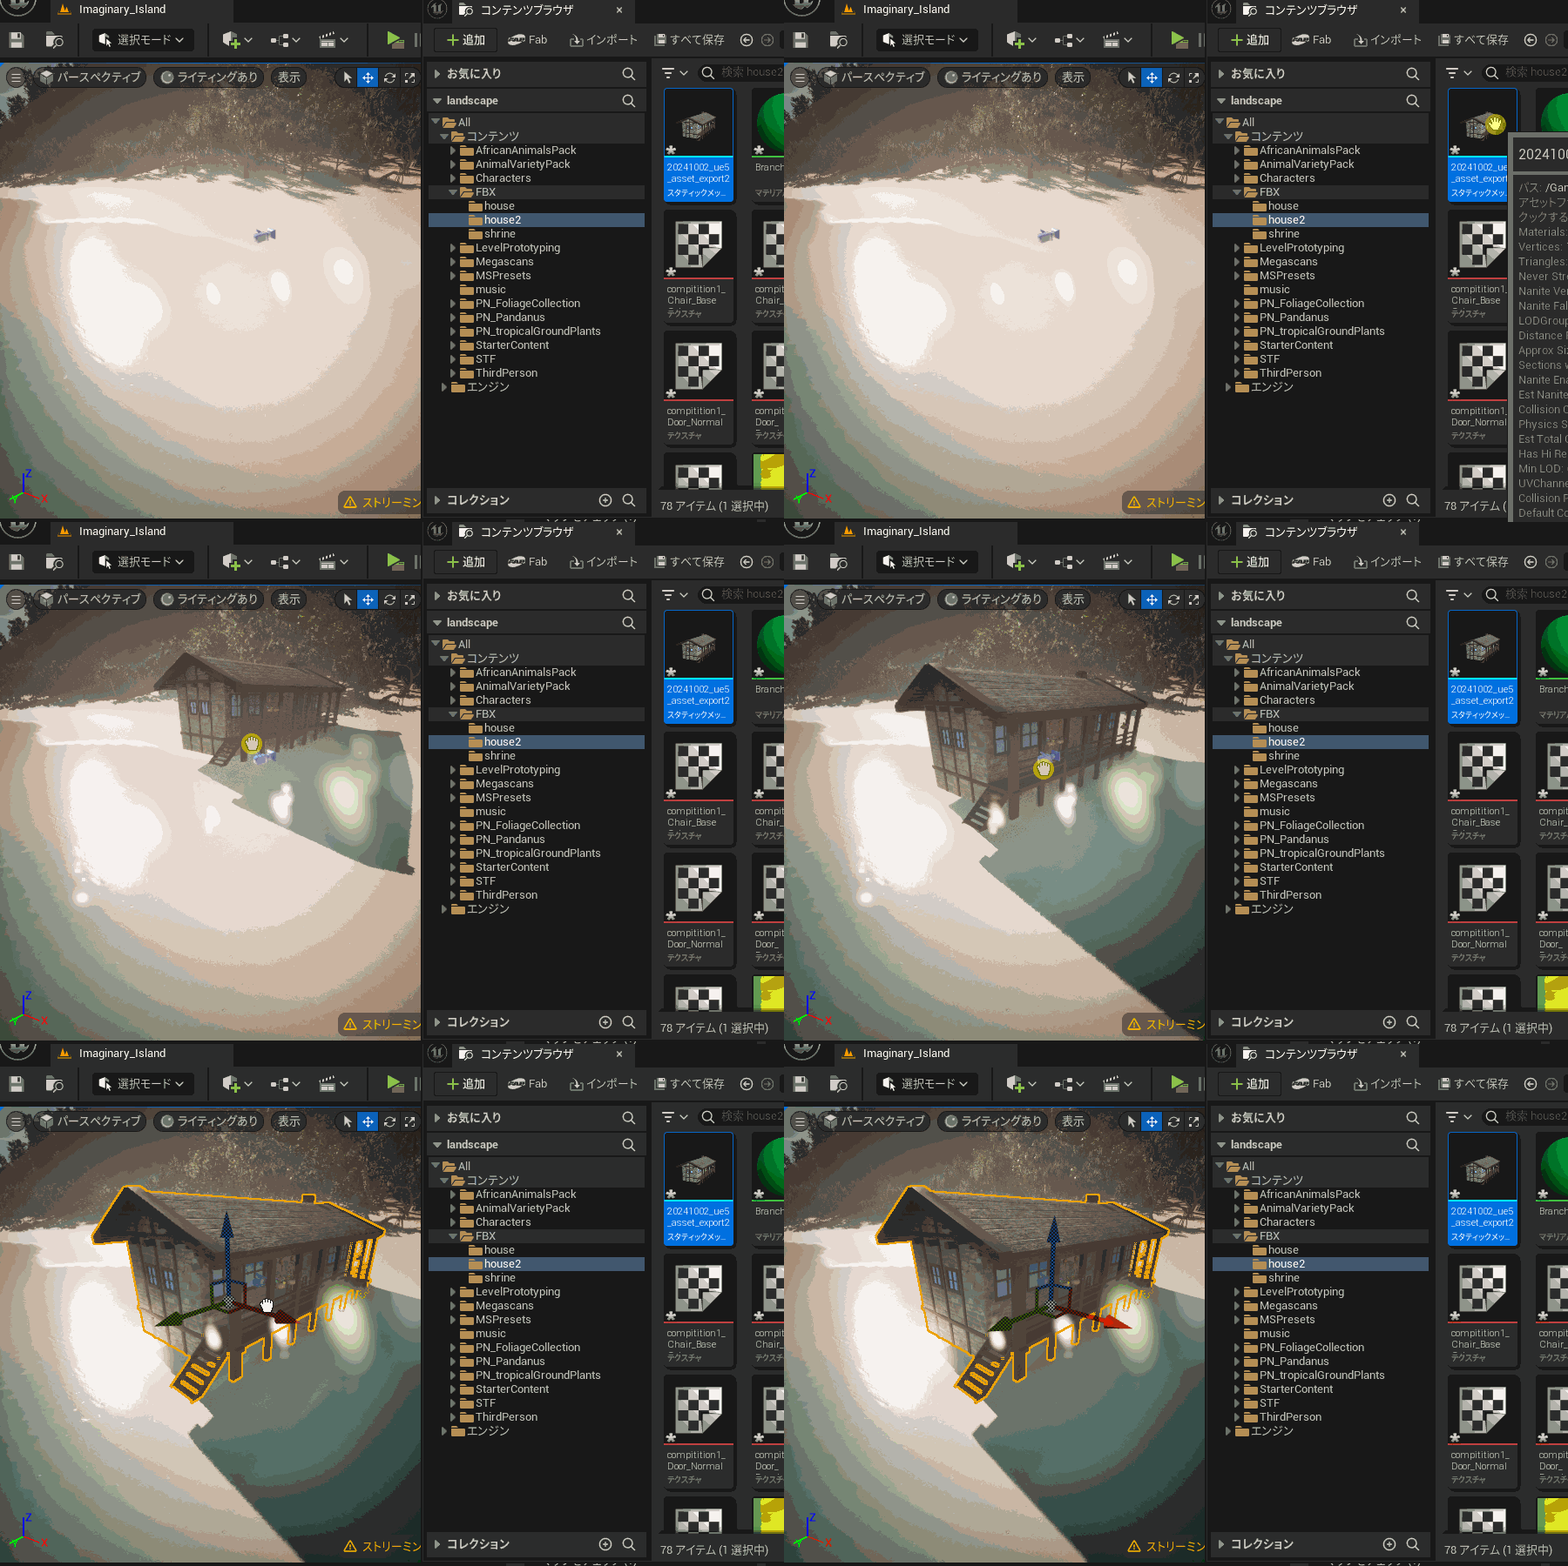
After completing steps 1-3, you can import the FBX file, including the textures, through the Content Browser in UE5.
Placing Assets from the Marketplace
For this project, I used free animal and tree asset packs obtained from the Epic Marketplace.
Since October 2024, these assets can now be accessed via Fab.
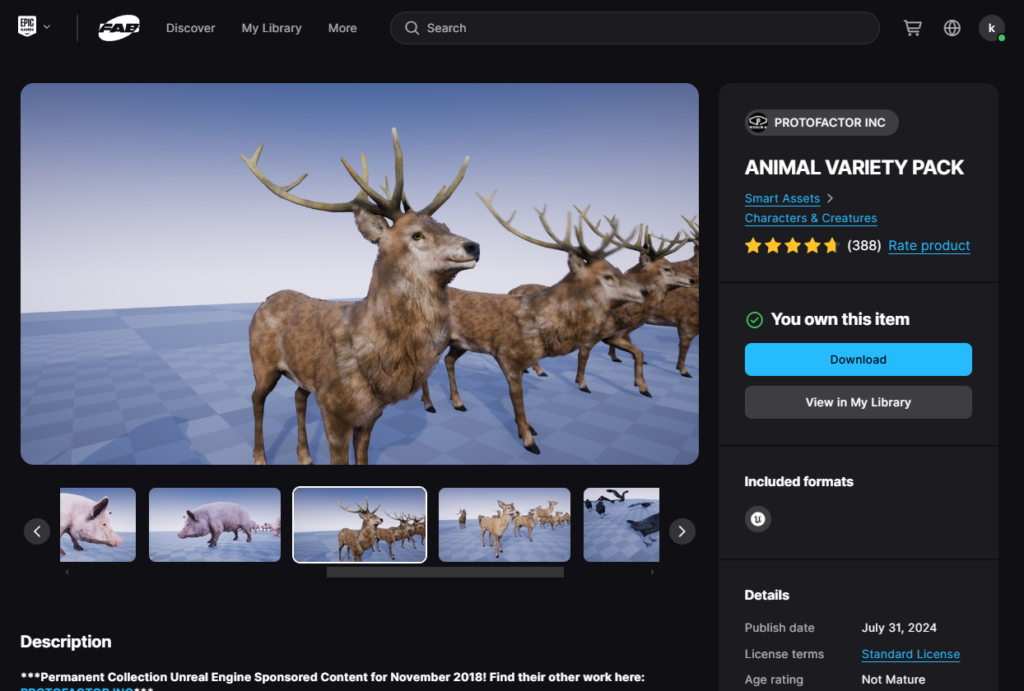
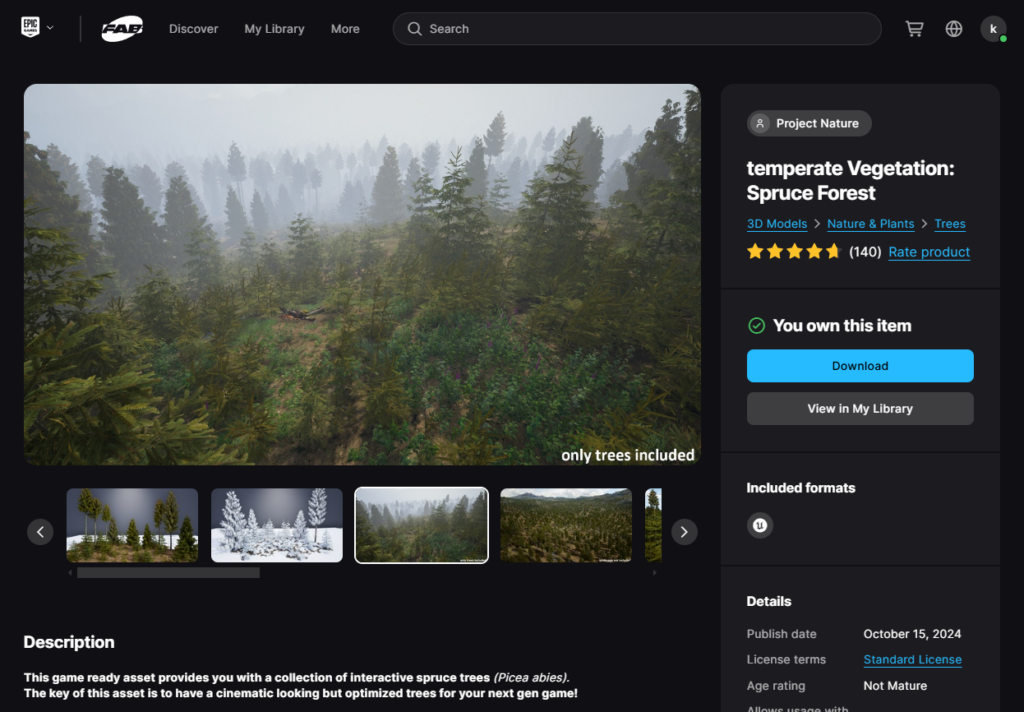
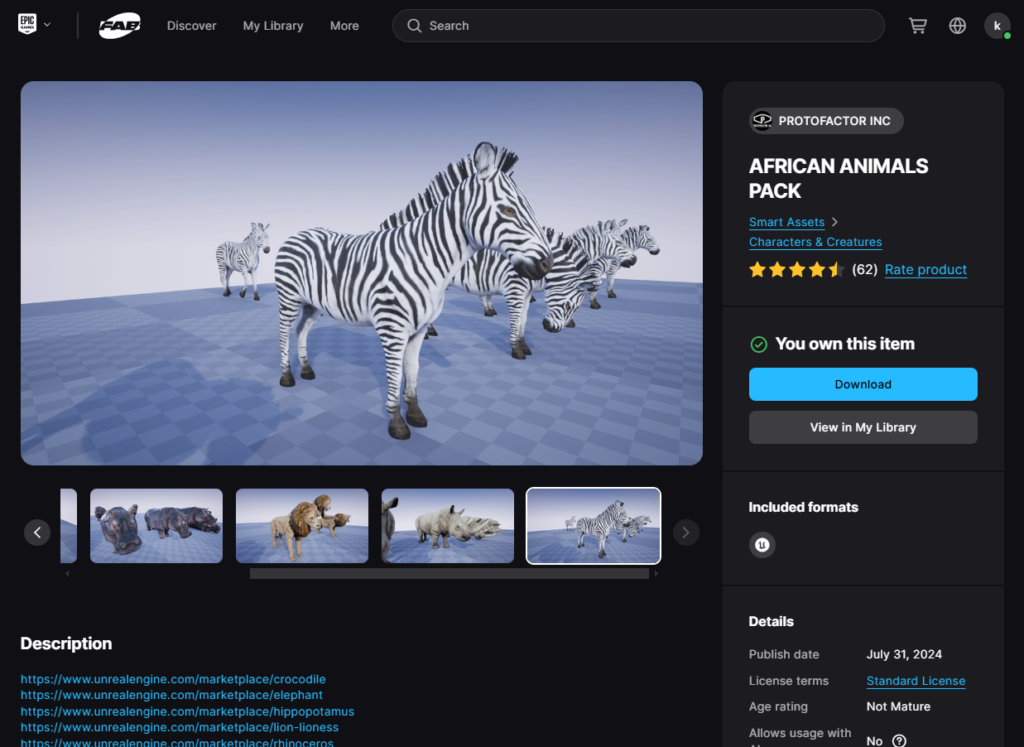
Once you’ve obtained an asset pack, you can add it to your project by selecting Library → Add to Project from the Unreal Launcher. This will add a folder to your project containing the downloaded assets.
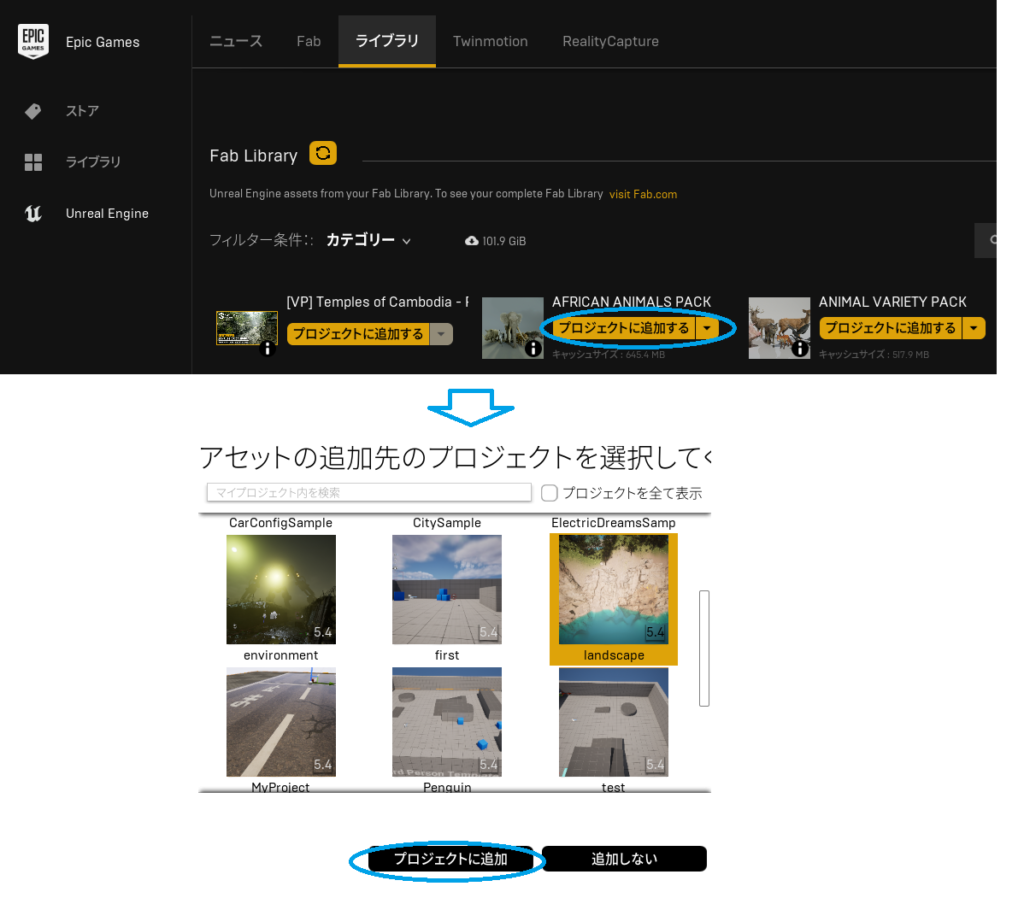
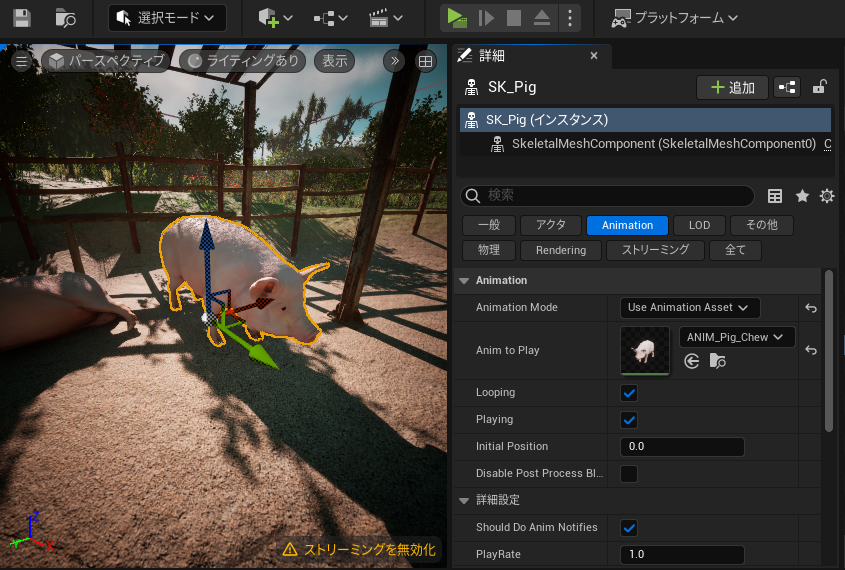
The animal assets I added included animation data, so in the Details window, I selected Use Animation Asset and chose an animation under Anim to Play to make the animations loop during gameplay.
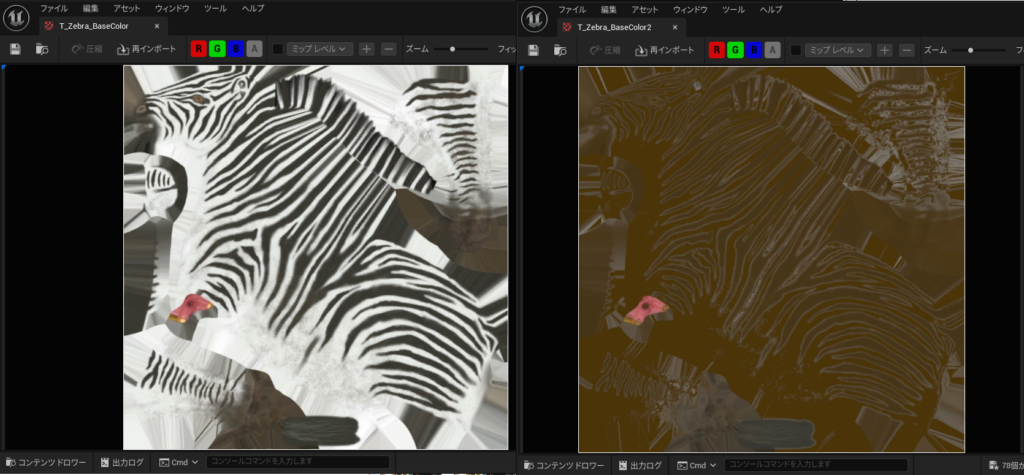
Since I didn’t have a free horse asset, I exported the zebra texture from the free asset pack, used the free illustration software Gimp to color it brown, and replaced the texture to create a horse model.
I added horses, pigs, and crows to the farm area and a deer to the shrine area. They really added a nice touch to the scene!
Foliage
I obtained this asset pack from the Epic Marketplace (now moved to Fab).
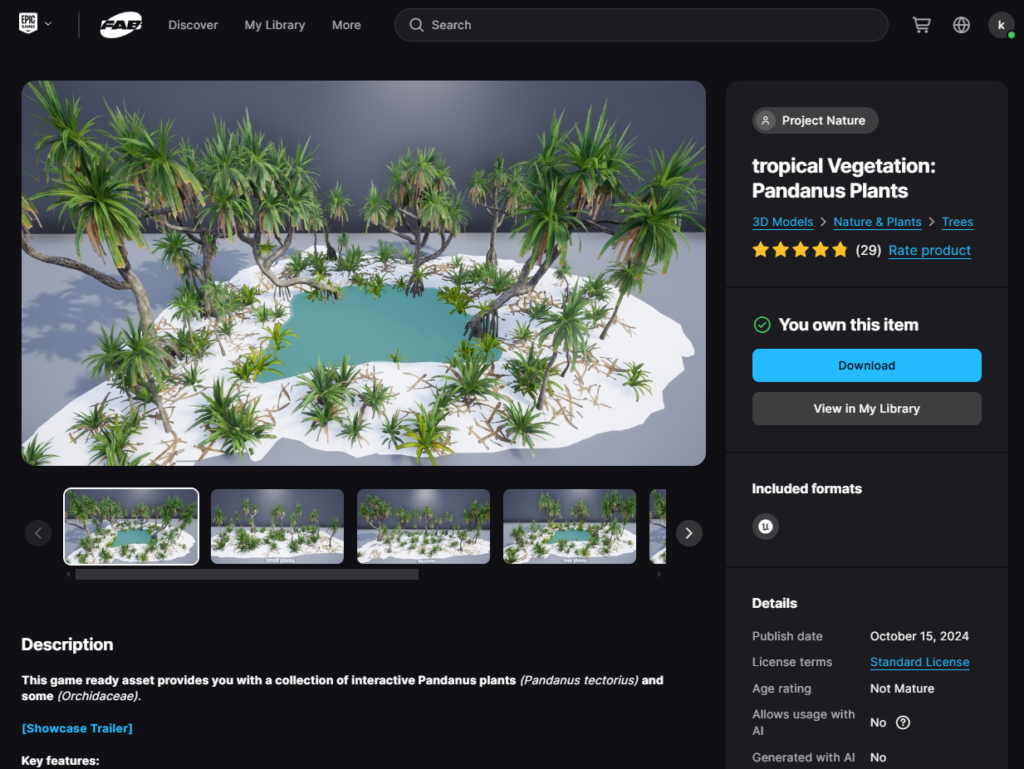
Using the palm tree assets from the pack, I planted a large number of them along the sandy beach using Foliage Mode.
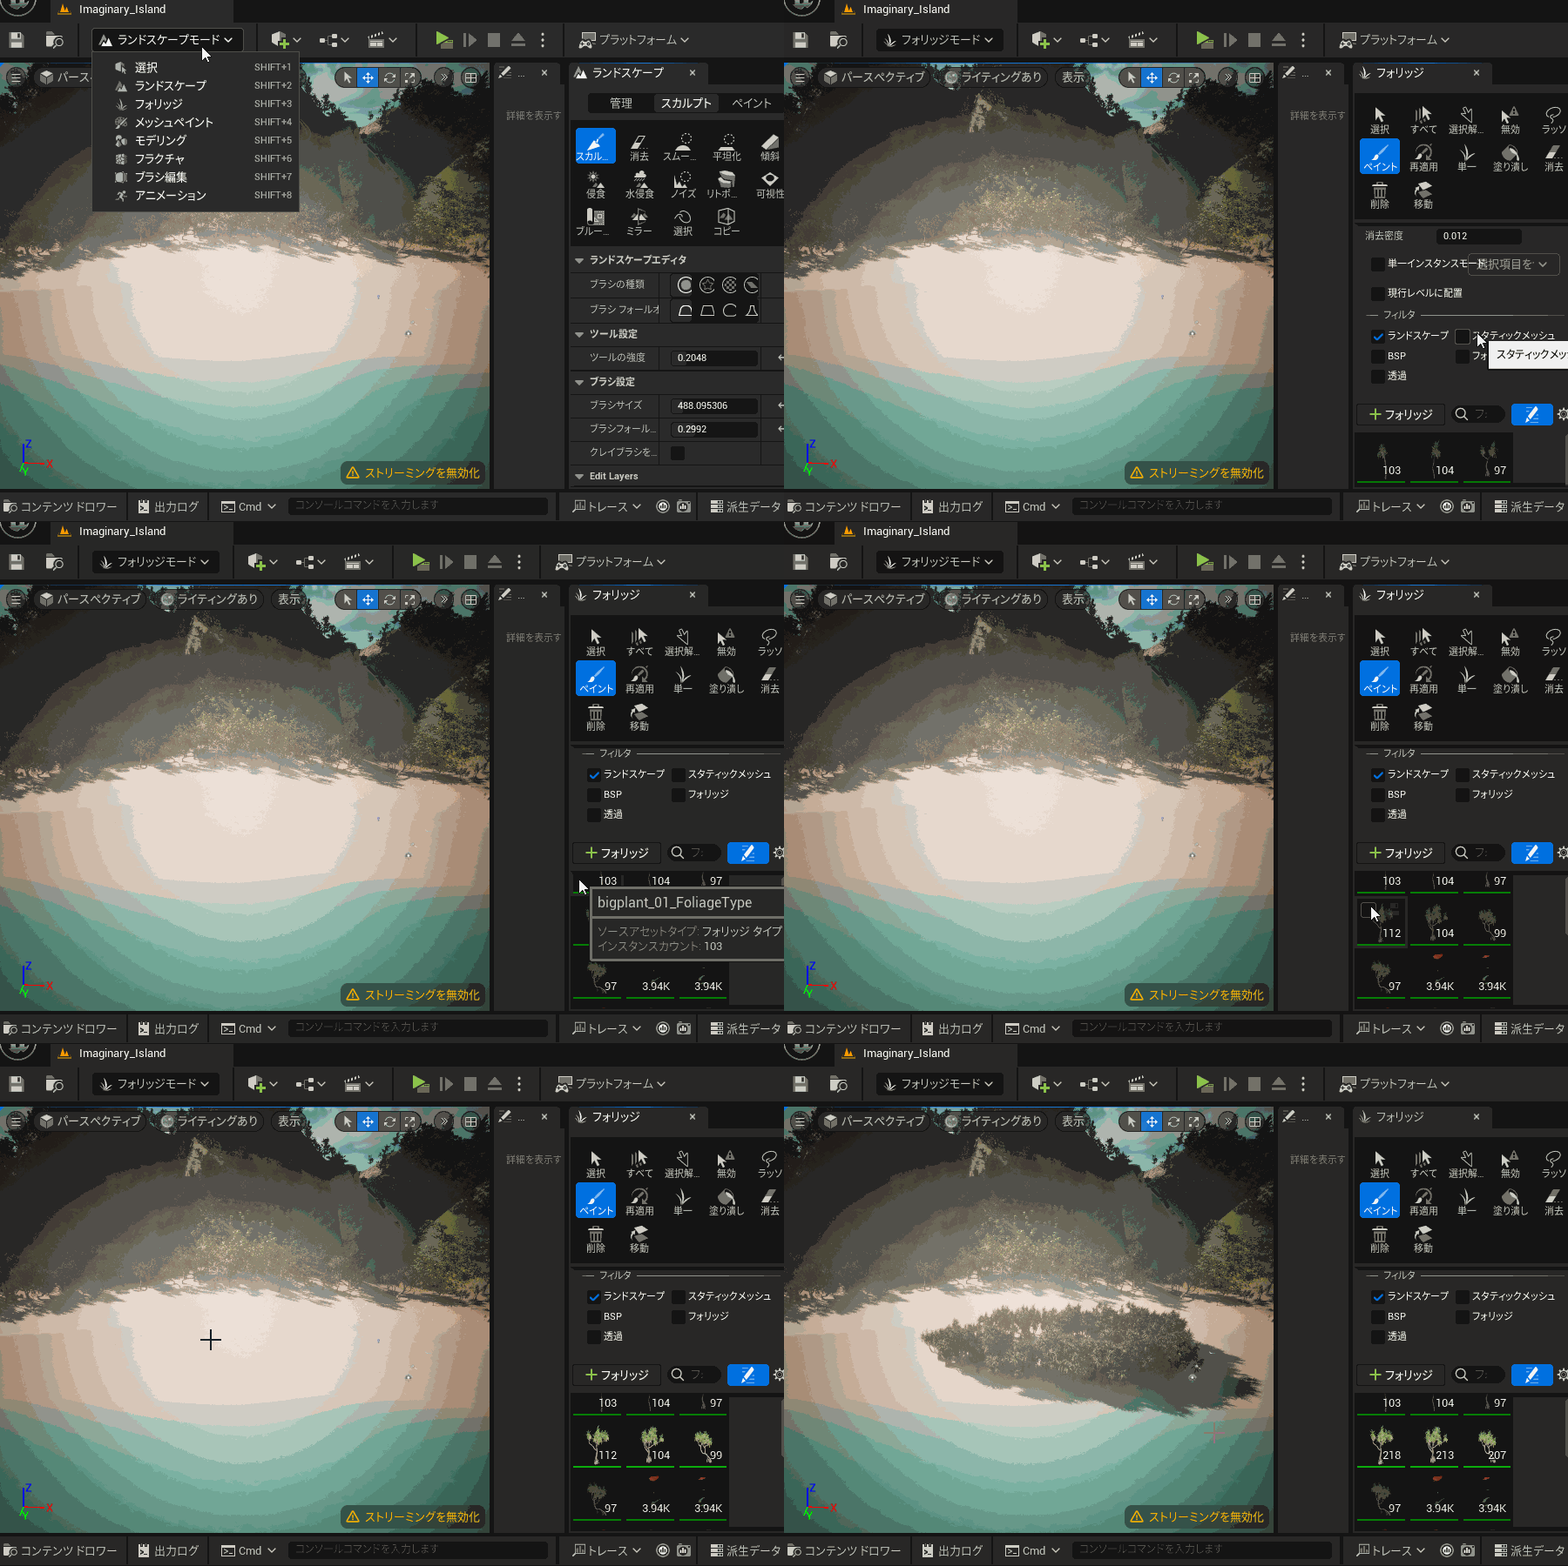
Running through the palm grove with Quinn is quite a spectacular sight!
Ocean
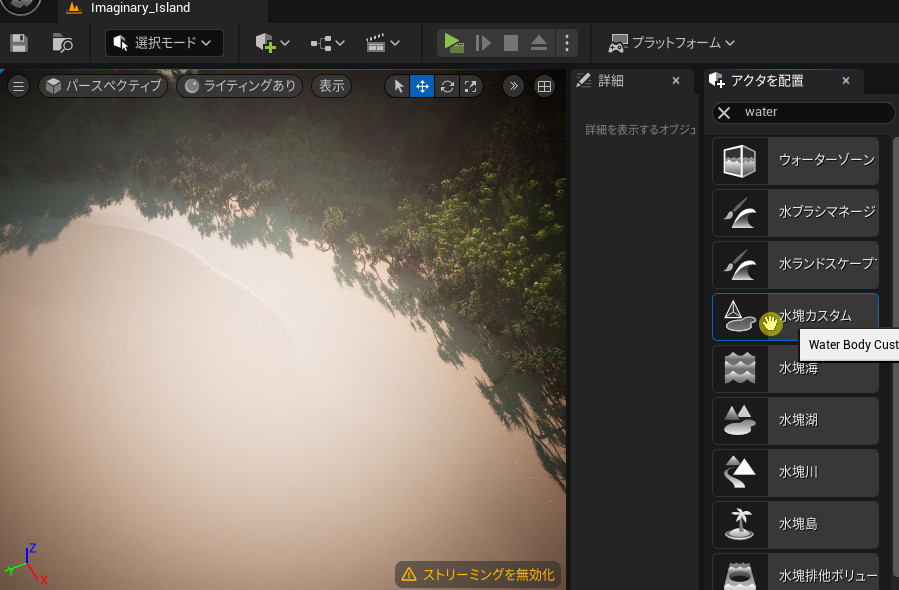
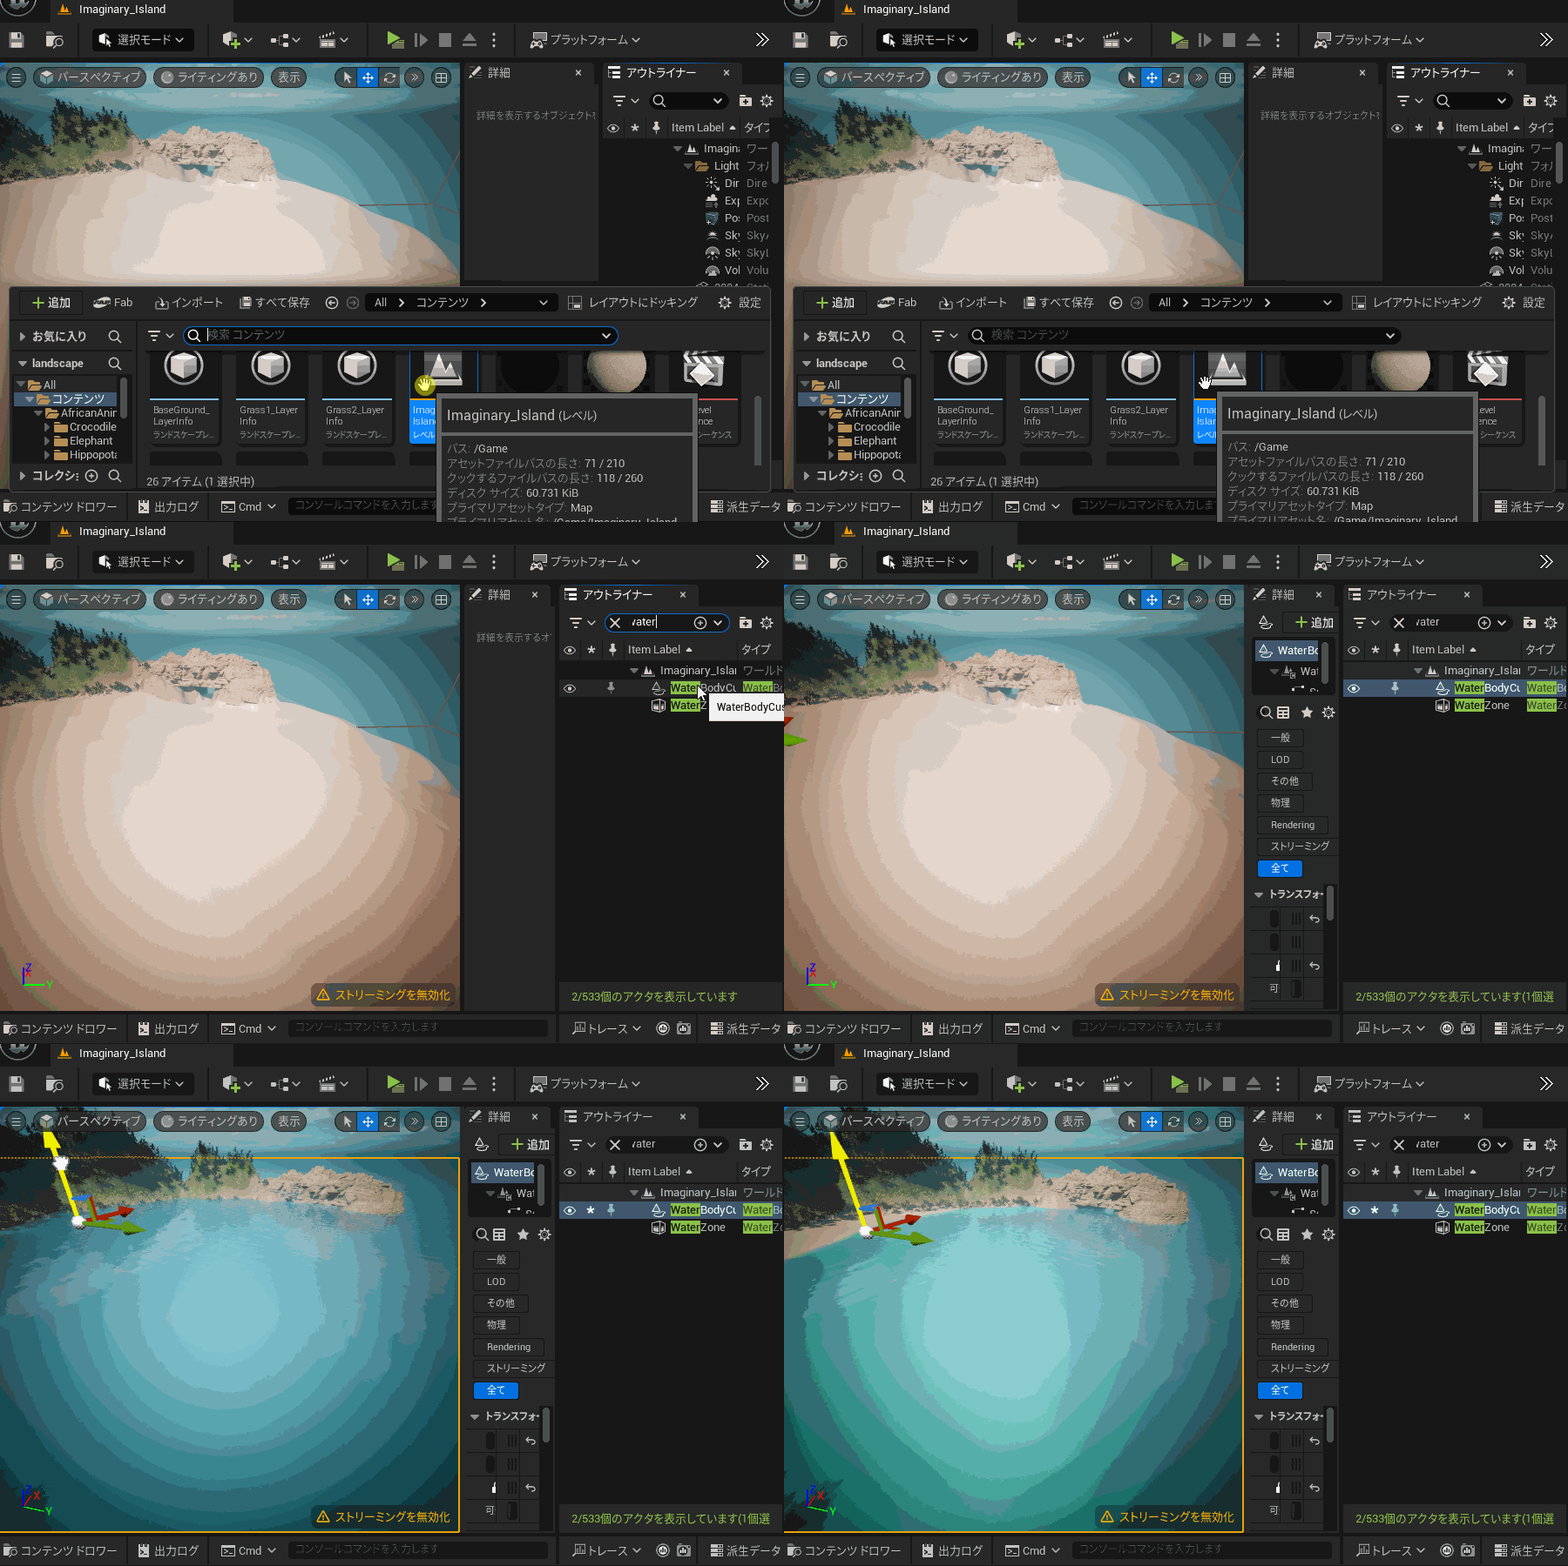
I added a realistic ocean actor as shown here.
By searching for “Water" in the actor addition panel, you can find the “Water Body Custom" actor, which can be dragged and dropped into the level.
If the actor doesn’t appear after being added, double-click the level to select it and adjust the position of the WaterBodyCustom to make it visible.
AD
Let’s Take a Walk Around the World
Once the world is complete, switch to gameplay mode and control Quinn to explore the world!
You can switch to gameplay mode by right-clicking on the spot where you’d like to place Quinn and selecting “Play from here".
Here’s how to control the game using a mouse and keyboard:
- W/S keys: Move forward/backward
- A/D keys: Move left/right
- Spacebar: Jump
- Mouse: Adjust the camera’s orientation and movement direction
Exploring the world in gameplay mode helps identify issues, such as assets floating unnaturally, making it easier to spot areas that need adjustments. Be sure to thoroughly explore and check every corner of the world!
Animation Rendering
For the final output, I rendered a video like the one below.
Note: The video includes sound.
The process followed to create the animation was:
Lighting → Post Processing → Camera Actor Placement → Sequencer → Finishing in Blender.
Here’s a brief overview of each step:
Lighting
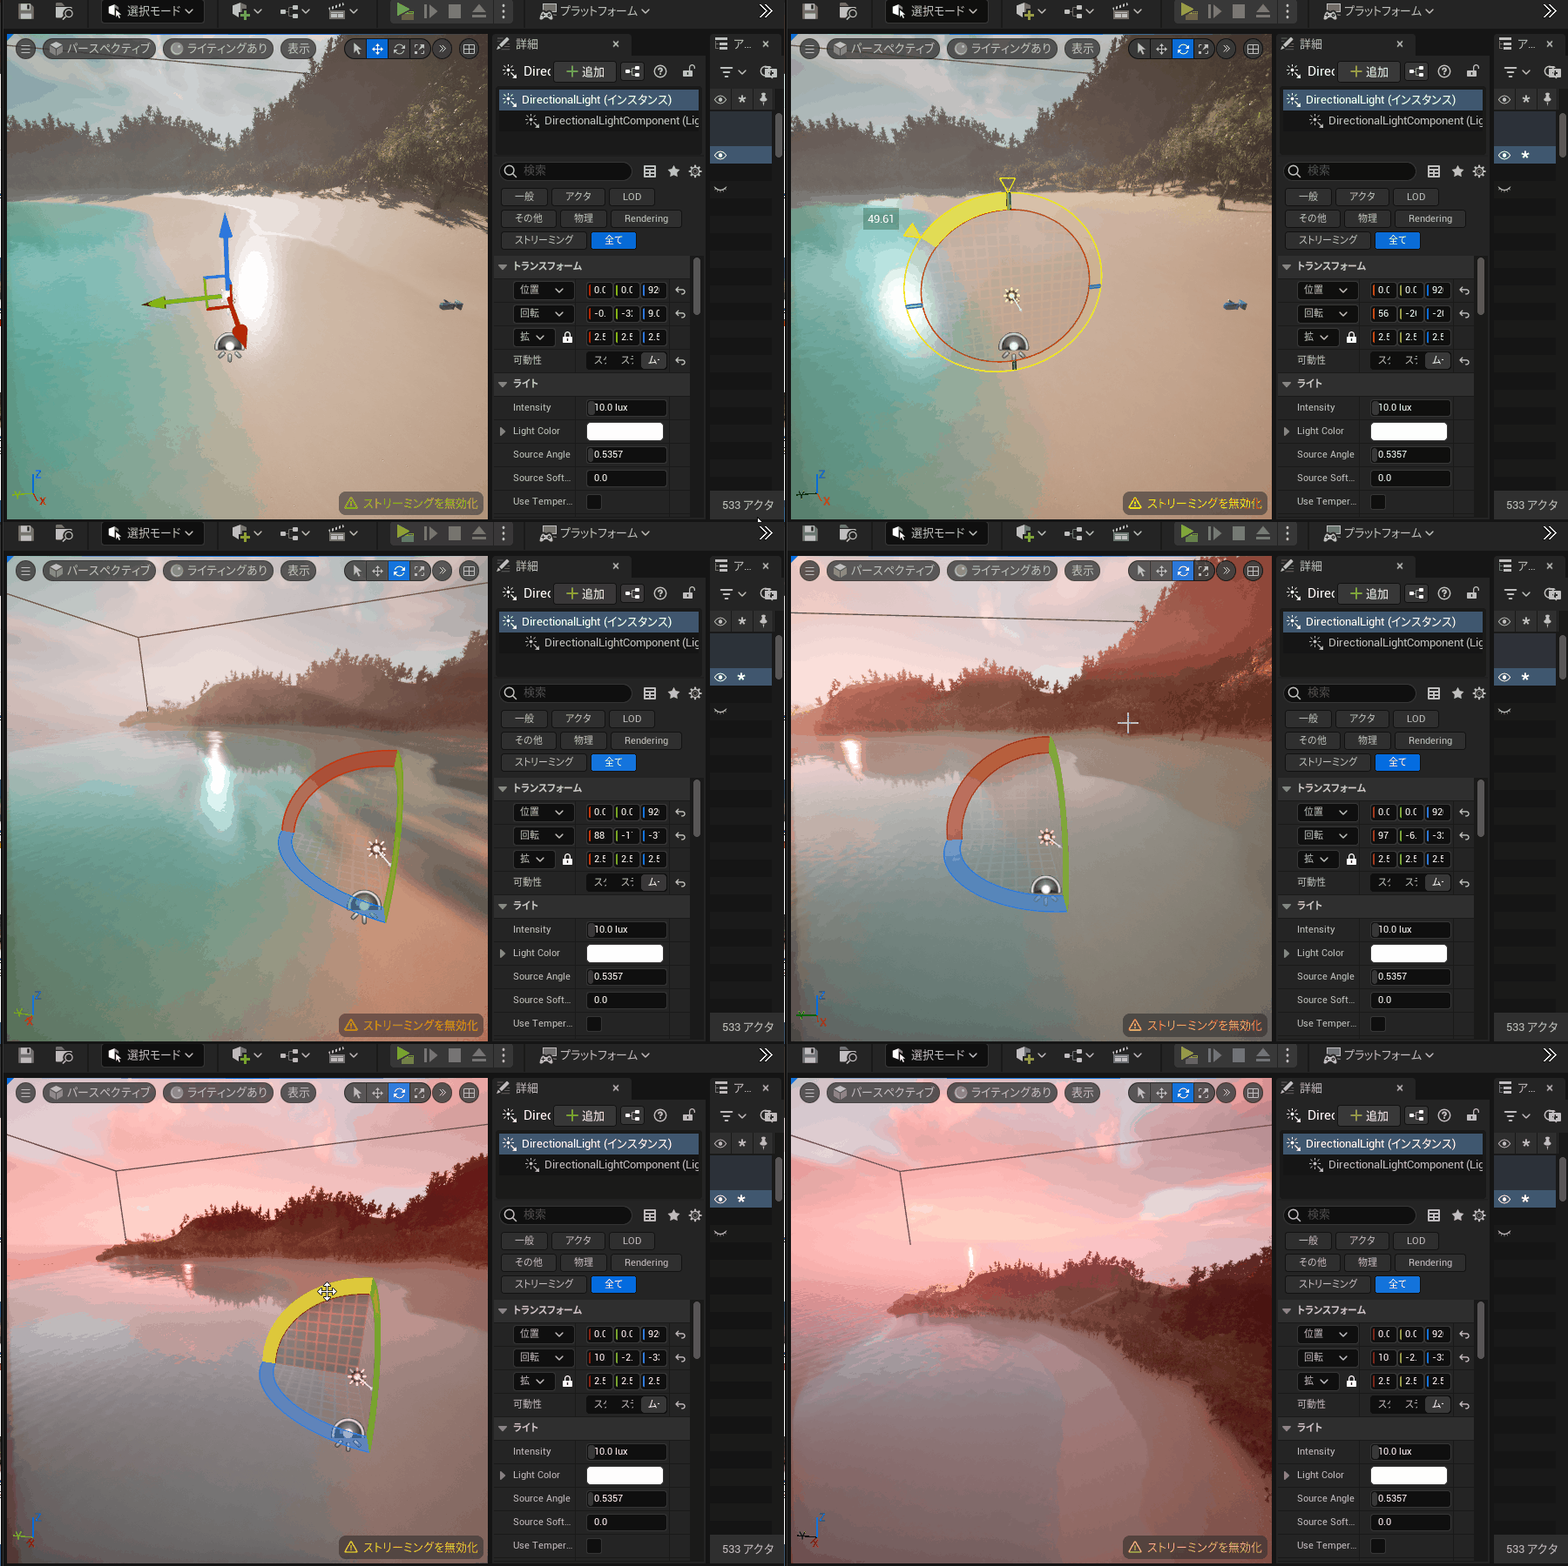
When creating a project in UE5, a Directional Light is automatically added. You can adjust the direction and intensity of this light to set the desired time of day and brightness.
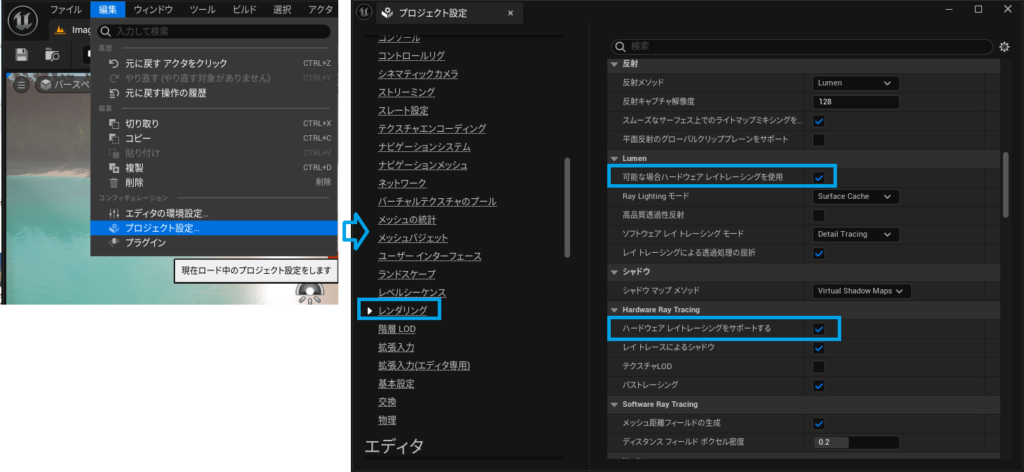
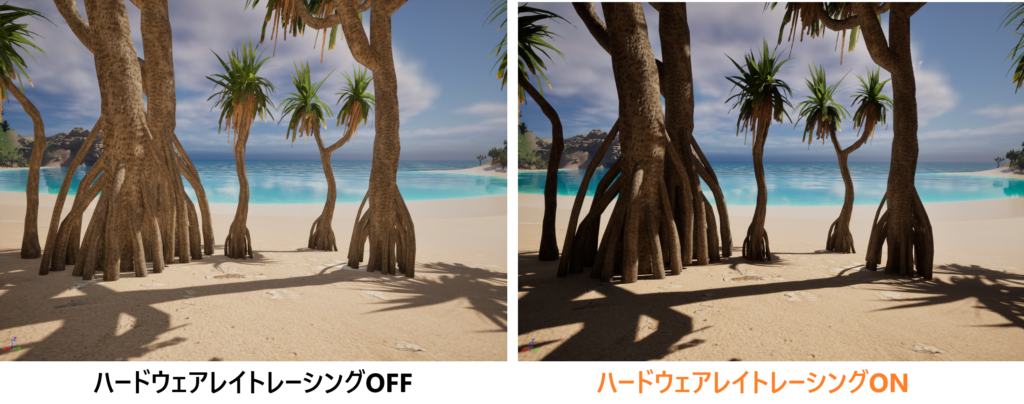
For more realistic shadows, it’s recommended to enable hardware ray tracing. You can do this by navigating to Edit → Project Settings → Engine – Rendering, and enabling Support hardware ray tracing and Use hardware ray tracing when available.
Post Process
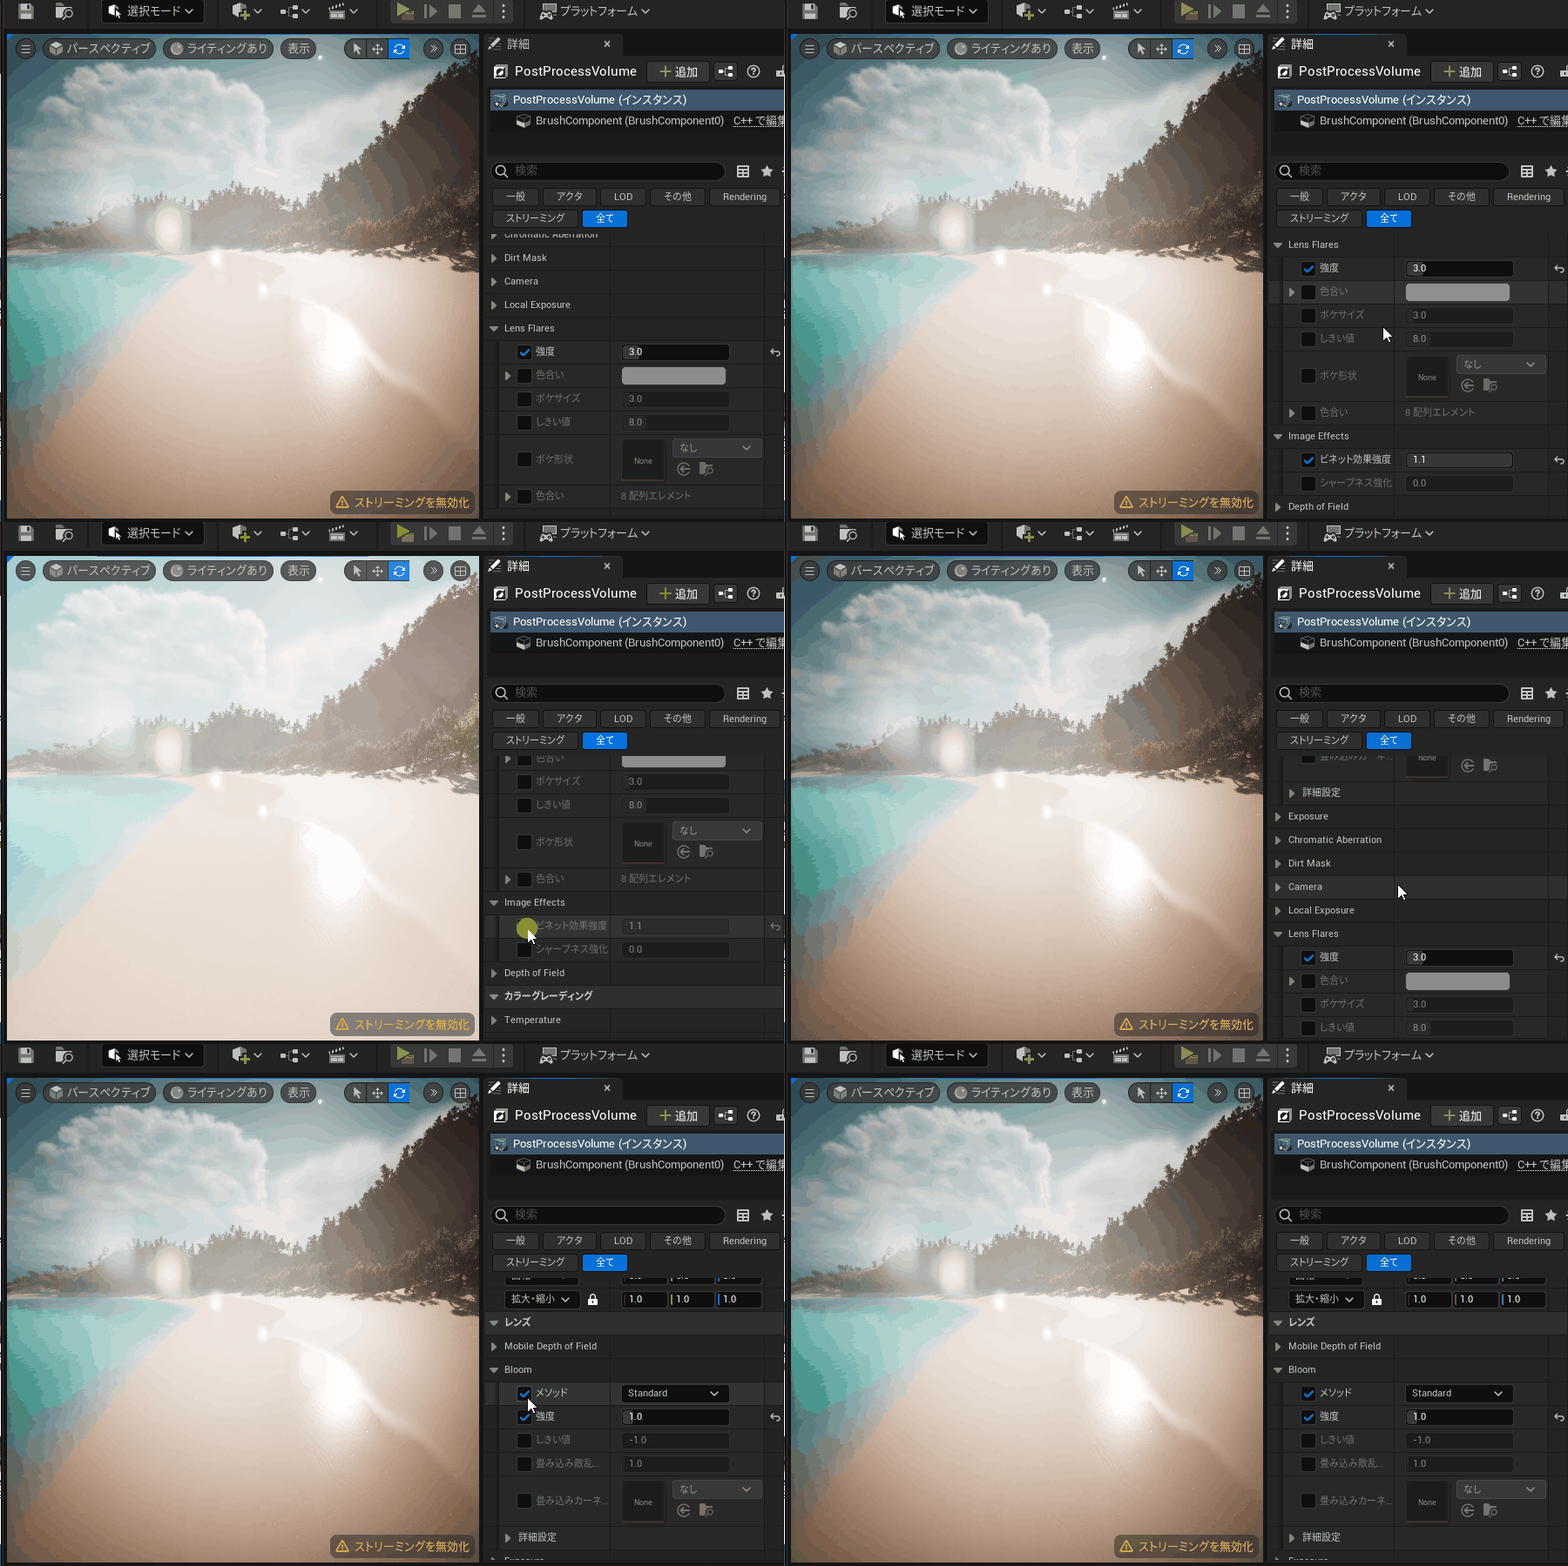
In UE5, you can edit the Post Processing Volume, which is automatically added when creating a project, to apply real-time effects like color grading, bloom, lens flares, and vignettes (darkening the edges).
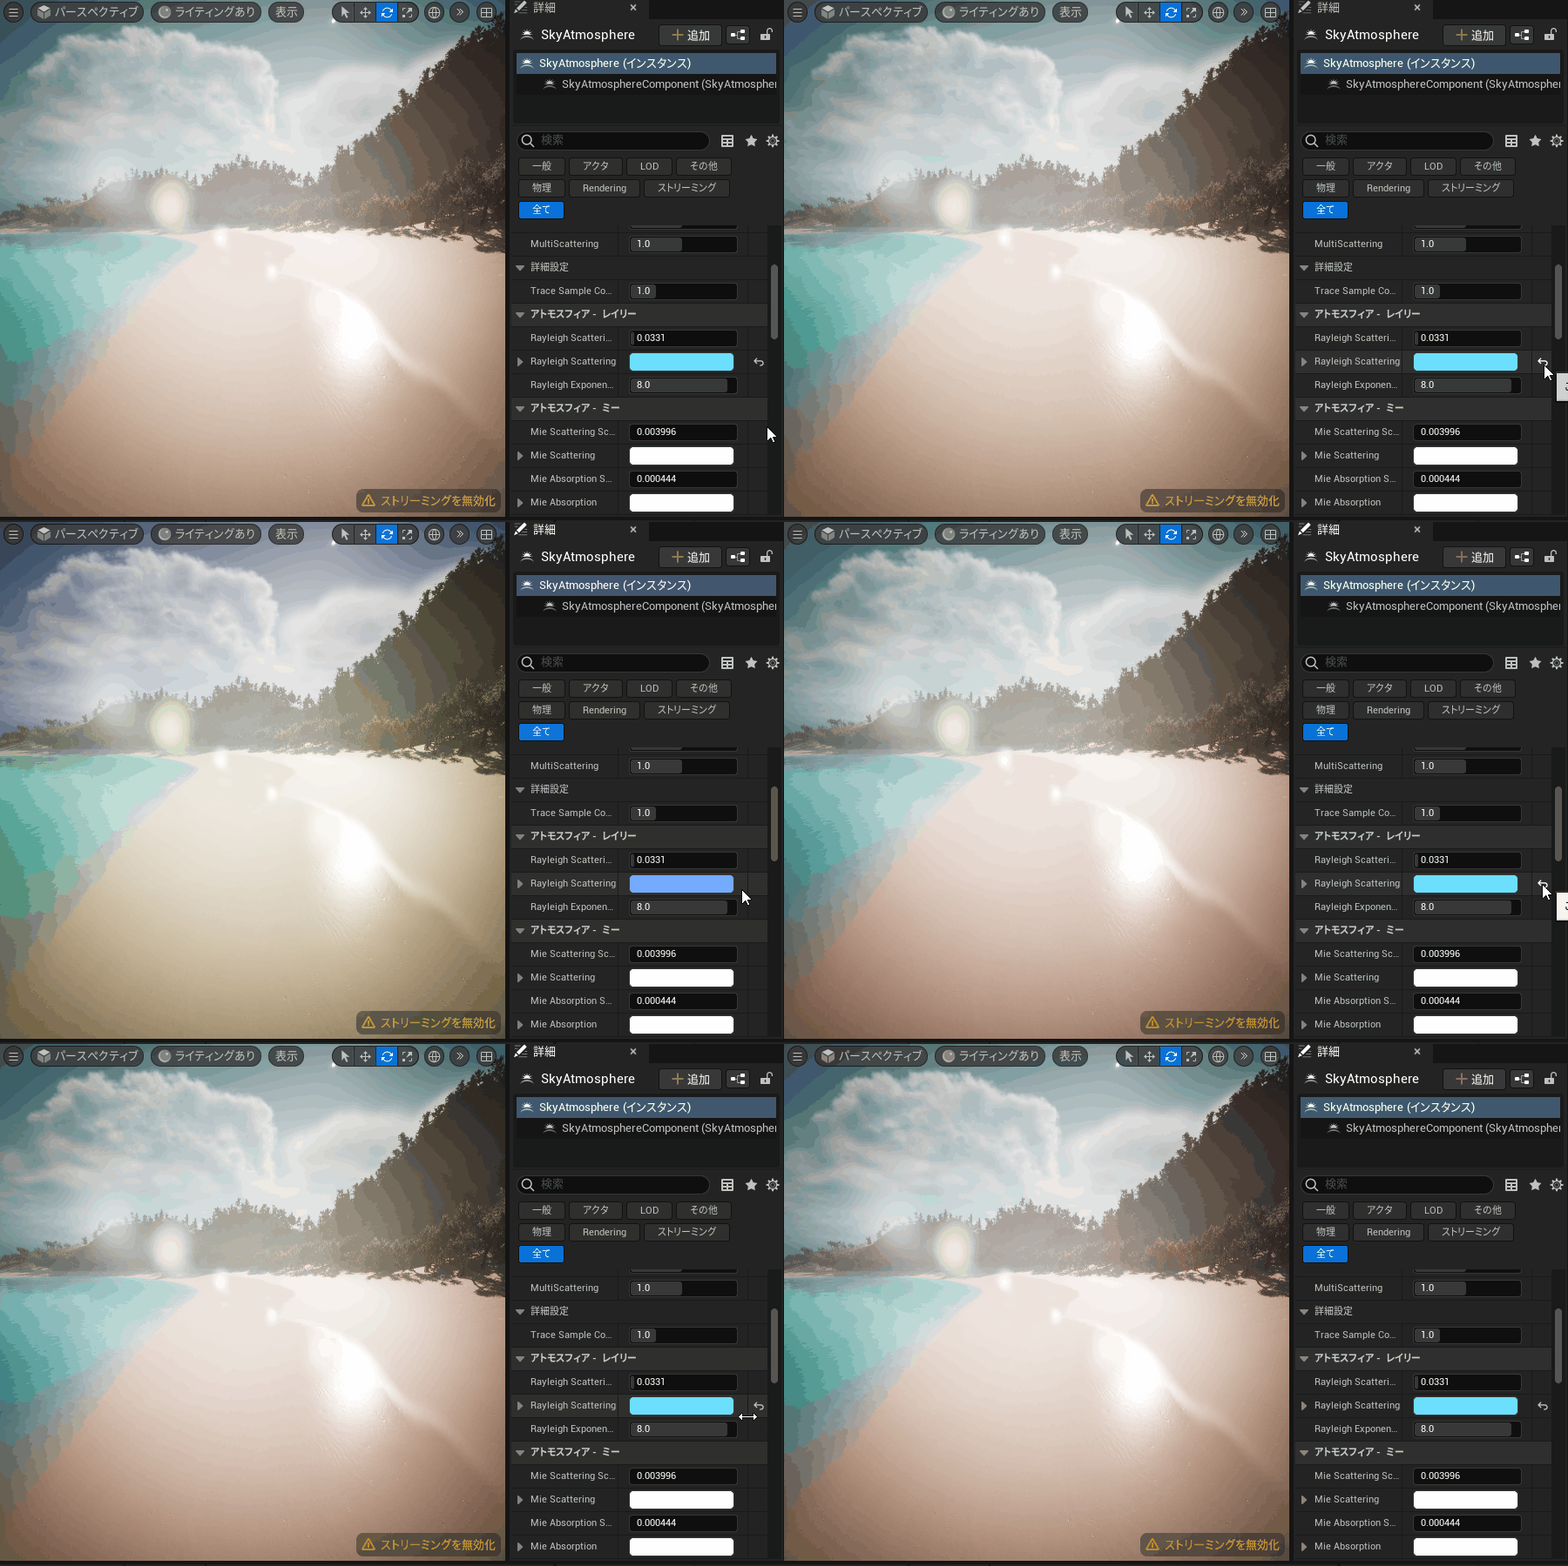
To emphasize the blue of the sky and sea, I adjusted the Rayleigh Scattering color in the Sky Atmosphere to give the entire scene a slightly blue tint.
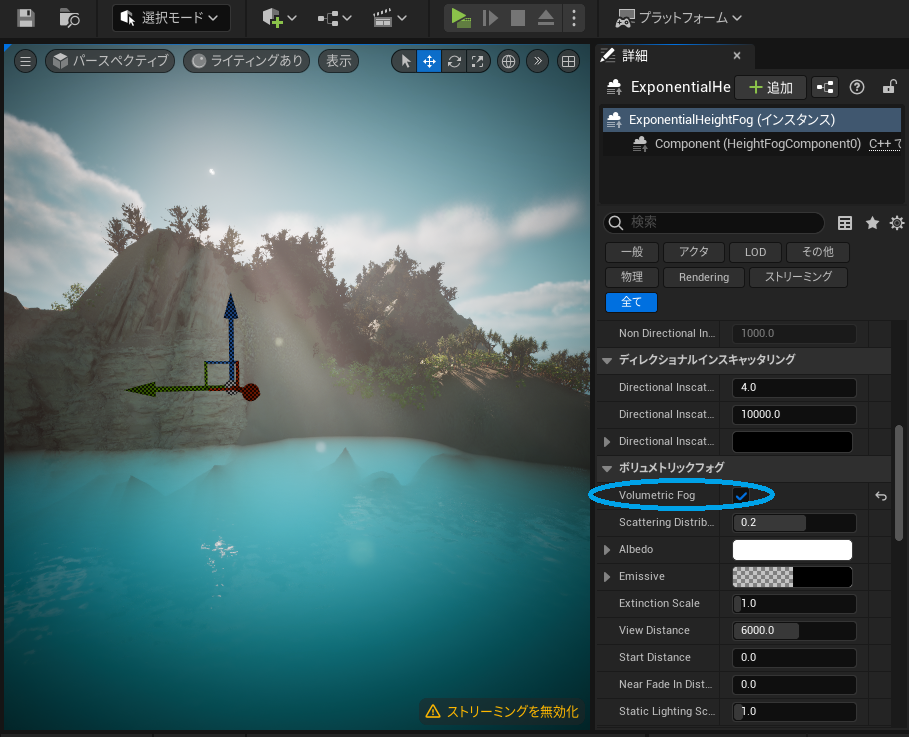
Additionally, by setting Volumetric Fog in the ExponentialHeightFog, I was able to easily create God Rays, which add a dramatic lighting effect, enhancing the atmosphere of the scene.
AD
How to Create a Camera Animation
Following the tutorial’s guidance, I created a camera animation by adding camera actors and a level sequencer, then animating the camera switches through keyframes.
- Add Camera Actor
- Add Camera Animation
- Assign Camera Cuts
- Repeat the Process
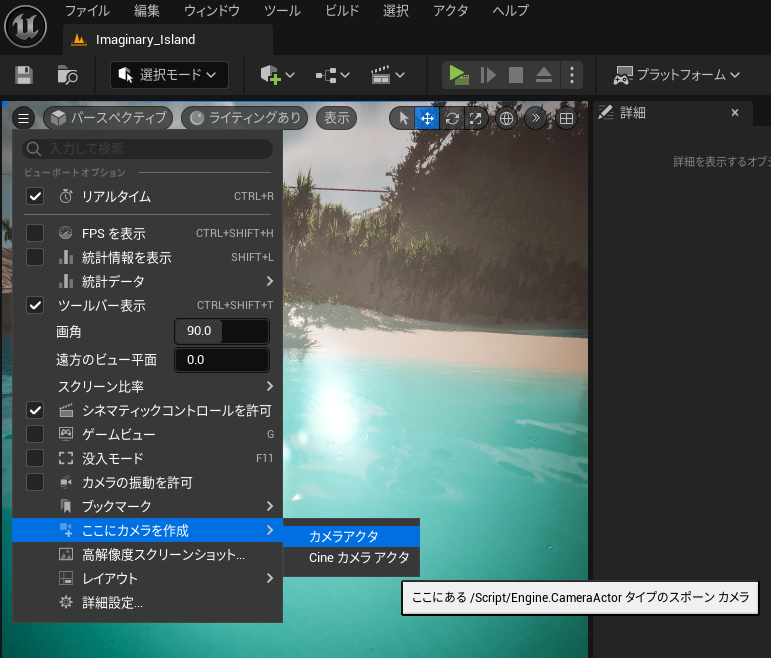
In the viewport, select the icon at the top-left corner![]() and click “Create Camera Here" to add a camera actor to the scene.
and click “Create Camera Here" to add a camera actor to the scene.
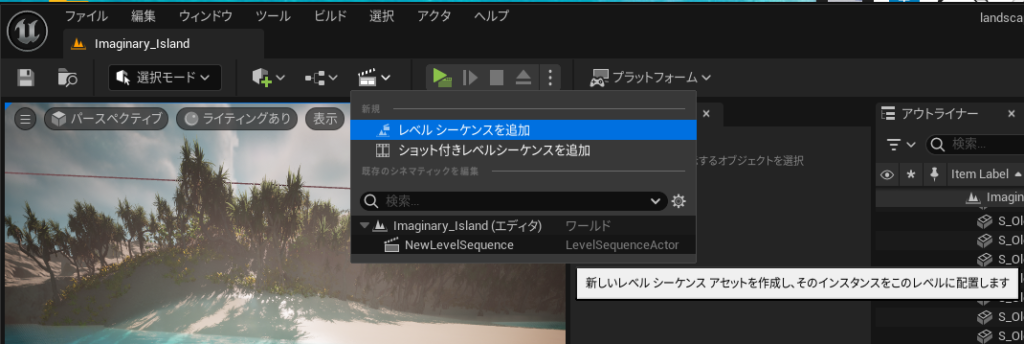
Add a level sequencer by clicking the icon ![]() → “Add Level Sequence". This will allow you to animate the camera.
→ “Add Level Sequence". This will allow you to animate the camera.
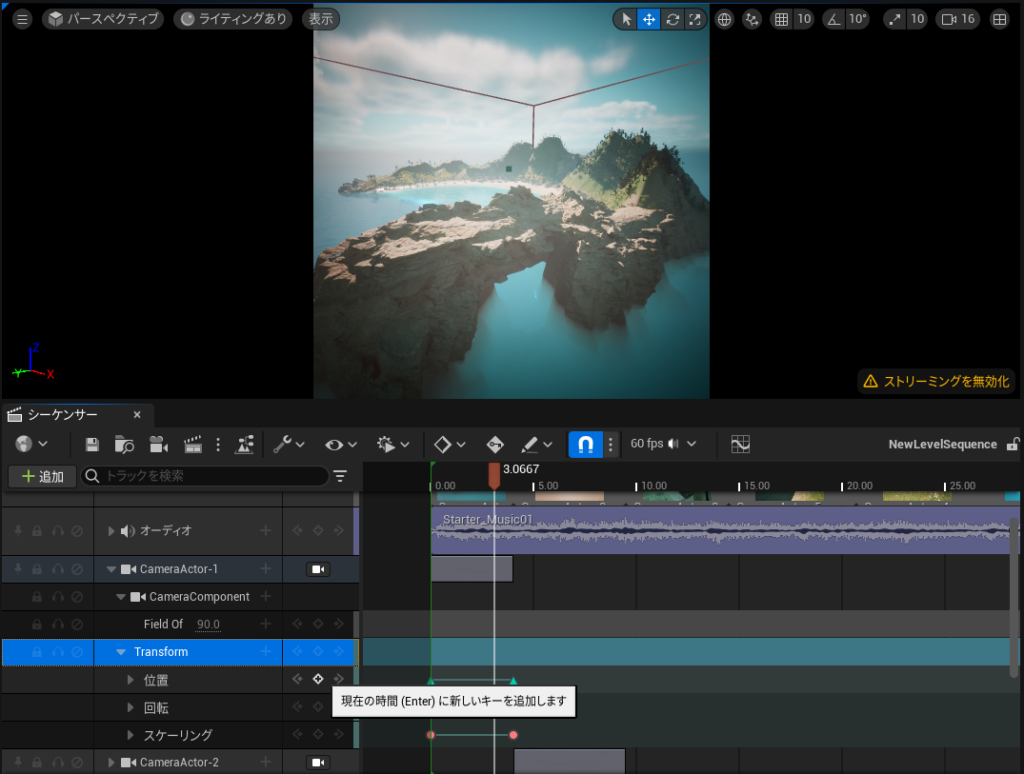
Use the sequencer to add keyframes, similar to how you would animate in Blender’s Graph Editor.
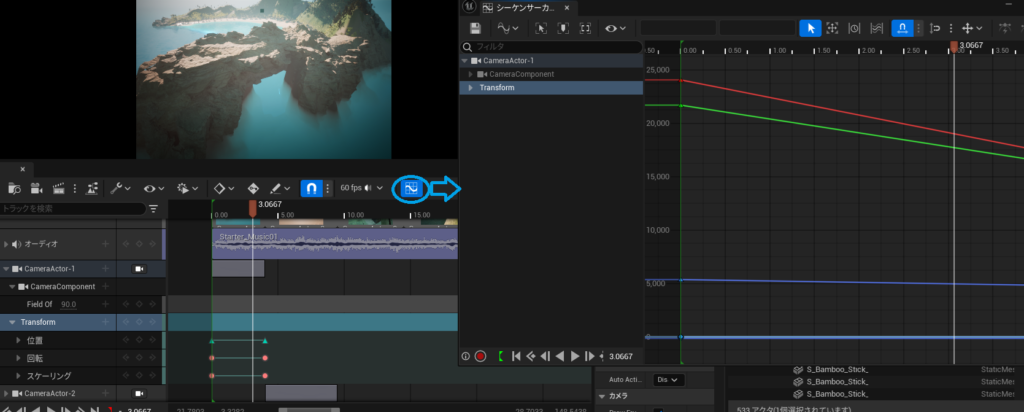
You can adjust the curves and the interpolation of the keyframes using the Sequencer Curve editor.
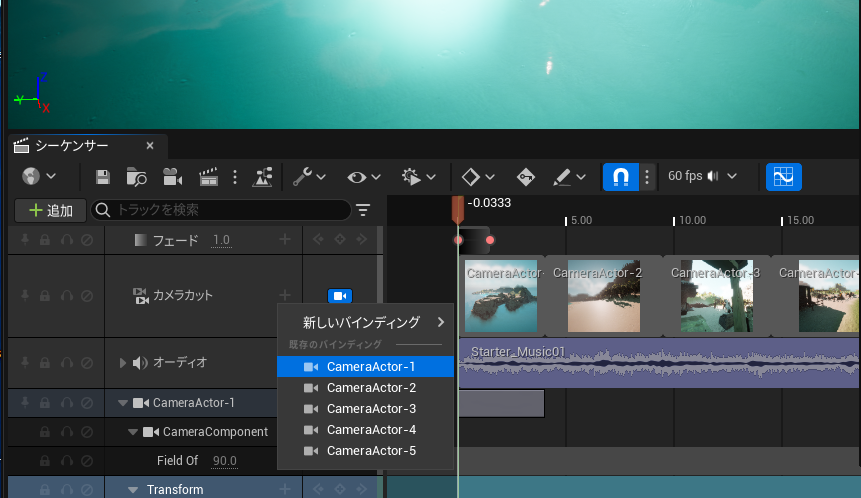
After creating the camera animation, assign each camera to the Camera Cuts sequence. This will set the switching between different cameras during the animation, based on the keyframes in the sequencer.
Adding Audio Tracks and Fade Effects
In UE5, you can add audio and fade tracks by selecting “+ Add" in the sequencer.
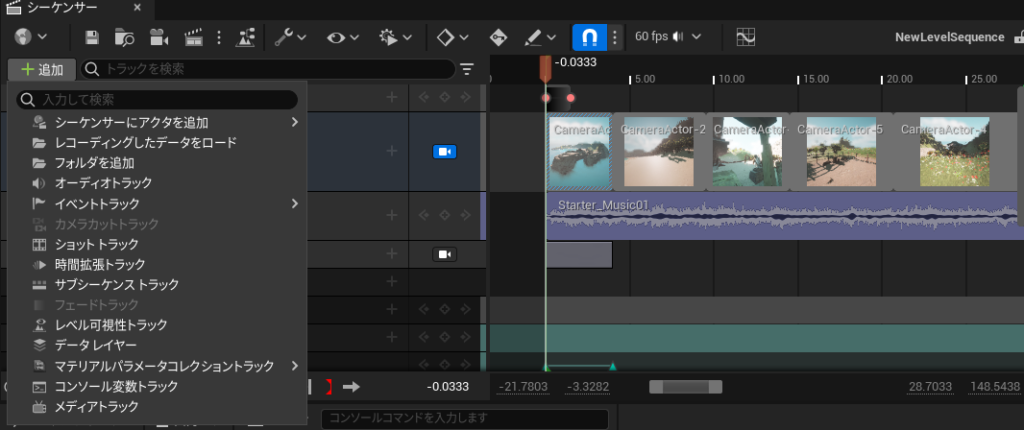
I set a fade-in and fade-out of about 1.5 seconds at the beginning and end of the video on the “Fade" track.
Additionally, I added the “Starter_Music01" audio from the Starter Content to the “Audio" track.
Rendering the video can be done by setting the output format in the sequencer’s icon ![]() and using the “Movie Capture."
and using the “Movie Capture."
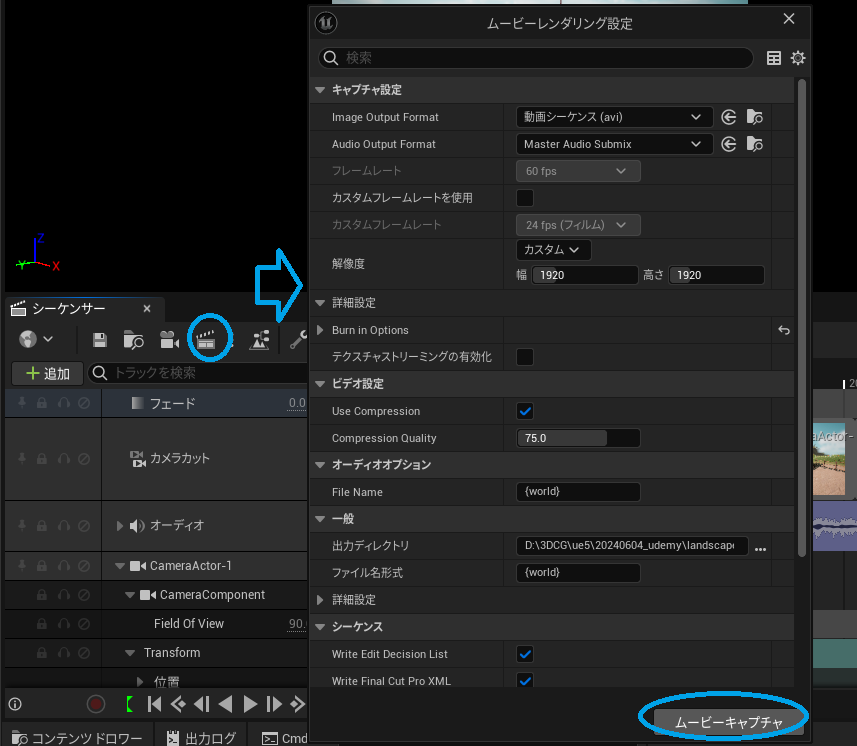
Since the video and audio are output as separate files, I performed the following steps in Blender’s Video Editor:
- Adding opening and ending screens
- Exporting the video with audio as an MPEG4 file
I imported the AVI (video) and WAV (audio) files from the output of UE5 into the sequencer and added an opening (UE5 official video logo) and credits at the end.
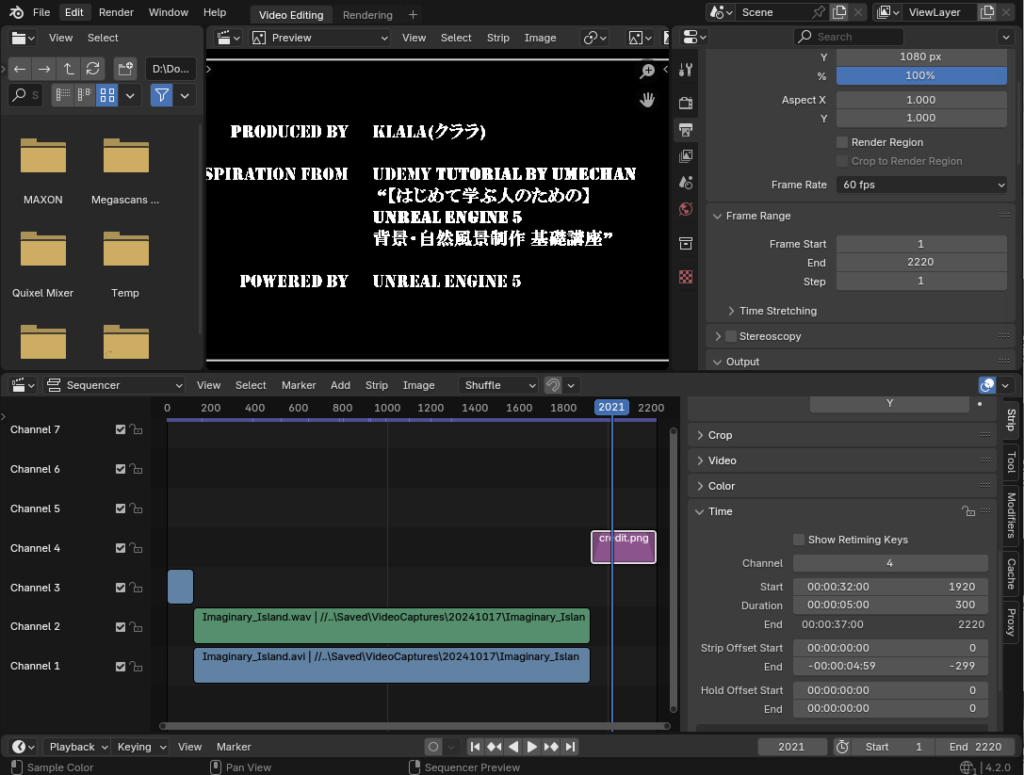
In the end, I was able to create a short movie like the one shown!
Reflection and Summary
This time, I documented what I learned while creating a “fictional island" world and rendering a video, incorporating my own unique arrangements along the way.
I also briefly introduced the method of adding assets using the newly added “Fab" addon.
By taking “Ume-chan’s" Udemy course, “Unreal Engine 5: Background & Natural Landscape Production for Beginners," you can learn the entire process of creating landscapes, adding assets, working with textures and materials, lighting, and rendering in UE5.
If you’re looking to start video production using UE5, I highly recommend considering this course.

AD
