【Blender 2.93】Anko Modeling (Yomogi Dango) [Memo]
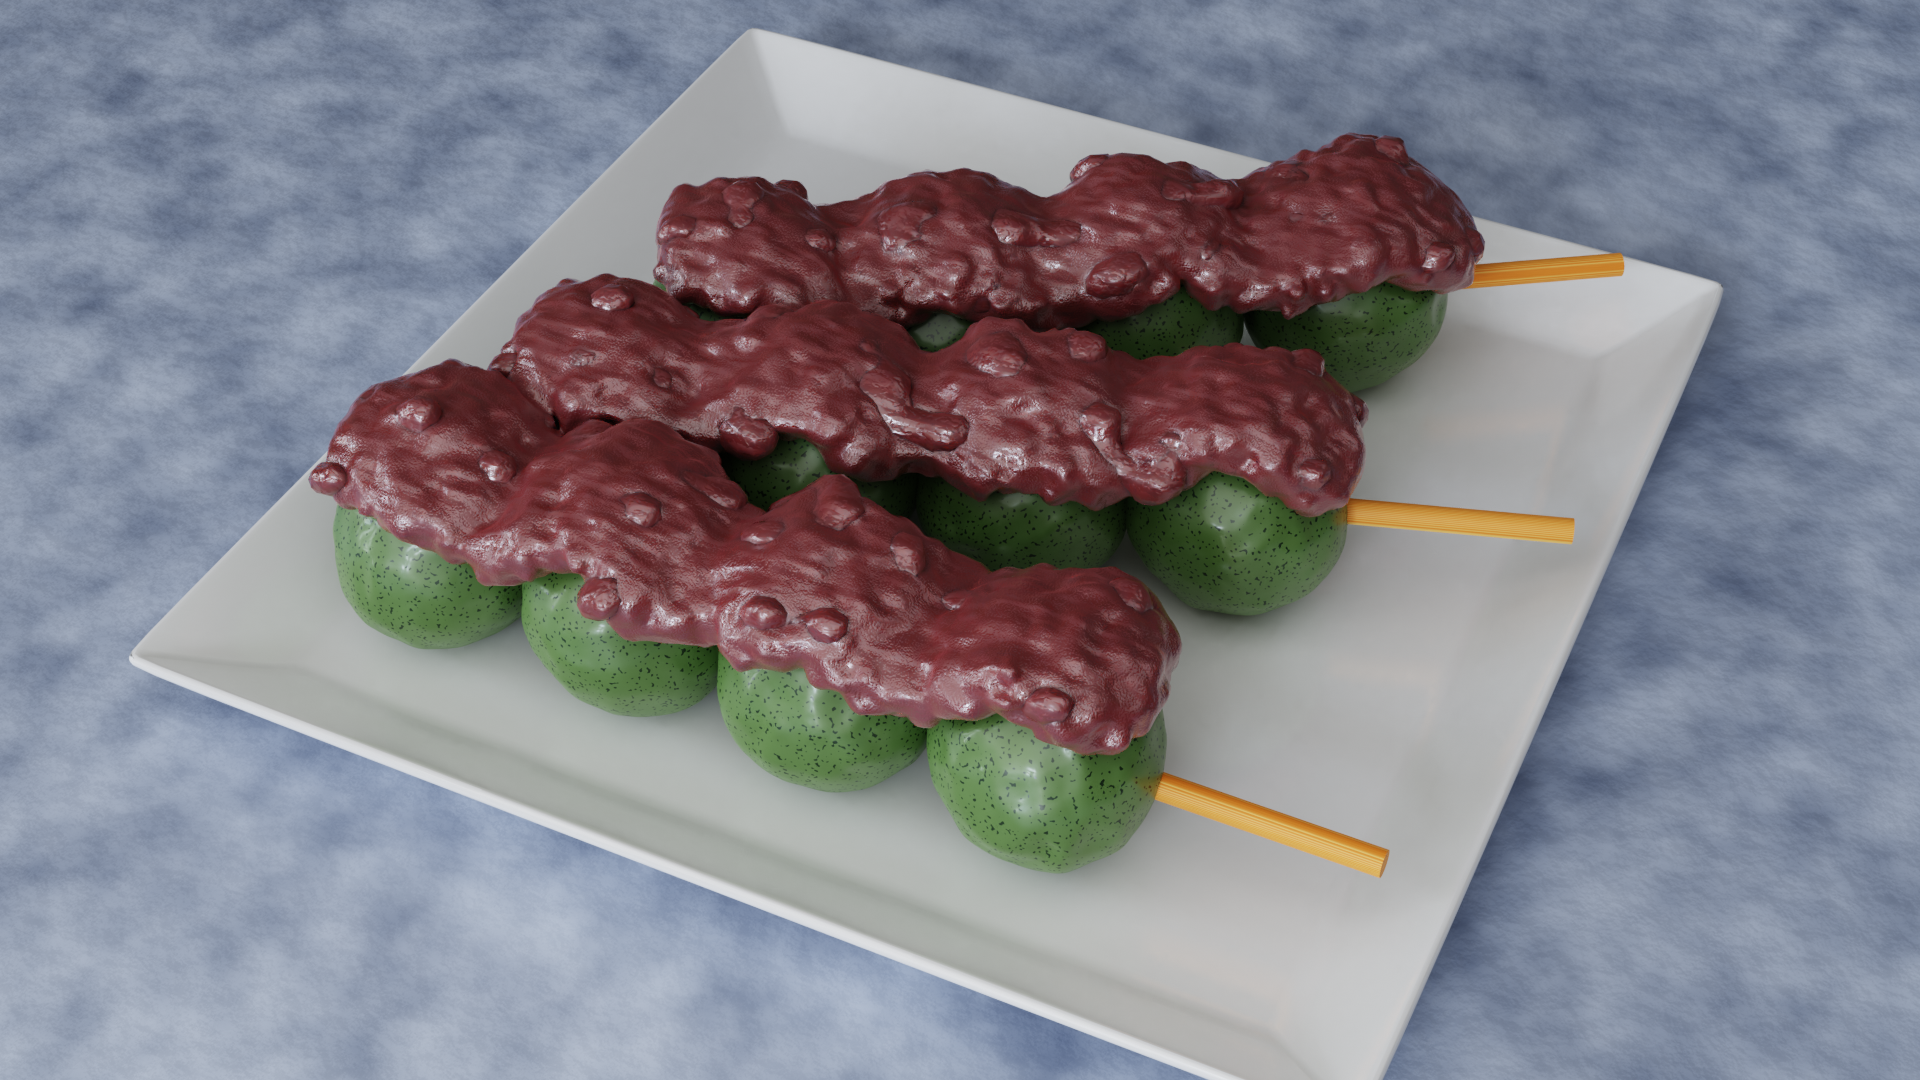
I’ve compiled how to create anko (sweet red bean paste) using 3DCG (Blender) for future reference.
This article primarily explains the modeling of anko, but I will also include additional details on how to make yomogi dango (mugwort rice dumplings).
If you have any feedback or questions, feel free to reach out to me on Twitter at https://twitter.com/klala_lab (^^)/
今週はバタバタしてたので、久しぶりのBlenderです🖥
— クララ/Klala (@klala_lab) July 10, 2021
お団子愛好家から「あんこのボリューム感が足りない」と再び指摘を受けたので、子パーティクルの半径を設定して厚みをもたせました🍡
まだまだ改善点はありそうですが、一応完成とします😅
あんこは色々と応用できそうです🤔#b3d #blender #3dcg pic.twitter.com/PGvrkOCX3T
AD
Purpose of the work
I took on the challenge of the 7/4 limited theme “Dango on Skewers" for the “SuddenModelingCompetition" (#突然だけどモデリング大会).
While searching for appetizing images of dango, I came across “Yomogi Dango" (mugwort rice dumplings) from the long-established Japanese sweets maker “Fudo Kaan Haraya" in Shizuoka. I decided to use it as a model for my work.
Although I searched for modeling methods for anko (sweet red bean paste), I wasn’t able to find much useful information, perhaps due to my lack of search skills 😅
So, I decided to try my hand at creating anko using particles in my own unique way.
By the way, if you search “Blender anko recipe," you’ll find many real-life methods for making anko using a mixer, which may trigger hunger, so be cautious… 😅
Methods Used
- Particles (Metaballs)
- Cloth Simulation (Emitter)
- Material Nodes
Creation Process
Below is an overview of the creation process. Each step will be explained in detail.
-
Anko (Sweet Red Bean Paste)
- Creating the Emitter
- Creating the Instance Object
- Particle Settings
- Creating Materials
-
Yomogi Dango
- Creating the Mesh
- Creating Materials
Anko (Sweet Red Bean Paste)
To express the grainy texture of anko, I used Blender’s built-in “Particle" system.
The “Particle" system is a feature in Blender that allows objects to be emitted from an emitter (source). I introduced this method in my previous article, Creating an Animation of Rolling Lemons.
There are two main types of particle settings: “Emitter" and “Hair".
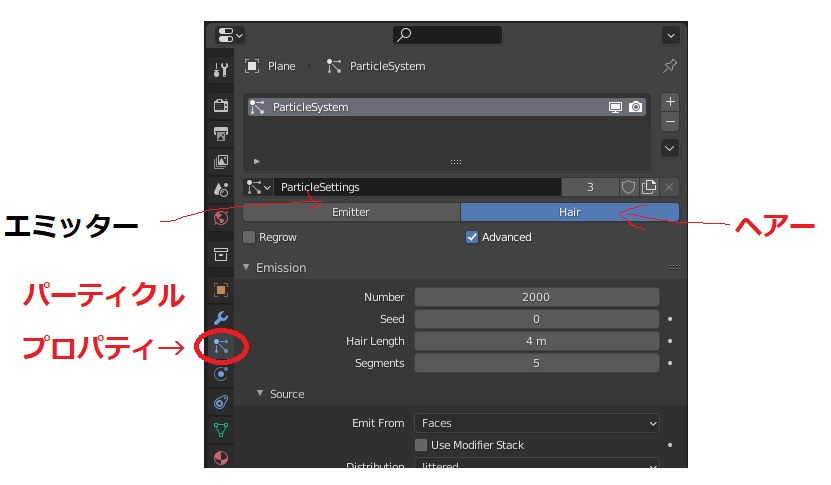
For the Rolling Lemons animation, I used the “Emitter" (where objects are emitted from a surface). However, this time I used “Hair" (where objects grow from the emitter but are not emitted).
Since anko is a collection of azuki beans, I decided to express this by having beans grow from the surface of the emitter.
Additionally, to represent the crushed and mushy texture of the beans, I used “Metaballs" as the instance object. Metaballs have the property of sticking together when they get close to each other. (I also used Metaballs in my previous article, Modeling Cumulonimbus Clouds)
In this section, I will explain how to create the Emitter, Instance Object, Particle Settings, and Materials for the anko.
Creating the Emitter
Before creating the anko, we need to prepare a mesh for the surface on which the anko will be placed.
For this, I created a dango (rice dumpling). (The method for creating the dango will be explained later in the article.)
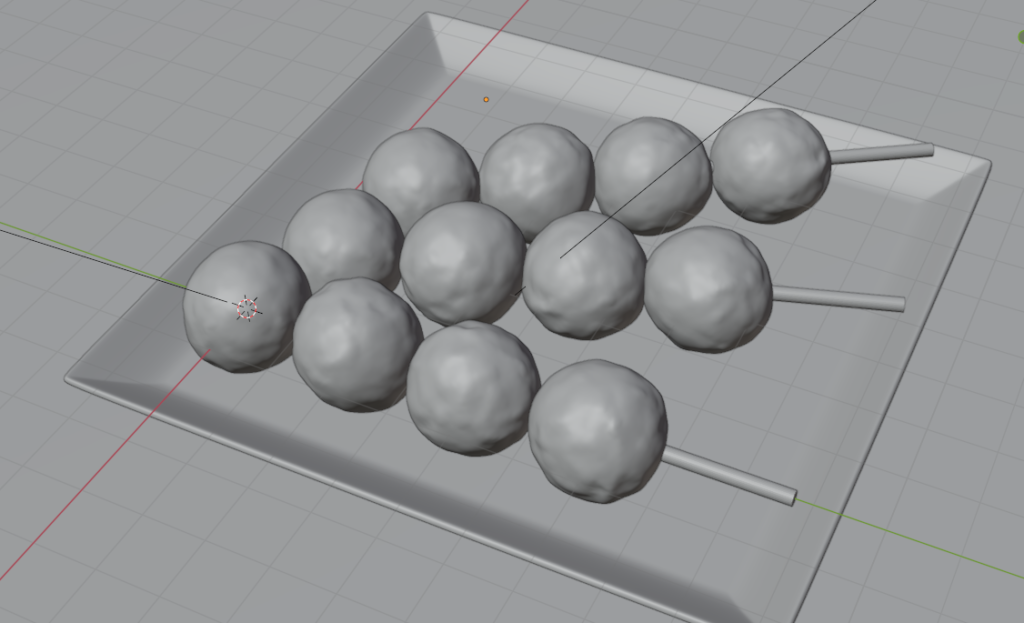
It’s perfectly fine to simply place a square mesh on top of the dango as the emitter (the source of the particles).
However, to better represent the “gooey" texture of the anko, I used cloth simulation to deform the emitter.
Here are the steps for the cloth simulation:
-
Create a square mesh and subdivide it
-
Set the collision for the dango
-
Set up the cloth simulation for the square mesh
-
Apply the cloth modifier
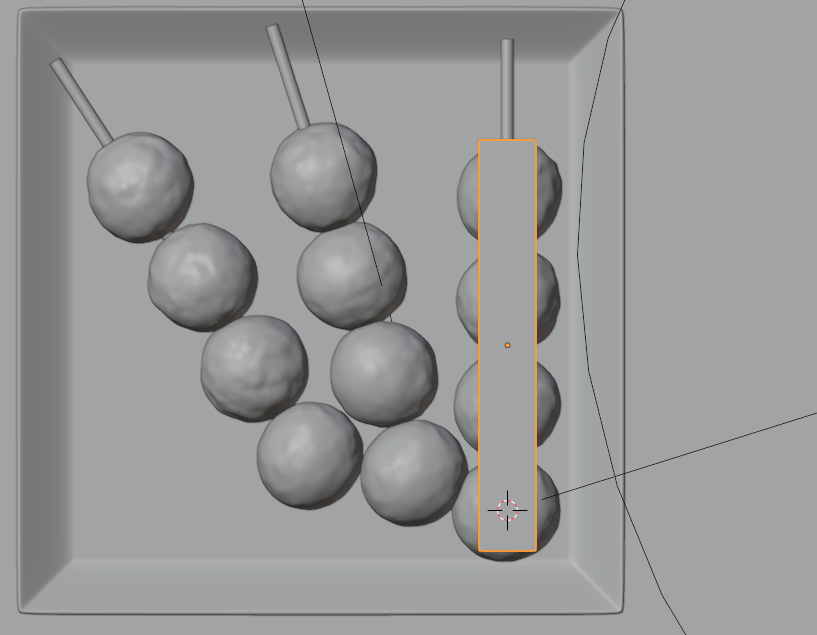
Stretch the square mesh along the stick (skewer) to match the shape, making it slightly smaller than the diameter of the dango.
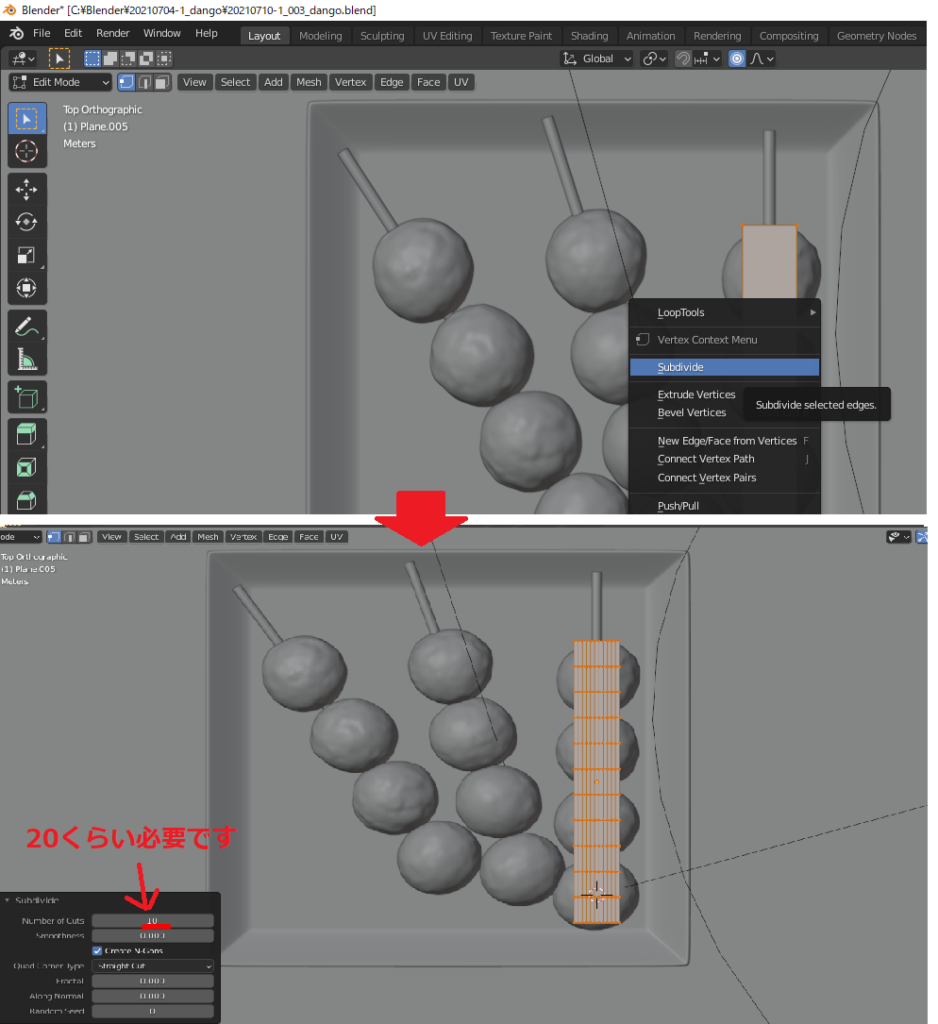
In Edit Mode, right-click and select Subdivide, then in the menu at the bottom-left, set the number of subdivisions to around 20.
Before performing the cloth simulation with the square mesh, we need to set up “collision" for the dango. Without this setting, the square mesh will pass through the dango.
Select the dango object, and in the Physics Properties, click on Collision to activate it. The default settings are fine.
It’s necessary to set the collision for each individual dango, which can be a bit tedious… 😅
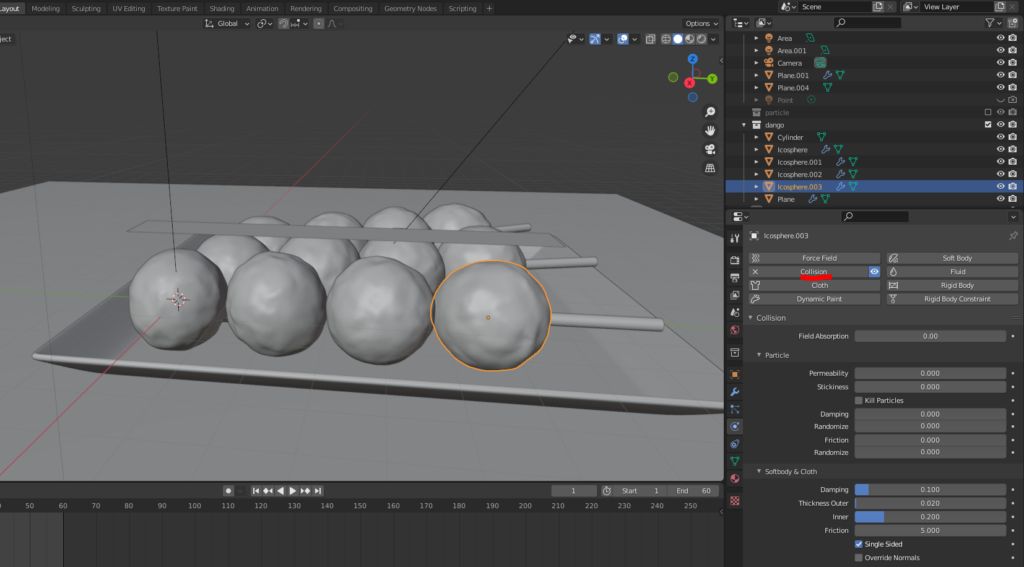
After setting up the collision for the dango, select the square mesh and in the Physics Properties, click Cloth to apply the cloth simulation.
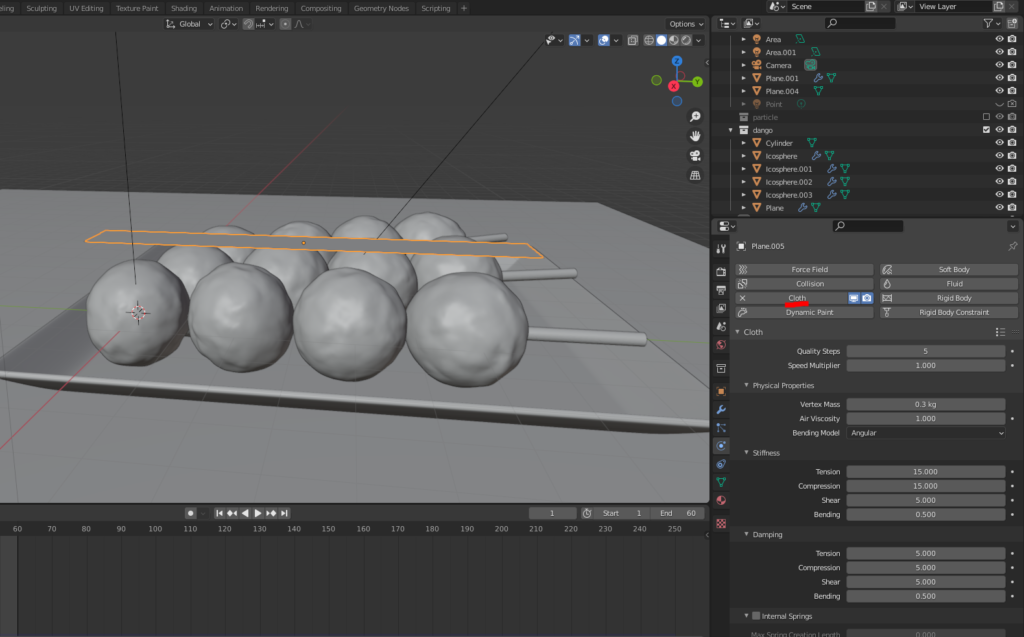
If the square mesh has sufficient subdivisions, the square mesh will deform as it falls and conforms to the dango mesh without needing any preset settings.
If the mesh doesn’t have enough subdivisions, the square mesh might not deform properly and result in a stiffer, less realistic anko. 😅
After the cloth simulation is complete, select the desired frame and go to the Modifier Properties → Cloth → Apply to apply the deformation of the mesh.
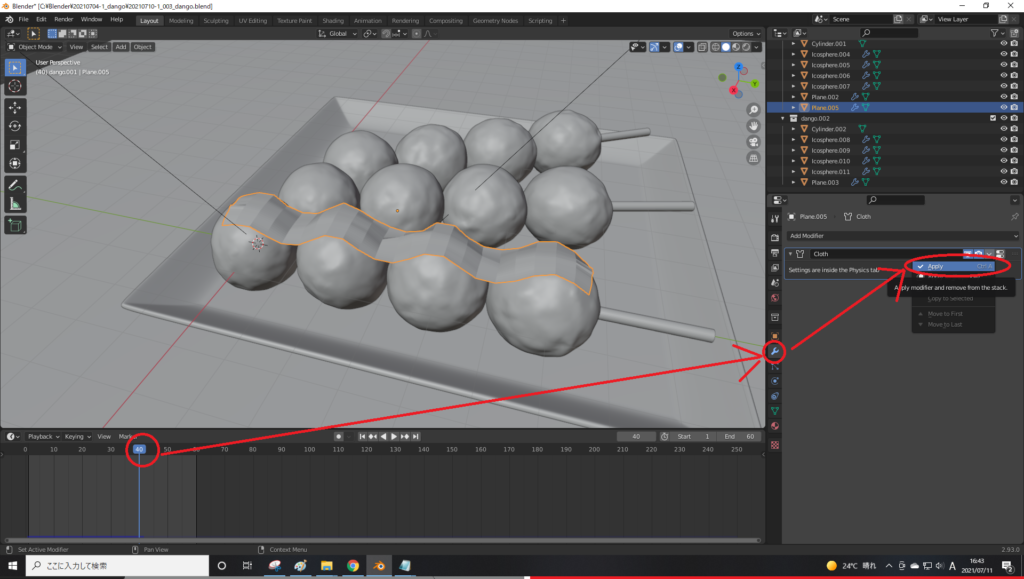
At this point, the emitter mesh is ready!
Creating Instance Objects
Next, we create the instance objects for the particles that will be emitted from the emitter.
To represent the “anko" (sweet red bean paste), I prepared two types of objects. (For “smooth anko," only the first one might be necessary.)
①Large Metaball: This represents the whole beans that remain without being mashed into a paste.
②Small Metaball: This represents the gooey, stirred anko.
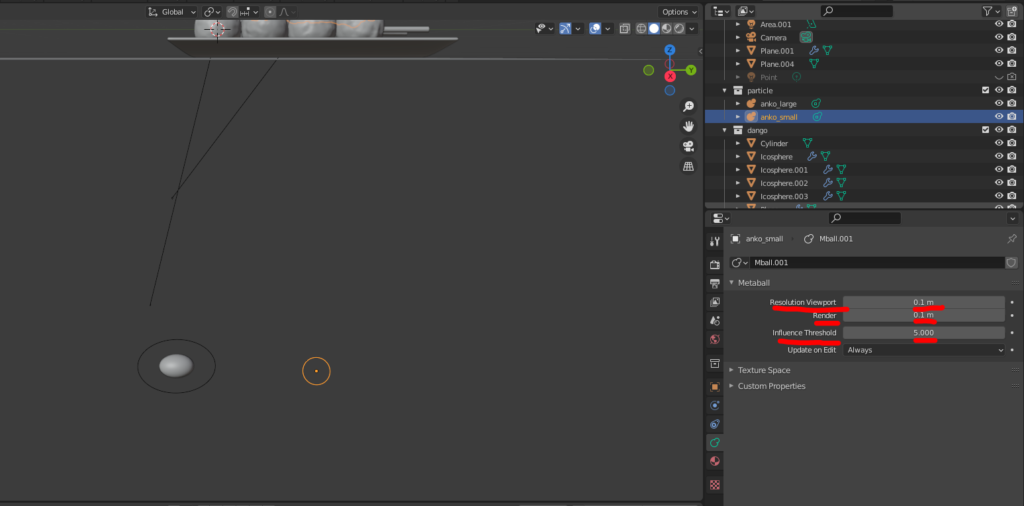
You can adjust the scale of both objects through the Object Properties (orange square icon in the lower-right corner of the screen):
Large Metaball (②): (X, Y, Z) = (1.1, 1.5, 1.0)
Small Metaball (①): (X, Y, Z) = (0.5, 0.5, 0.5)
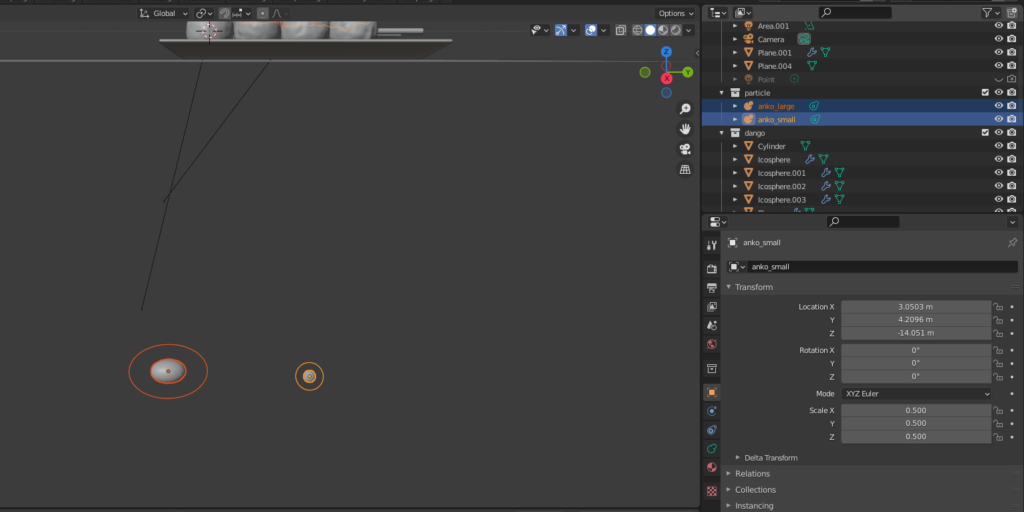
Additionally, set the Metaball Properties through the Object Data Properties:
Small Metaball (①):
- Viewport/Render Resolution: 1.0
- Influence Threshold: 5.0
Large Metaball (②):
- Viewport/Render Resolution: 1.0
- Influence Threshold: 1.0
Increasing the value of Influence Threshold makes the metaballs stick together more easily, making them resemble a more liquid texture. The difference in values between ① and ② is key for achieving a realistic look.
Finally, select both Metaballs (① and ②), press M to create a new collection, and name it something like “particles."
That’s it! The creation of the instance objects is complete.
AD
Particle Settings
Once the instance objects are created, select the emitter and proceed with the particle settings.
This part was the most challenging for me, so I want to make sure I document it well! 😅💦
First, select the emitter, go to the Particle Properties, and add a new particle system.
Choose Hair from the Emitter/Hair options.
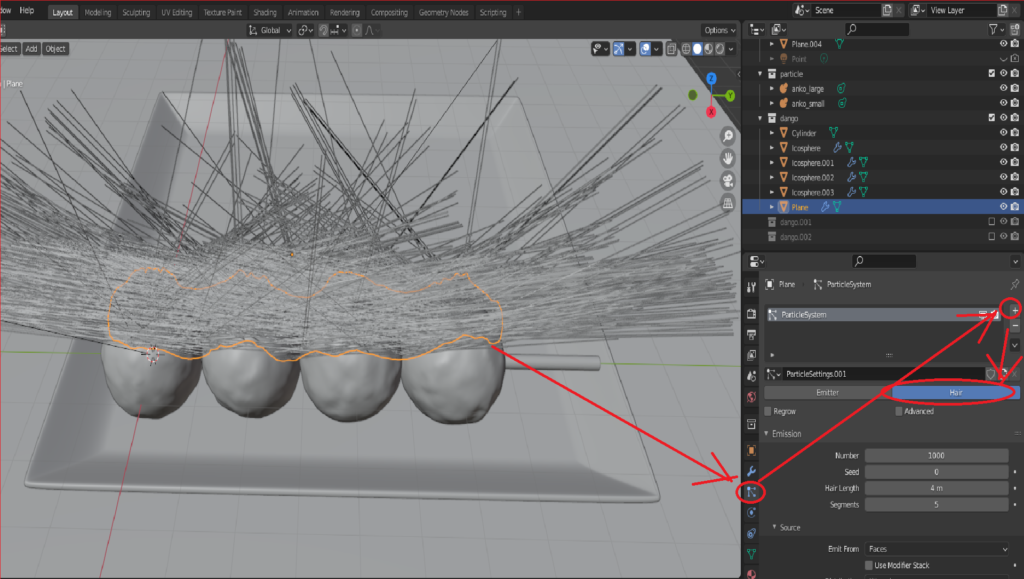
Below are the changes I made from the default settings:
- Check Advanced
- Emission:
- Number: 2000
- Check Rotation
- Orientation Axis: Normal
- Randomize: 1
- Randomize Phase: 2
- Render:
- Render As: Collection
- Scale: 0.09
- Scale Randomness: 0.2
- Uncheck Show Emitter
- Collection:
- Instance Collection: Select the collection containing the metaballs (created earlier)
- Check Pick Random
- Check Use Count
- Set the Count of Small Metaball (①) to 500
- Viewport Display:
- Uncheck Show Emitter
- Children:
- Select Simple
- Display Amount and Render Amount: 10
- Radius: 0.25m
- Roundness: 1.0
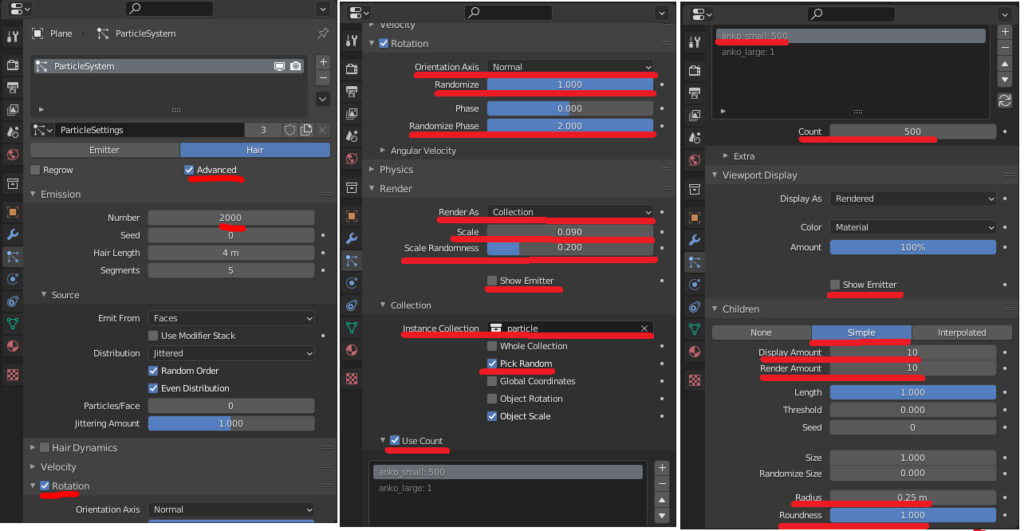
With these settings, you’ll get a “plump and moist" anko effect. 😊🍡
If you want to increase or decrease the amount of anko, you can adjust the Emission > Number and Children > Radius settings.
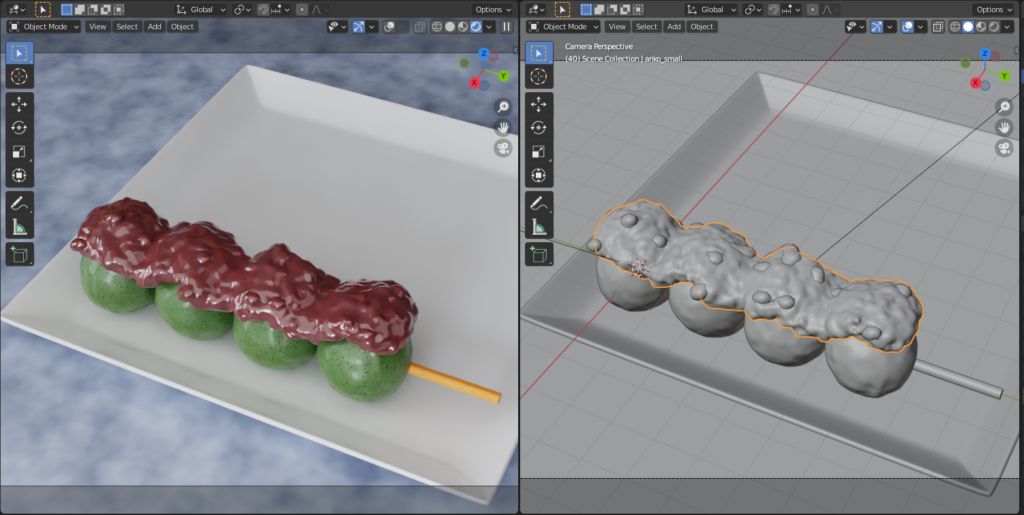
As a final touch, to make the anko appear to sit perfectly on the dango, I moved the emitter in the +Z direction slightly, just to raise it above the dango.
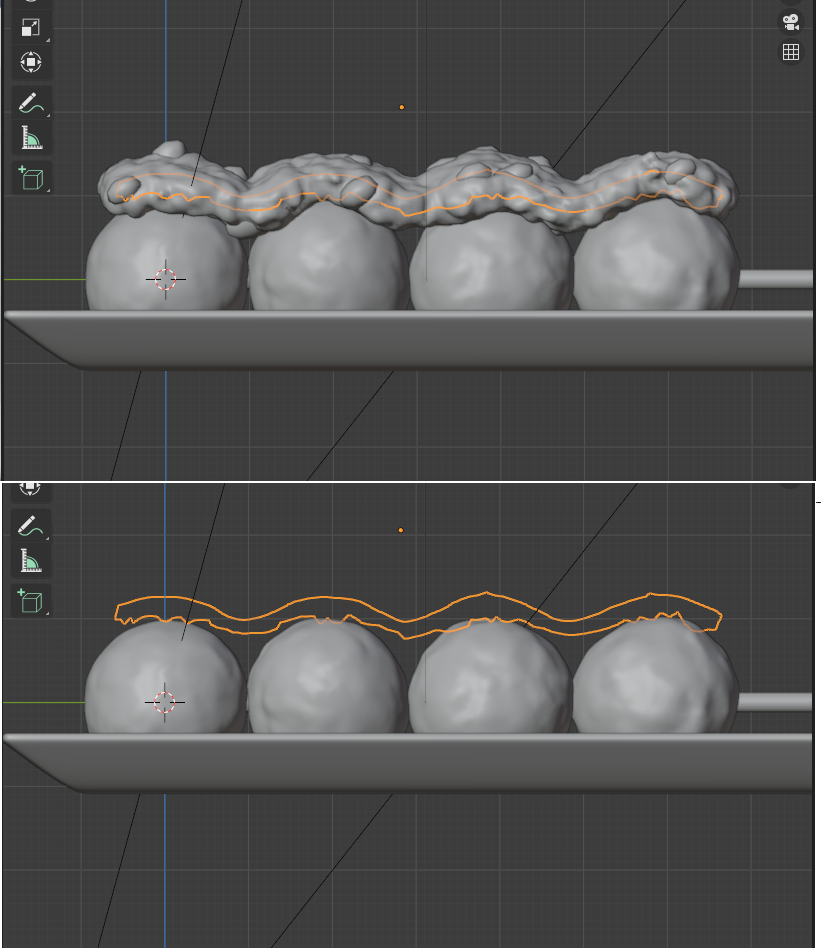
That’s it! The particle setup for the anko is complete. Great job! 😅
Material Creation
Finally, I’ll explain the materials I created for the anko in this project.
The material nodes are set up as follows:
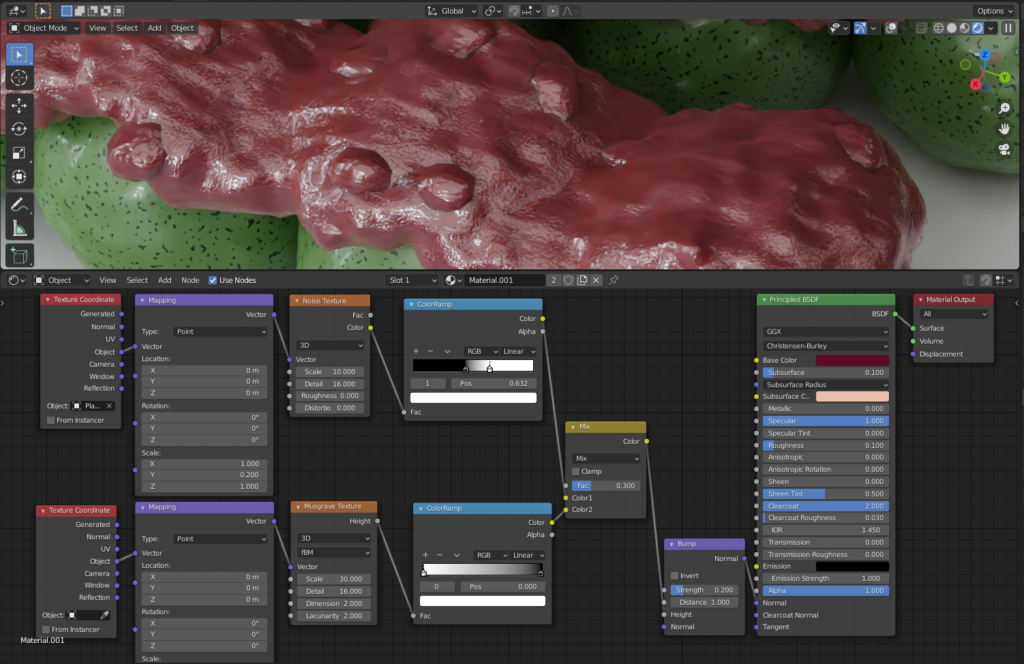
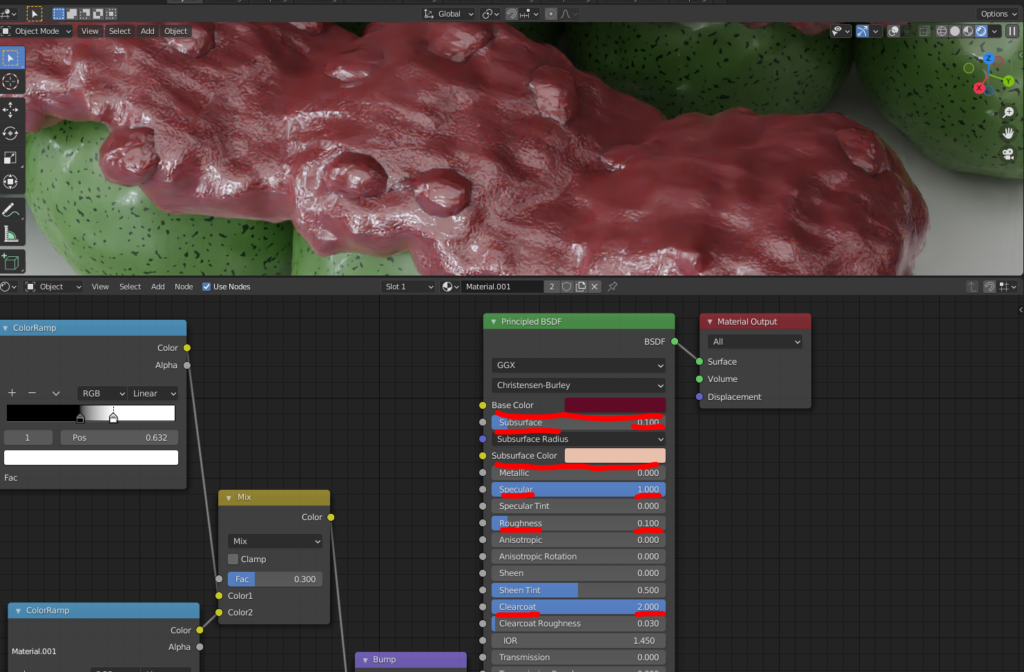
For the Principled BSDF, I configured the parameters as below:
- Base Color: Azuki bean color (reddish purple)
- Subsurface: 0.1
- Subsurface Color: Light pink… After looking at photos of anko online, I tried to represent the light pink hue that appears due to light transmission.
- Specular: 1.0… for added glossiness.
- Roughness: 0.1
- Clearcoat: 2.0… to give the surface a translucent feel.
Additionally, to create surface texture, I connected a bump map to the normal input. I used two elements, layered using RGB Mix, as follows:
- Expression of the small, bumpy indentations on the surface of the anko (I used a Musgrave Texture).
- Expression of the lines formed when the anko is spread (I stretched a Noise Texture in the Y direction).
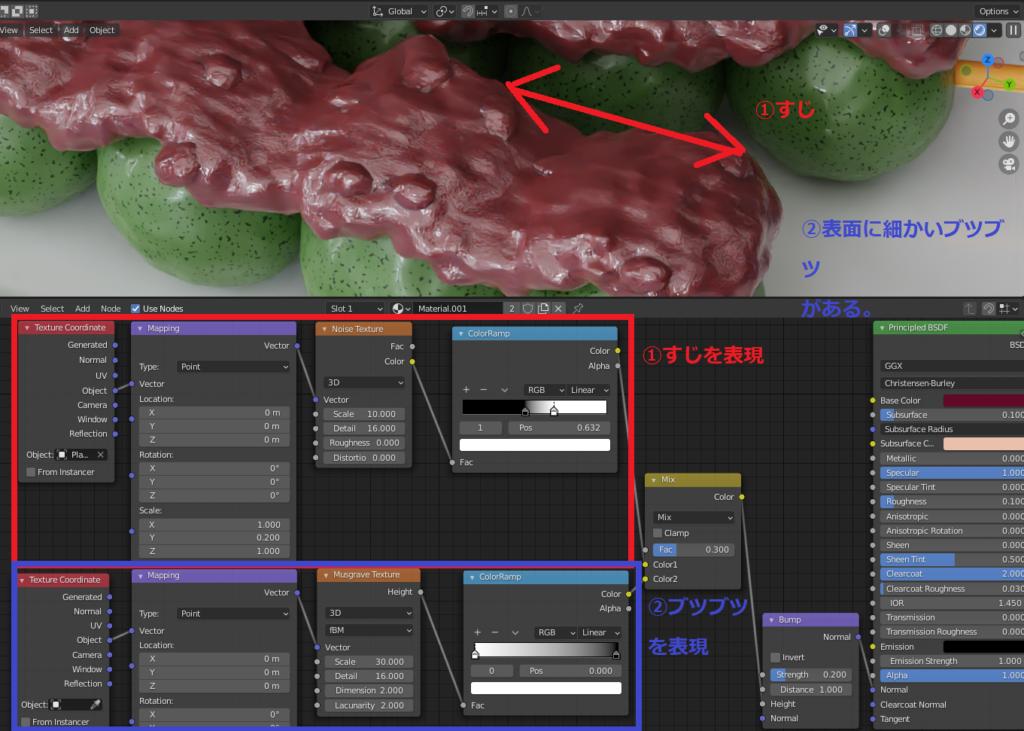
For a detailed guide on using material nodes, you can refer to my previous article on Creating Conch Shell Patterns.
And with that, the anko is complete! 🍡
Final Image

(Supplement) How to Make Yomogi Dango
Here is a simple guide on how to make yomogi dango 🍡.
Mesh Creation
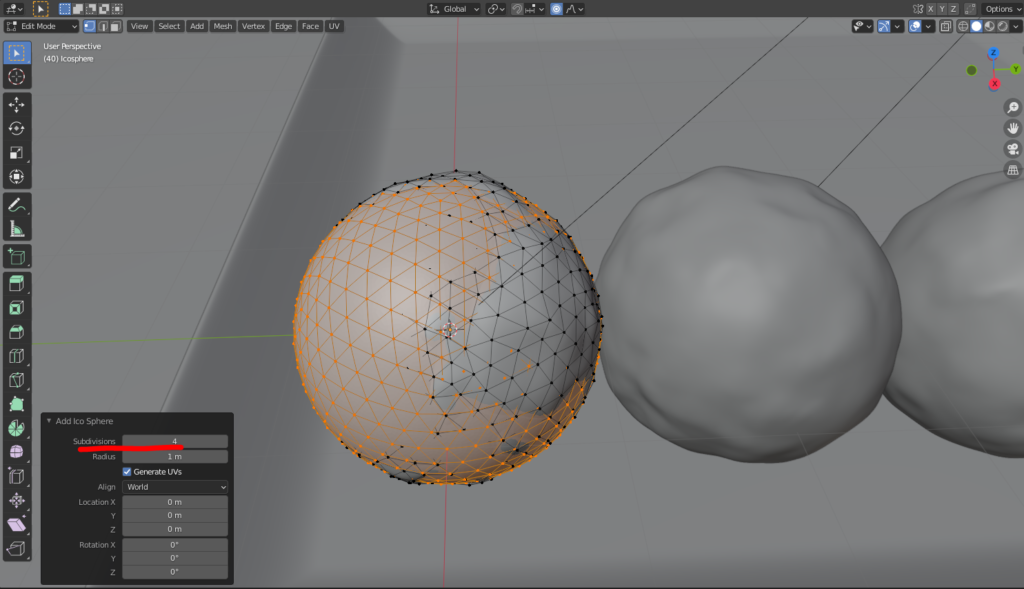
The dango was made from an ICO Sphere. I set the subdivision value to 4.
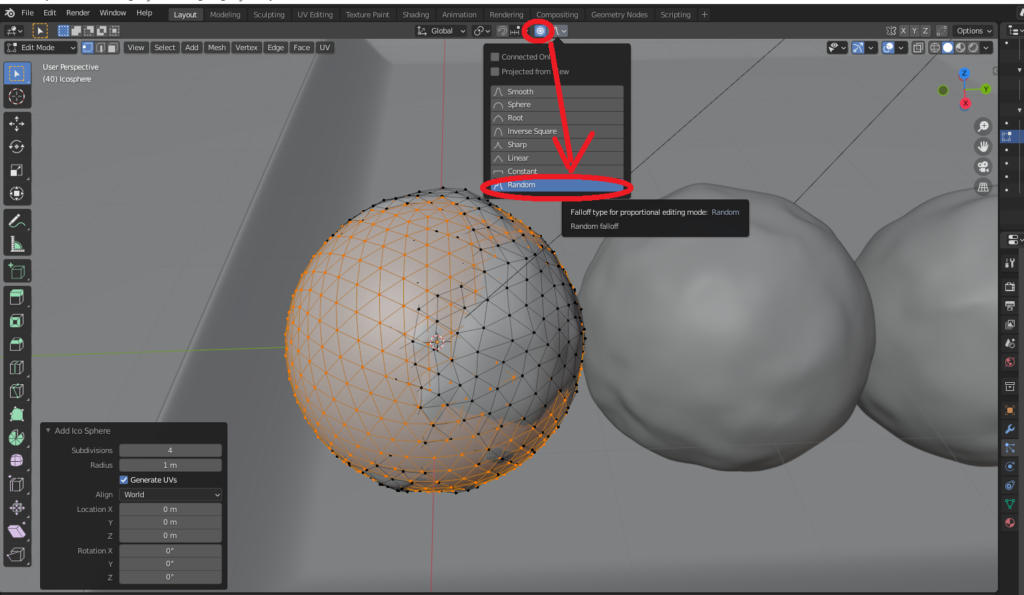
To create the bumpiness on the surface of the dango, I used Proportional Editing in edit mode and selected Random, then moved the vertices using the G key.
After smoothing the shading and duplicating the mesh, it was finished.
Material Creation
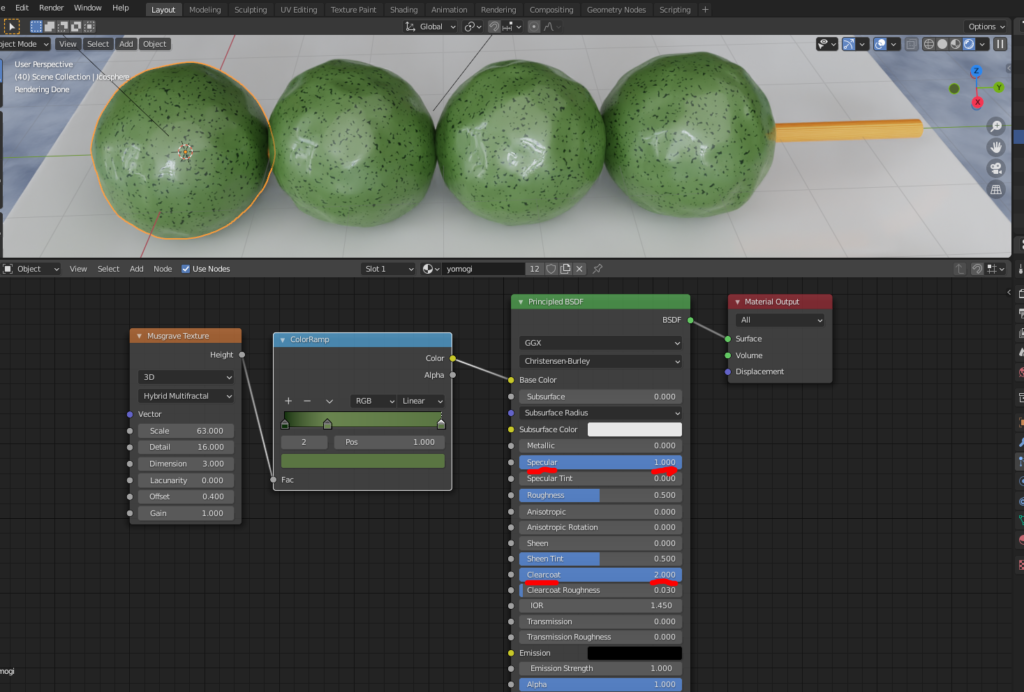
To create the spotty pattern on the surface of the yomogi dango, I used a Musgrave Texture.
Like the anko, I increased the values of Specular and Clearcoat to make the surface shiny.
AD
Conclusion
Thank you for reading all the way through this long article 🙇.
I must admit, although I’ve shared my process, I still feel that the anko I created doesn’t fully break away from that typical “CG look," and there are definitely areas for improvement 😅.
Therefore, I would be thrilled if those of you who have read this article can use it as a stepping stone (?) to further pursue realism in your own work! 🍡
Recommended Tutorials
I’d like to mention a tutorial I previously shared in the “Dice Animation" article by Ume-chan (@zero_blender), which is an excellent Udemy course for learning the basics of particle effects in a systematic way. Highly recommended! 👍✨
The method for Cloth Simulation was also learned from Ume-chan (@zero_blender) in their Udemy course “Learn Physics Animation by Creating" (link below).
This course provides a systematic approach to learning various physical simulation techniques, so it’s highly recommended as well! 👍✨
2021 Edition: Introduction to Physics Animation:
https://www.udemy.com/course/2021-ass/?referralCode=E719AEB3A5C765F1FDAA
Here are some related articles from Klala Lab (covering topics like particles, metaballs, and material nodes):
AD
