【Blender 2.92】 “Pouring Water into a Fishbowl” Fluid Animation
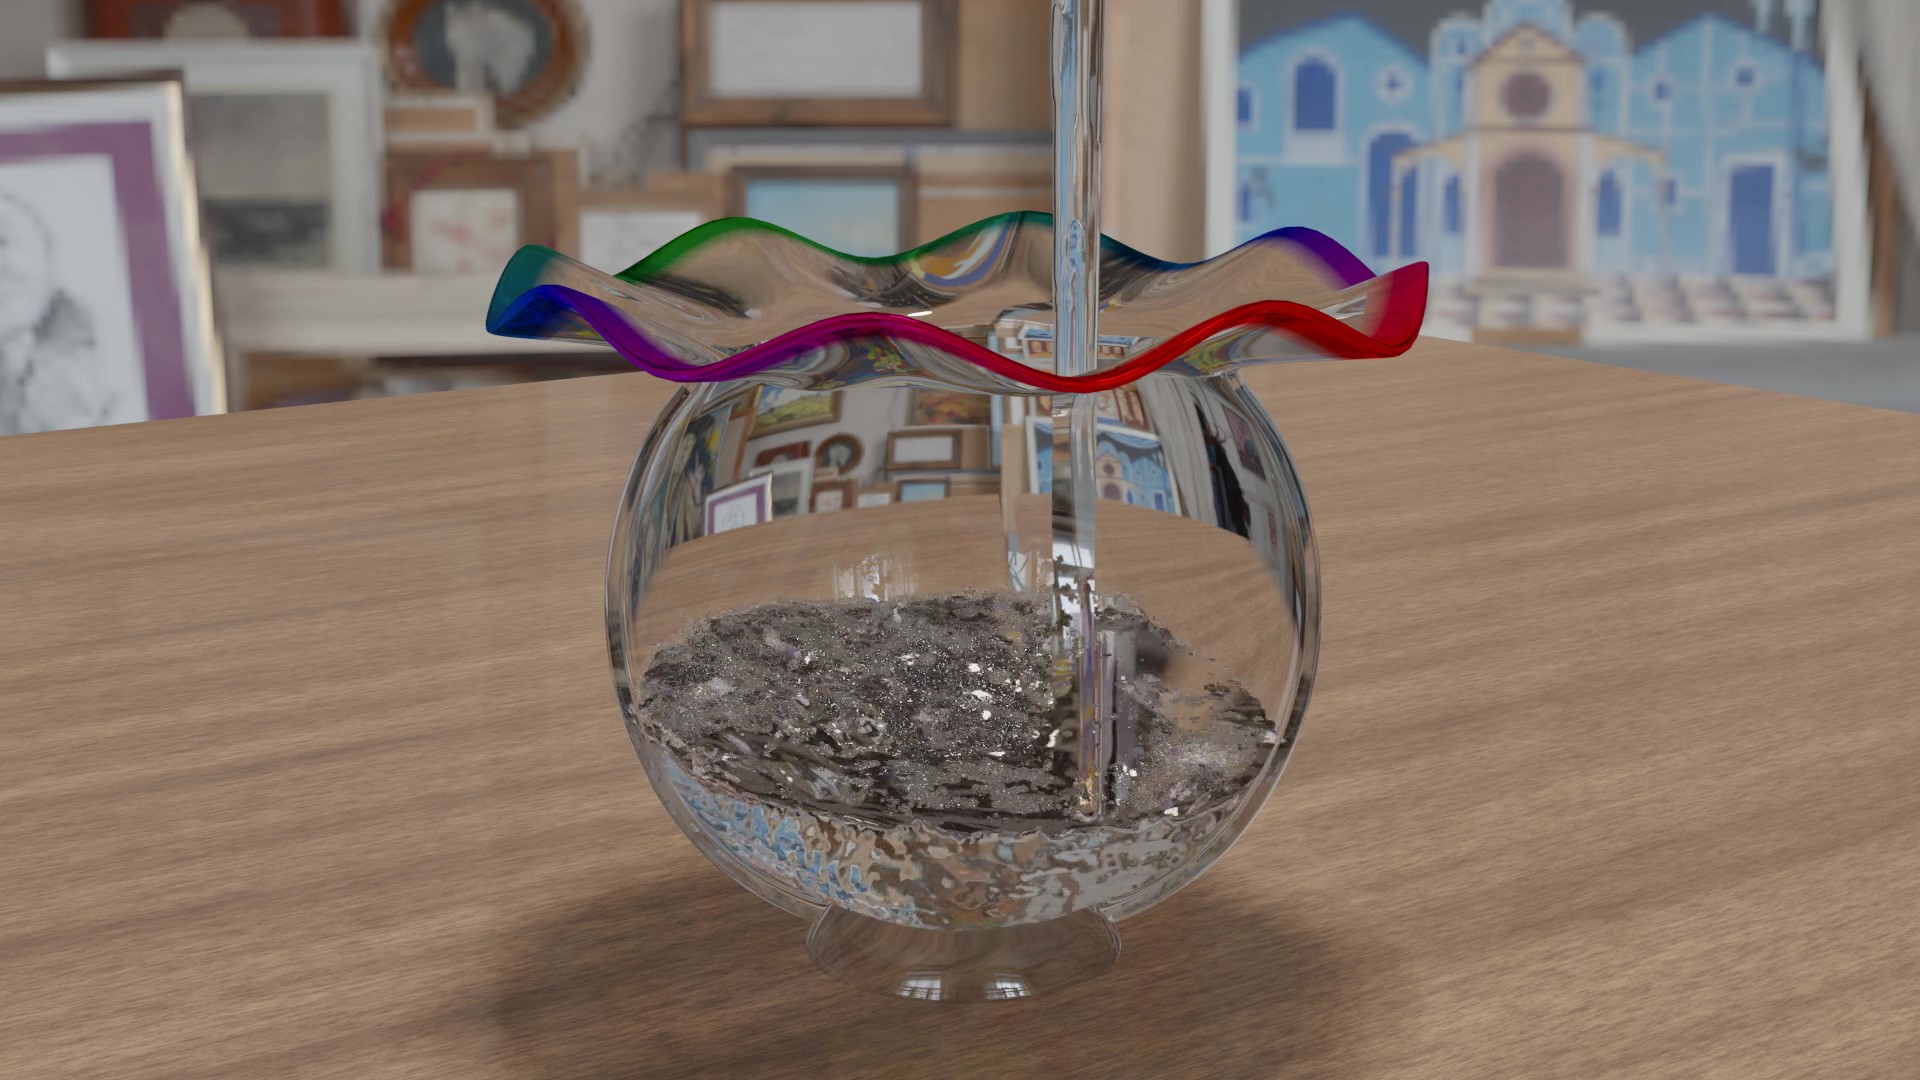
In this project, I used fluid simulation (physics simulation) in Blender to pour water into the “Dream-Colored Fishbowl" created by SasaraBch (@sasara_Bch).
This article summarizes tips and key points for performing fluid simulations in Blender as a personal reference.
For feedback or questions, feel free to reach out to Klala on Twitter (https://twitter.com/klala_lab) 😊
↑の分割解像度を256に上げてみました🧐
— クララ/Klala (@klala_lab) June 5, 2021
物理演算の負荷が大幅に増えて、150フレームのベイクに1時間半かかってしまいました😅笑
また、レンダリング時間も長かったです(EeveeフルHD画質で50分)💦
水面の動きは細かくなりましたが、まだ違和感が残ります😅
が、ひとまず講座は次に進もうと思います! pic.twitter.com/hUlP40ZvRZ
AD
Concept Behind the Project
On May 27, 2021, the theme for the “#60-Minute Midnight Modeling Challenge" (referred to as “OneModel") was “Fishbowl." Inspired by the many beautiful fishbowl designs I saw on my Twitter feed, I decided to give it a try myself!
However, I wasn’t confident enough to model the delicate wavy rim of the fishbowl on my own, so I referred to SasaraBch’s (@sasara_Bch) video, “Dream-Colored Fishbowl." 🙇💦
By following Sasara’s video tutorial, I successfully created the beautiful fishbowl featured in my initial tweet. 😊✨
Since leaving the bowl empty seemed like a missed opportunity, I decided to try out the fluid simulation (physics simulation) technique I recently learned and pour water into the bowl.
The fluid simulation method I used is something I previously introduced in my “Dice Animation" article. I learned it from Ume-chan’s (@zero_blender) Udemy course, “Learning Physics Animation through Creation."
This course is an excellent resource for systematically learning various physics simulation techniques from the basics, and I highly recommend it! 👍✨✨
Techniques Used
This article focuses solely on the fluid simulation method used to pour water into the fishbowl. It does not cover the modeling process for the fishbowl itself (haha).
For details on modeling the fishbowl, I recommend SasaraBch’s video mentioned above, which provides a clear and easy-to-follow explanation. 😅
The process involves the following steps:
- Quick Effects → Liquid
- Setting the Inflow
- Configuring the Domain
- Adjusting the Effector
- Creating Particles
Step-by-Step Creation Process
Now, I’ll explain the process of pouring water using fluid simulation in Blender.
Quick Effects & Inflow Setup
To pour water, the first thing we need is a mesh object to represent the water source.
The shape of the object doesn’t matter, but in this case, I used an ICO sphere.
In Object Mode, press Shift + A to add an ICO sphere. Then, use S to scale it down to about 1/10th of the size of the fishbowl opening. After that, press G to move the ICO sphere to the position above the fishbowl where you want the water to be poured from.

Next, we’ll add the fluid simulation via Quick Effects.
With the ICO sphere selected, go to the top-left corner and click on Object → Quick Effects → Quick Liquid.
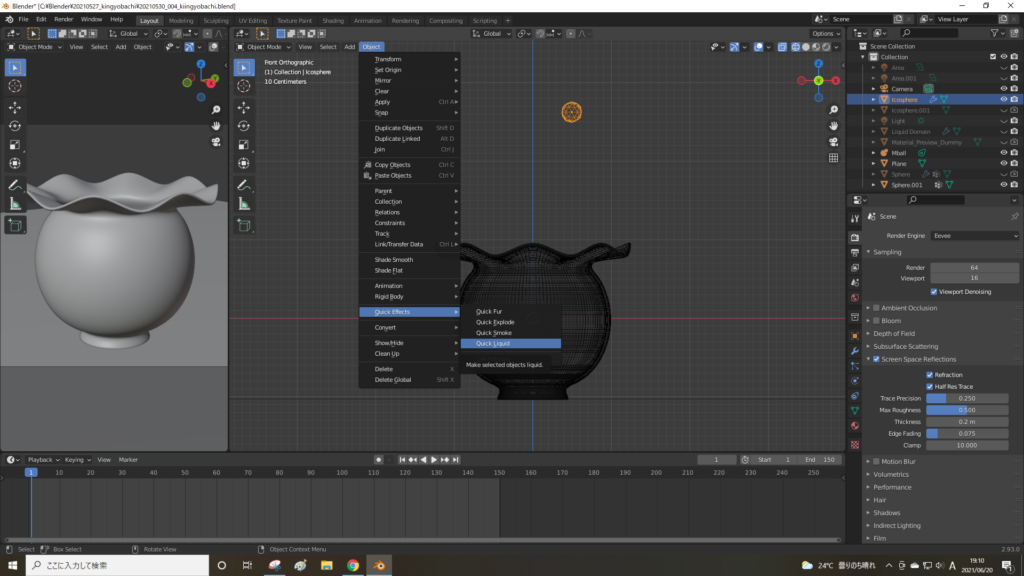
This will create a rectangular prism named LiquidDomain. This domain is where the physics calculations for the fluid will take place.
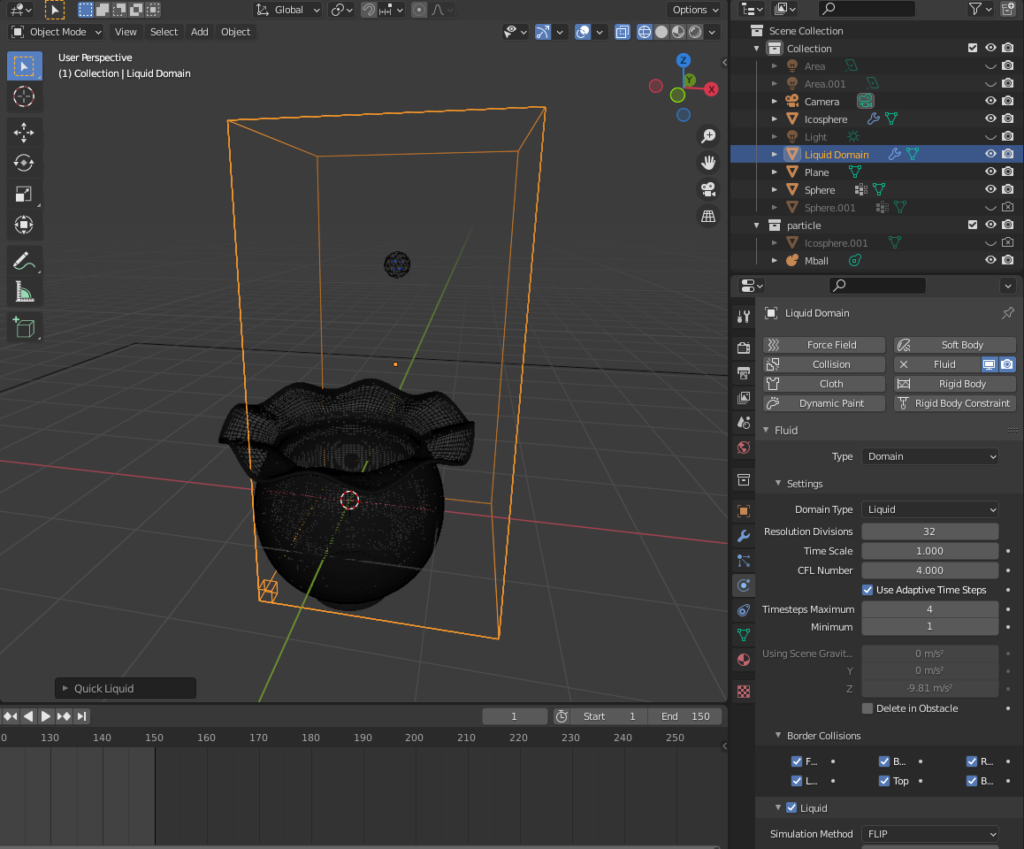
In the image above, the fishbowl slightly extends out of the domain.
To correct this, move (G) and scale (S) the domain so that the fishbowl and ICO sphere fit comfortably inside it. You can move and scale the domain just like any other mesh object (e.g., the cube).
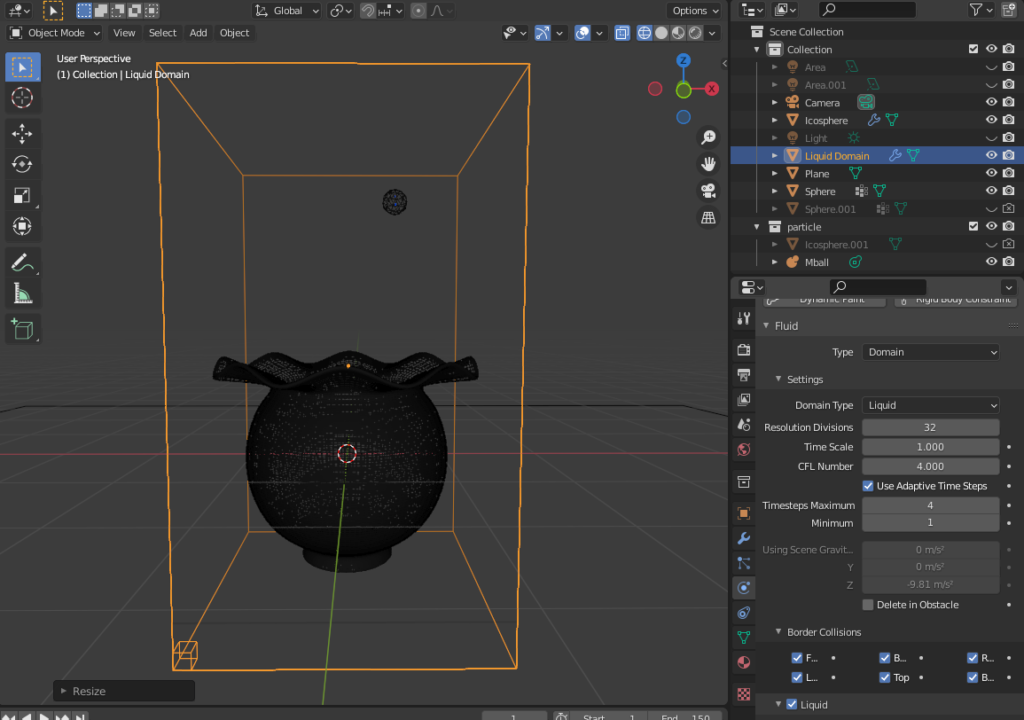
Now, we’ll set up the inflow for the ICO sphere.
Inflow Setup
Select the ICO sphere, go to the Physics Properties tab, and under Flow Behavior, choose Inflow. This will make the ICO sphere emit water.
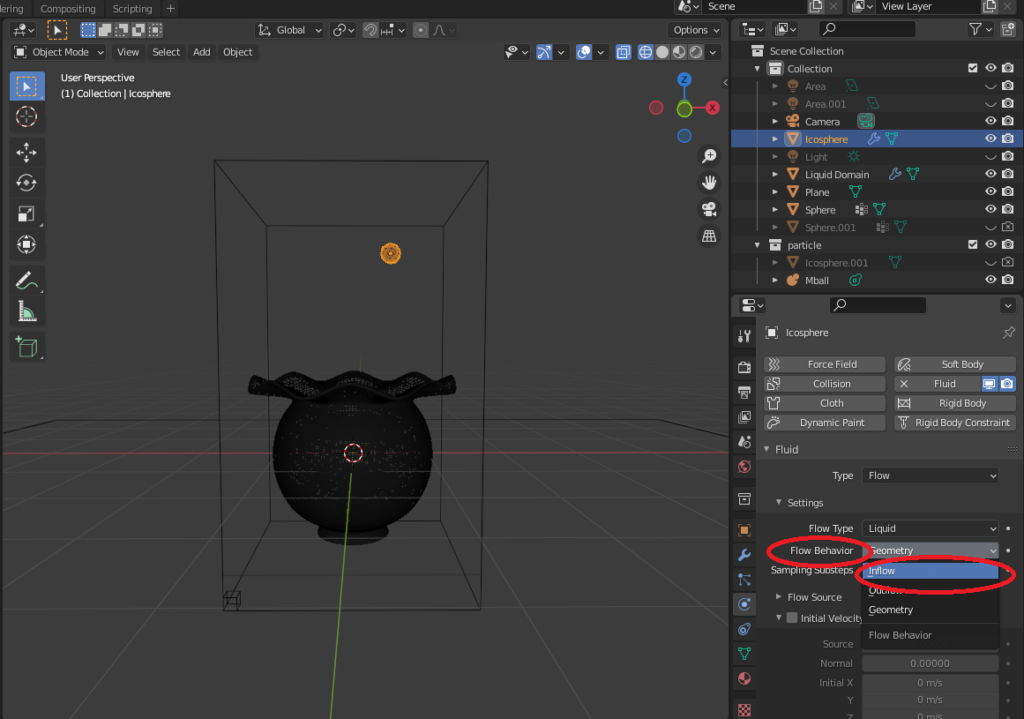
When you play the animation, you’ll see the movement of the water surface displayed as blue or green dots, indicating that the inflow is now active.
Domain Configuration
To refine the fluid simulation, select the domain and adjust its settings in the Physics Properties tab as follows:
Settings Adjustments
- Resolution Divisions: Change from 32 to 64.
- This increases the resolution of the simulation, resulting in more detailed animations.
- Diffusion: Enable the checkbox for Diffusion.
- This smoothens the fluid behavior.
- Presets: Select Water from the Presets dropdown.
- This applies optimal parameters to simulate realistic water motion.
- Particles → Spray: Enable the checkbox for Spray.
- This allows water splashes to be represented as particles.
- The particle objects will be set up later.
- Mesh: Enable the checkbox for Mesh.
- This converts the fluid into a mesh during baking, making it visible in the animation.
- Cache:
- Frame End: Change from 250 to 150 to match the desired animation length.
- Type: Change from Replay to Modular.
- Enable Is Resumable.
- This ensures that the cache can be baked for rendering the animation.
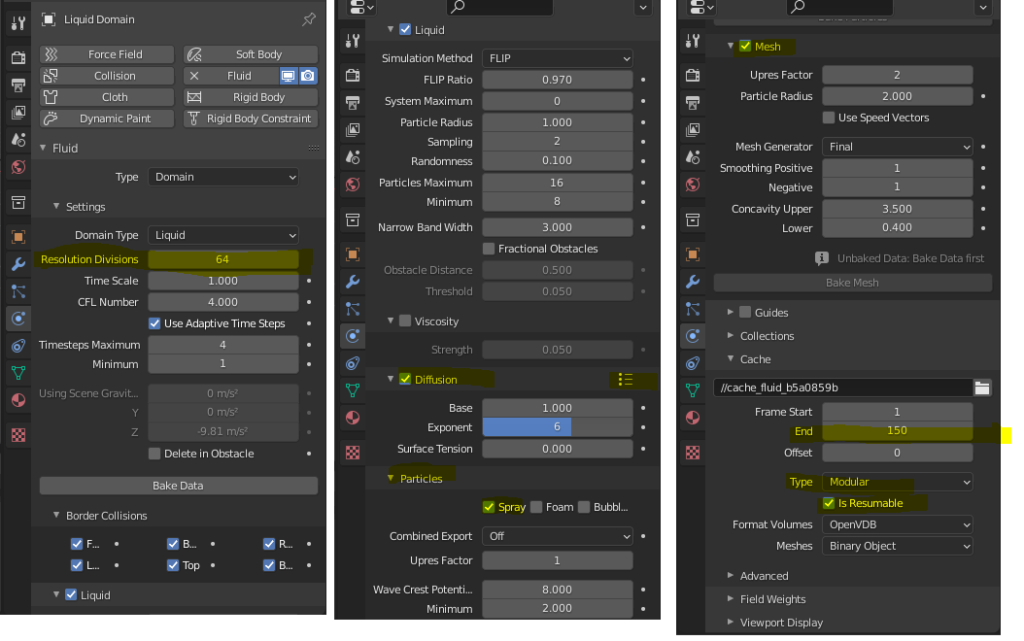
By setting the cache type to Modular, the Bake Data button becomes active. Click it to bake the simulation data.
Baking the Cache
Once you select Bake Data, the timeline will process and bake simulation data for frames 1 to 150.
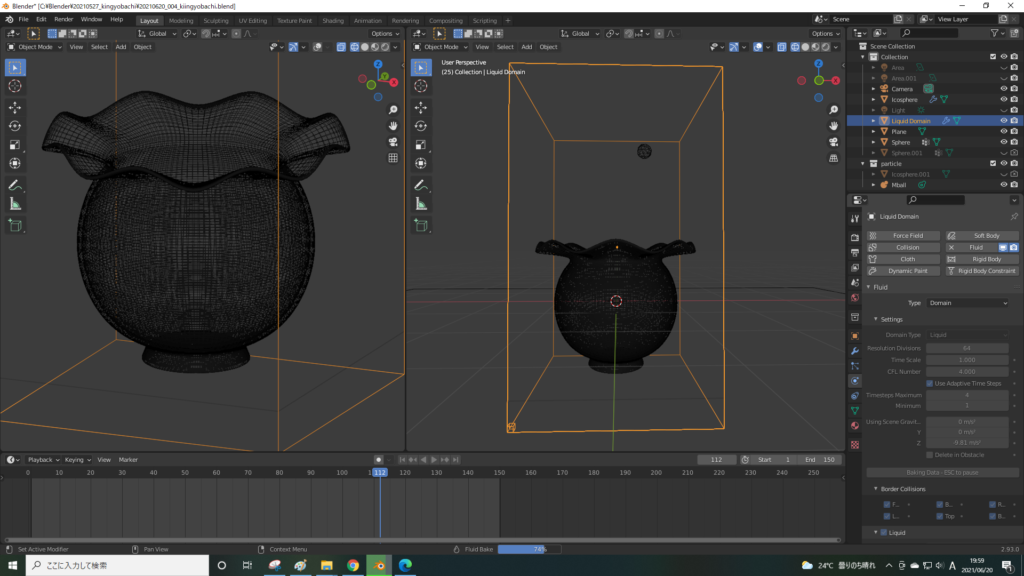
You will see a progress bar indicating the simulation data is being processed.
You can play the animation to see the fluid dynamics in action.
Why Further Configuration Is Needed
At this stage, the water will still pass through the fishbowl. To fix this, we need to designate the fishbowl as an Effector. This will be covered in the next section.
AD
Effector Configuration
To prevent the water from passing through the fishbowl, set it as an Effector in the Fluid Simulation settings. Here’s how:
Steps to Configure the Effector
- Select the Fishbowl:
- In Object Mode, click on the fishbowl to select it.
- Physics Properties:
- Navigate to the Physics Properties tab.
- Under Fluid → Type, choose Effector.
- Surface Thickness:
- Adjust the Surface Thickness in the Settings section.
- Set it to a larger value, such as 1.0.
Why this matters: A smaller thickness, such as 0.1, causes most of the water to leak through the fishbowl, which undermines the simulation.
With Surface Thickness = 1.0, water leakage is significantly reduced.
Although some splashes may escape, they were deemed acceptable for the animation.
Creating Particles
To represent water splashes, we enabled Particles → Spray in the domain settings. Next, we’ll create an object for the splash particles.
Set Blend Mode to Alpha Blend and enable Screen Space Reflections.
Add a Metaball
Press Shift + A, then select Metaball → Ball.
While an ICO Sphere can also be used, metaballs merge when close to one another, allowing you to simulate surface tension for water droplets.
Set Material for Transparency
Apply a Glass BSDF material to create a transparent water droplet appearance.
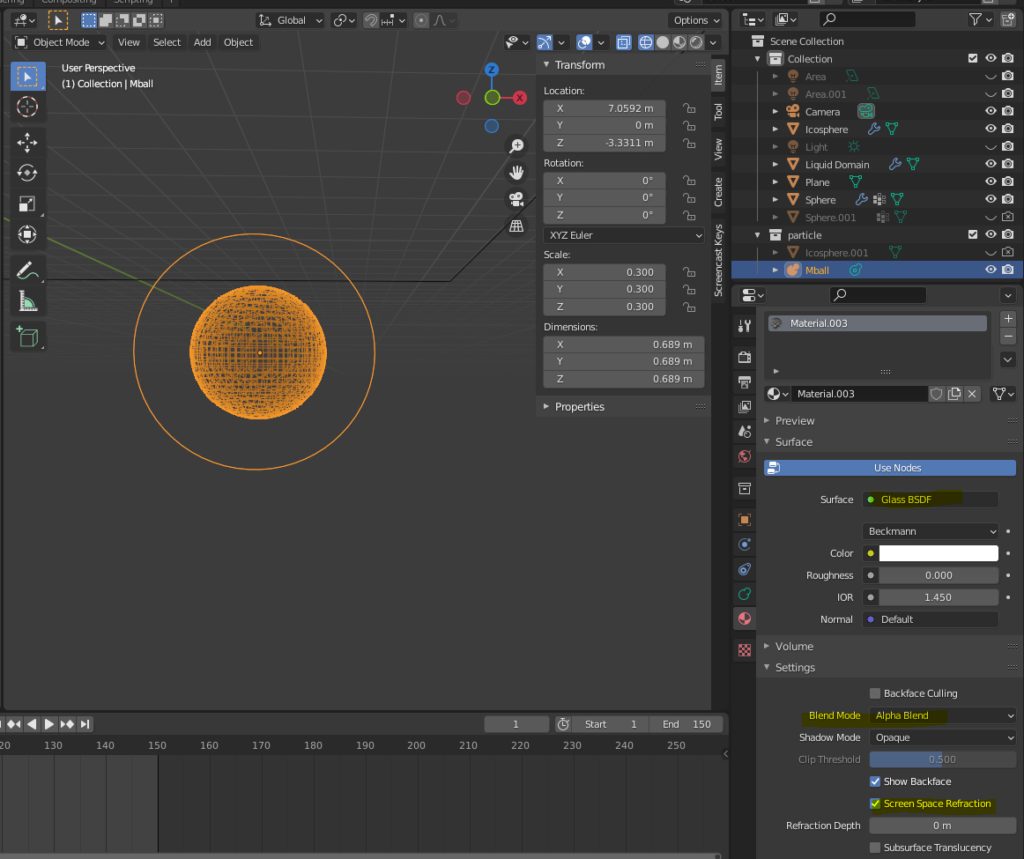
Adjust Resolution
In this case, we set the resolution to 0.2m.
The metaball resolution affects the smoothness of the particle surfaces:
Lower resolution values create smoother surfaces but increase computational load.
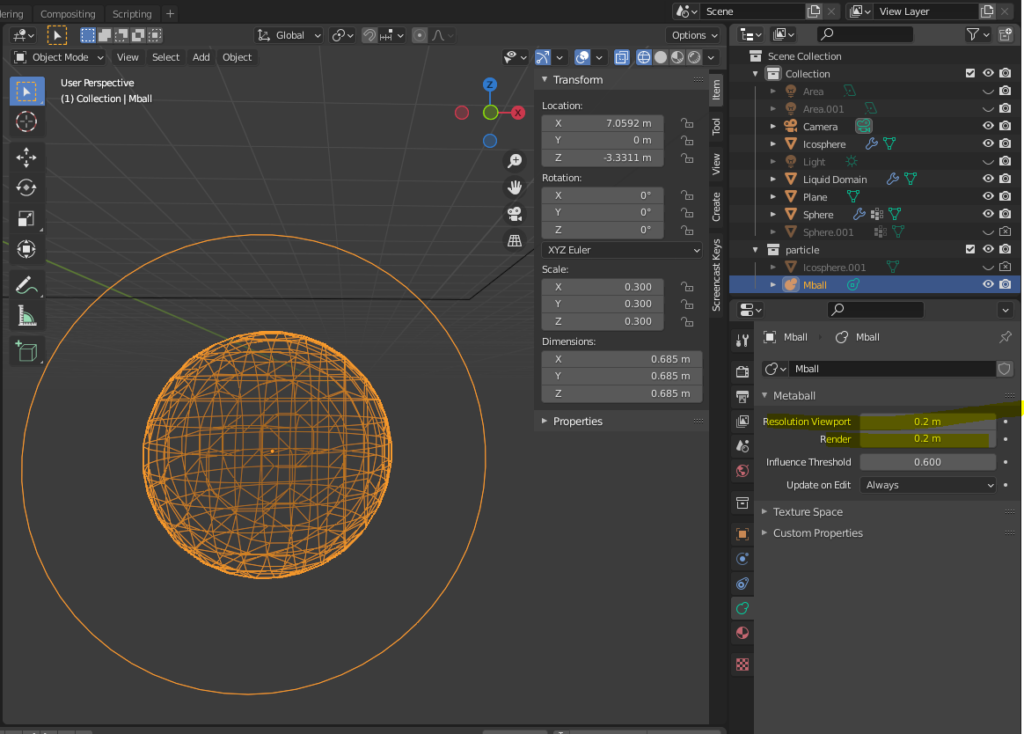
Configure Domain Particle Properties
After creating the particle object, configure the domain’s particle settings:
Ensure Show Emitter is checked. Unchecking it can prevent the liquid from appearing during rendering.
- Render As: Object
- Scale: Adjust later based on the animation.
- Instance Object: Select the metaball object (Mball).

Bake Particles and Mesh
- In the Physics Properties, bake particles and mesh:
- Select Bake Particles and Bake Mesh after caching the data with Bake Data.
Fine-Tune Settings
Adjust the settings for the domain, effector, and particles until you are satisfied with the result.
- If you need to re-bake, select Free Data to release the current cache.
- In some Blender versions, cached data may persist and prevent new settings from taking effect. To resolve this:
- Change Cache → Type to Replay, then switch it back to Module to reset the cache.
Final Rendering
After completing the settings and rendering the video, the animation is ready!
Rendered Results:
Increasing the resolution to 256 significantly improved the smoothness of the water surface. However, the interface between the water and the fishbowl remains slightly wavy, leaving room for improvement in realism. 😅
Supplement: Fixing Floating Water in the Fishbowl
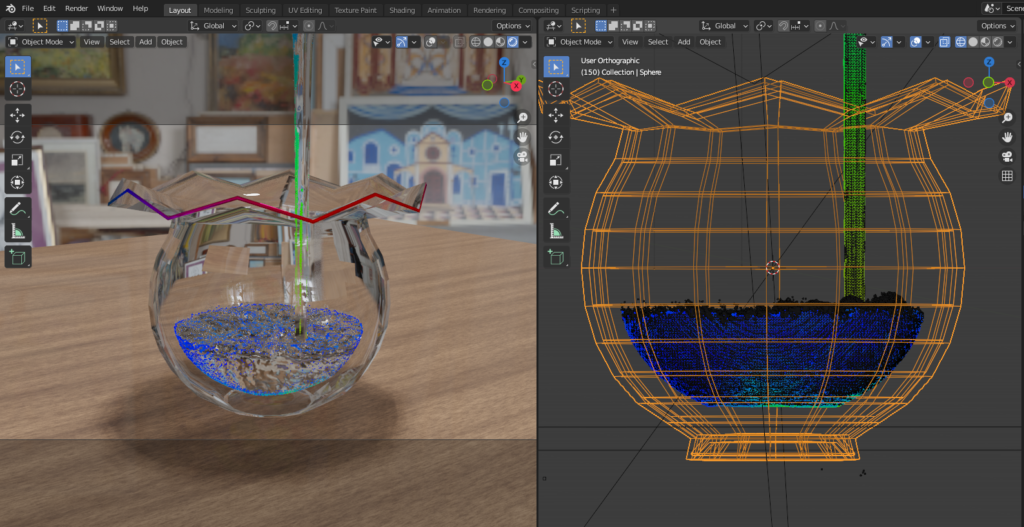
When increasing the resolution division value, I noticed that the amount of water leaking from the effector increased significantly. 😅
To prevent water leakage, I raised the Surface Thickness of the effector even further (from 1 at resolution 64 to 10 at resolution 256).
However, as shown in the image below, this adjustment caused the water inside the fishbowl to appear as if it was floating.
My Solution
- Duplicate the Fishbowl Mesh
- To resolve this issue, I duplicated the fishbowl mesh and scaled down the duplicate slightly to prevent the water from appearing as if it’s floating.
- Remove the Effector on the Duplicate
- Delete the effector properties from the duplicated fishbowl.
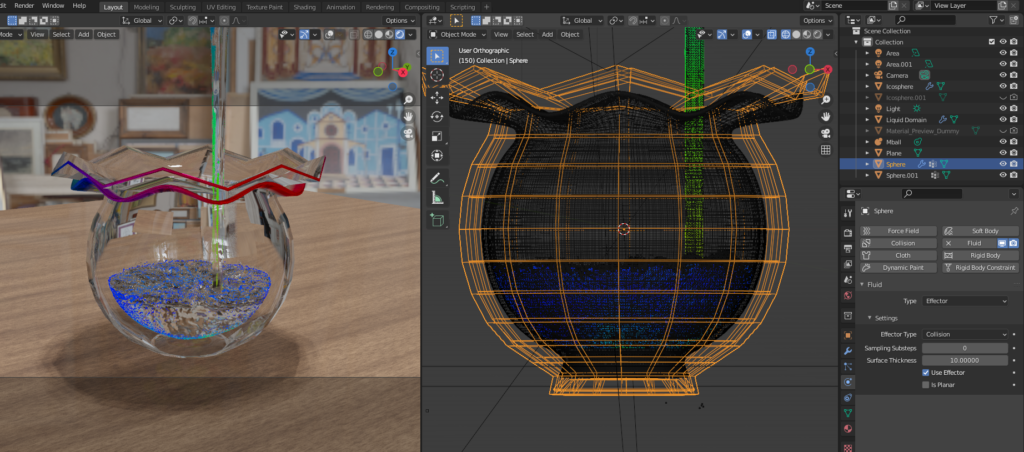
3. Hide the Original Fishbowl in the Render
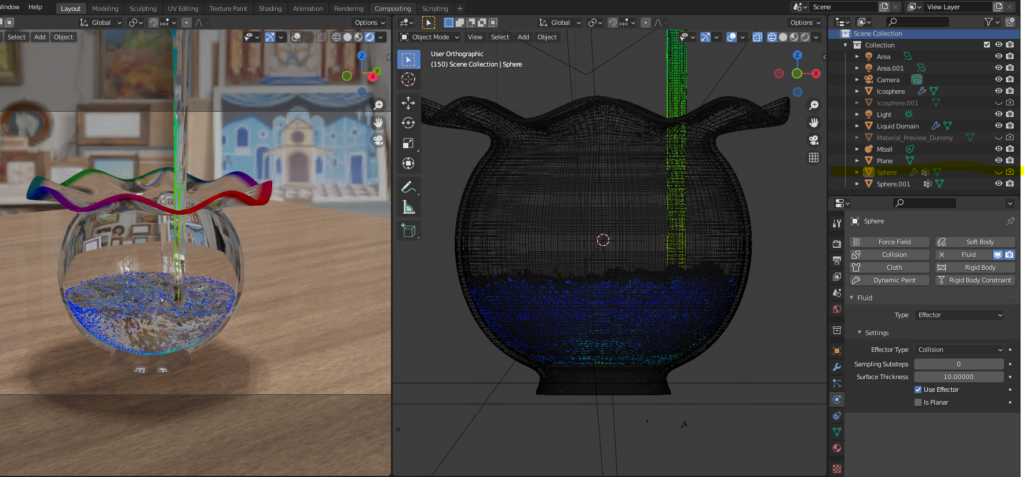
- In the Scene Collection (top-right corner), uncheck the 👁 (Visibility) and 📷 (Render) icons for the original fishbowl.
- This ensures that only the duplicate fishbowl is visible and rendered, maintaining the appearance of realistic water inside the fishbowl.
By following these steps, the issue was resolved, and the water no longer appears to float.
AD
Conclusion
Through the process of creating fluid simulations for animation, I learned valuable tips and important considerations (and the challenges!) involved in fluid animation.
While the animation I created is still far from being fully realistic 😅, I believe that I will have many more opportunities to use fluid simulations in the future. I hope to share what I’ve learned in another project soon.
Reference Tutorials
SasaraBch: Blender M01-037【Dream Color Fishbowl】
Ume-chan’s Udemy Course:
2021 Latest Version [Introduction to Physics] Create and Learn Physics Animation
https://www.udemy.com/course/2021-ass/?referralCode=E719AEB3A5C765F1FDAA
AD

