[Blender 4.3] Creating a Dragon (Snake) Animation
2025 is the Year of the Snake (巳年, “Midoshi")!
Since I started using Blender in 2020, I have modeled the Chinese zodiac animals for four consecutive years: Ox (2021), Tiger (2022), Rabbit (2023), and Dragon (2024).
This year, I created an animation transition from the Dragon (辰, 2024) to the Snake (巳, 2025) using Blender’s animation tools.
To focus on expressive movement, I kept the modeling simple and instead used techniques like Spline IK and the Hook Modifier to create dynamic, fluid motion for both the dragon and the snake.
This article will summarize the workflow and techniques used in the animation.
For any questions or feedback, feel free to reach out on Twitter (https://twitter.com/klala_lab)! (^^)/
🎍明けましておめでとうございます!🐍
— クララ/Klala (@klala_lab) December 31, 2024
今年も3DCG作品をたま~に投稿していきたいと思いますので、もし流れてきたら、いいね👍を頂けると嬉しいです☺️#b3d #3dcg #blender3d #HappyNewYear2025 #巳年 pic.twitter.com/LyGTTYEVPy
広告/AD
Why Did I Create This?
For New Year’s 2024 (Year of the Dragon), I created a dragon model in Blender.
2024年の干支の竜(辰)です🐉
— クララ/Klala (@klala_lab) December 2, 2023
ヒゲに苦戦しましたが、なんとかイメージを形にできました😅#b3d #blender3d #3dcg https://t.co/OWYJ9mPp8i pic.twitter.com/Zj7RYxab0e
At that time, I focused on detailed scale textures, putting a lot of effort into making them look realistic.
If you’re interested in the technique for creating scales, I have summarized it in a separate article—feel free to check it out!
Now that 2025 is the Year of the Snake, it naturally follows that the dragon would transform into a snake.
Since a snake has the same body shape as a dragon but lacks limbs and whiskers, modeling it is much simpler.
(Of course, if I aimed for a hyper-realistic snake, that would be a different challenge altogether!)
However, I felt that simply creating a realistic snake would make it seem like a downgraded version of the previous year’s dragon.
So instead of just making a basic snake, I decided to turn this concept into a fun animation:
👉 “As the dragon gradually loses its limbs and extra features, it transforms into a snake!"
This approach allowed me to creatively represent the transition between zodiac years in an engaging way.
Techniques Used
Here is a summary of the techniques used in this project.
In this article, I will mainly focus on rigging constraints and how to set them up.
Modeling
- Subdivision Surface Modifier
- Mirror Modifier
- Displacement Modifier
Rigging
- Bone Constraint: Spline IK
- Object Constraint: Child Constraint
- Hook Modifier
Creating Each Part
Modeling the Head
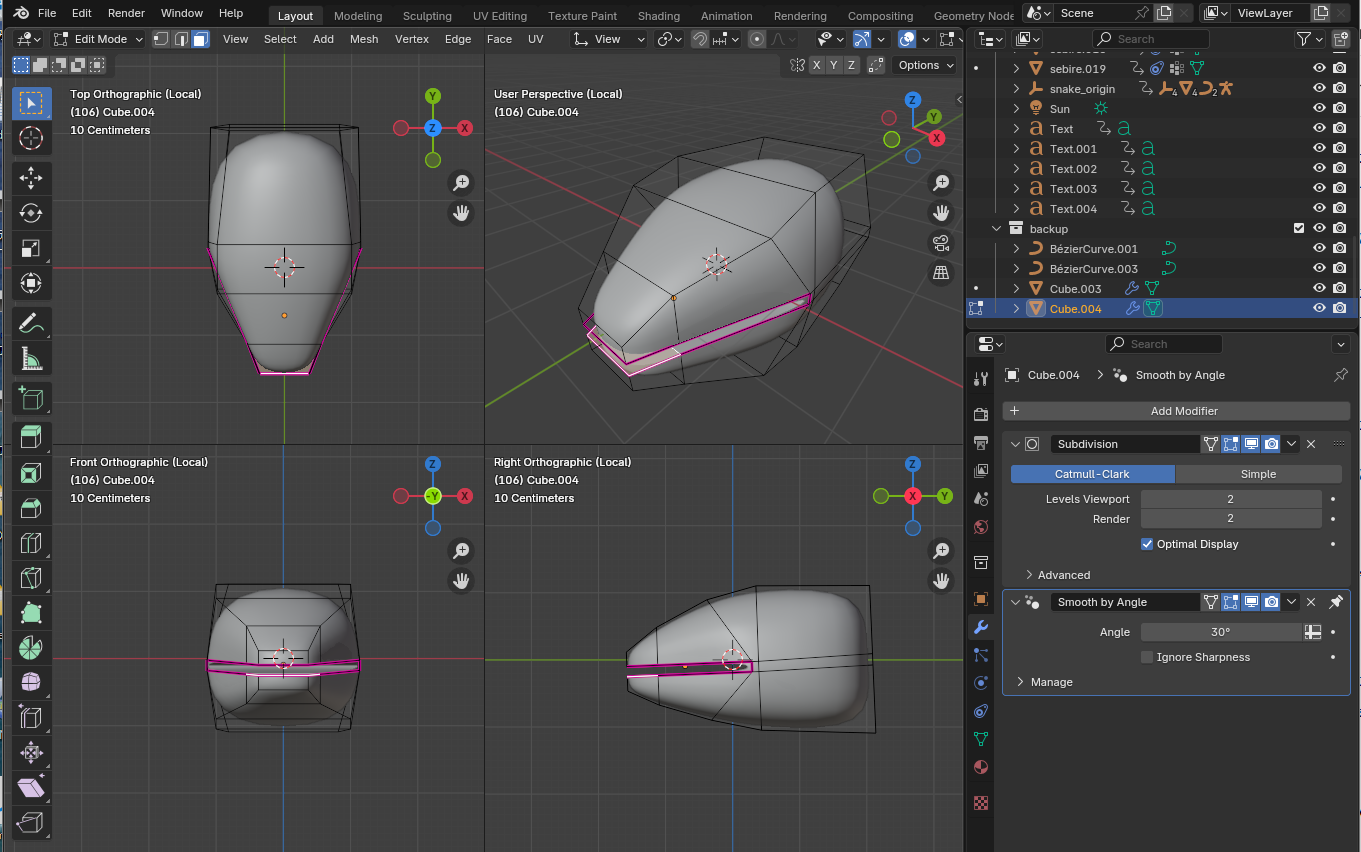
First, I created the head of the dragon (or snake).
I started with a cube, added a Subdivision Surface Modifier, and used loop cuts to subdivide the mesh.
For the mouth, I deleted some faces and then manually filled them back in.
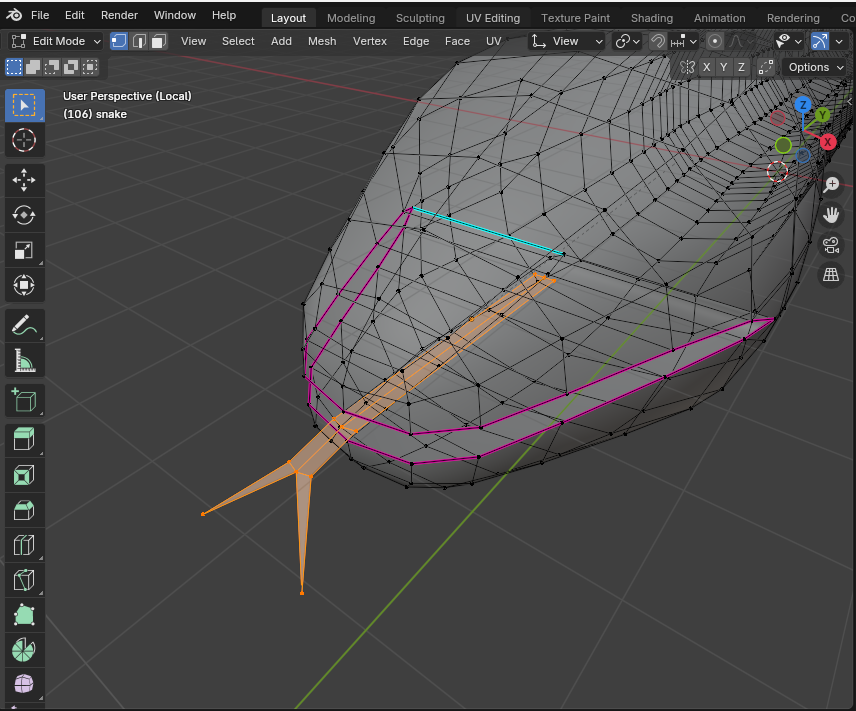
Below is the head mesh before applying the modifier.
The edges around the mouth are highlighted in pink because I set the crease value to 1 to emphasize the sharp edges.
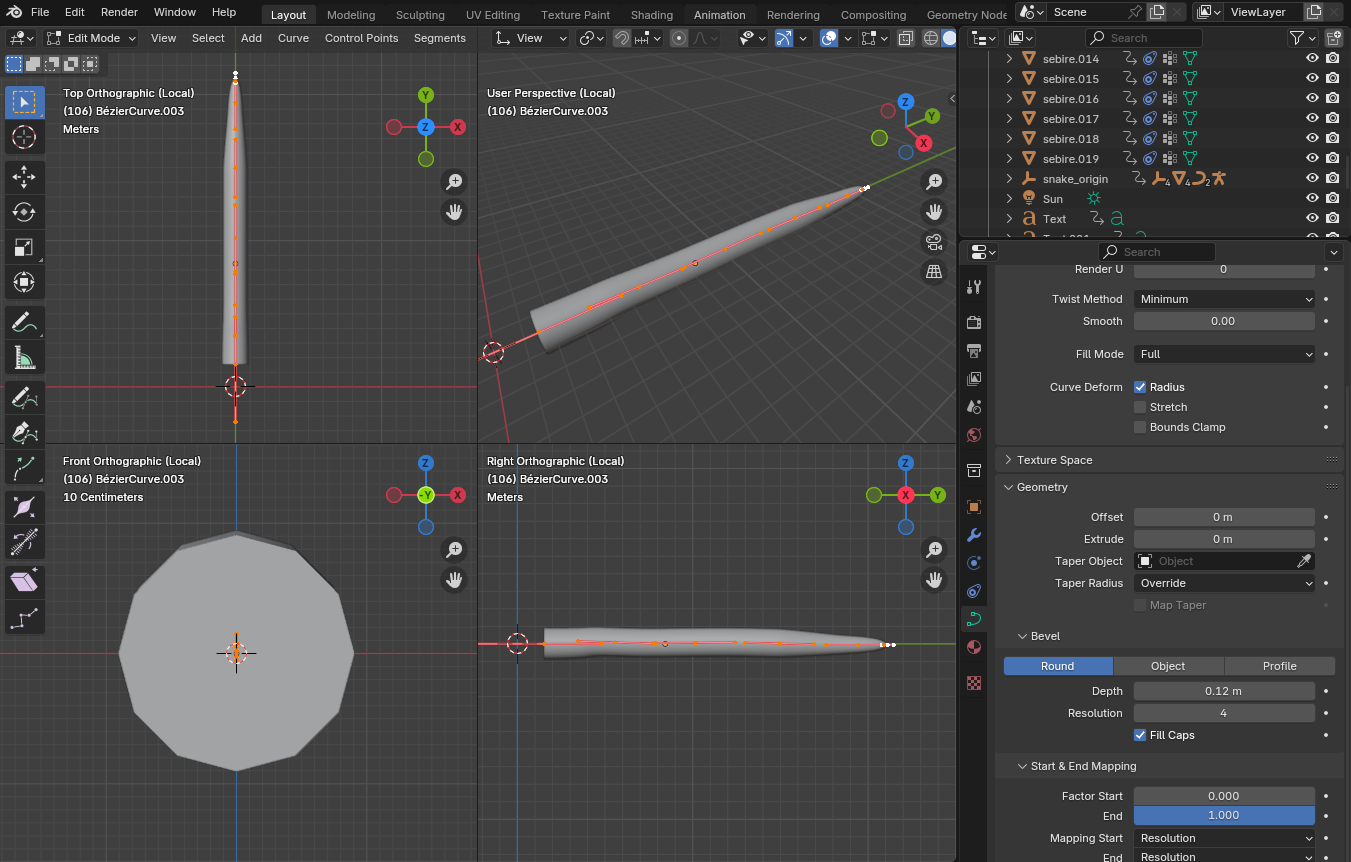
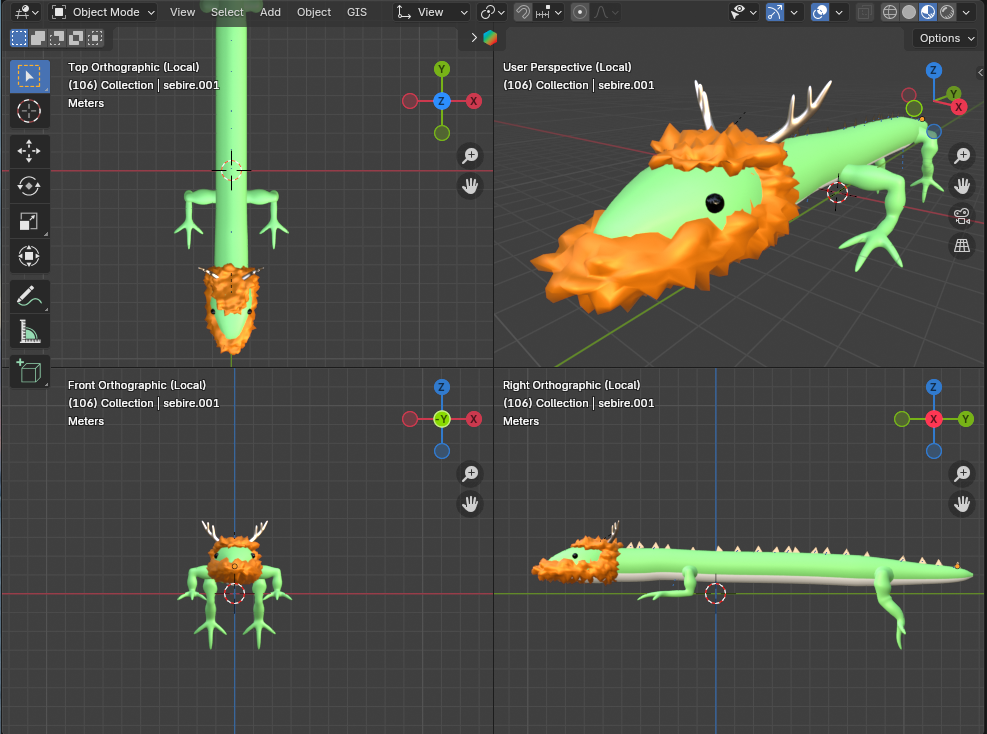
Creating the Body
The body was created using a Bezier curve.
In Edit Mode, I selected the tail’s endpoint and used “Alt + S" to make it thinner.
In the Object Data Properties, I set “Bevel" → “Depth" to 0.12.
Once the body shape was finalized:
- I applied the modifier to the head with “Ctrl + A".
- I converted the curve to a mesh by right-clicking the body → “Convert to Mesh".
- I merged the body and head by selecting both (Shift + Left Click) and pressing “Ctrl + J".
Since I wanted the object origin at the center of the head, I merged the body into the head.
This way, when I later parent the eyes, whiskers, and horns to the head, they would automatically follow its movement.
To close gaps in the mesh, I deleted overlapping faces and used “Ctrl + E" → “Bridge Edge Loops".
Adding Details
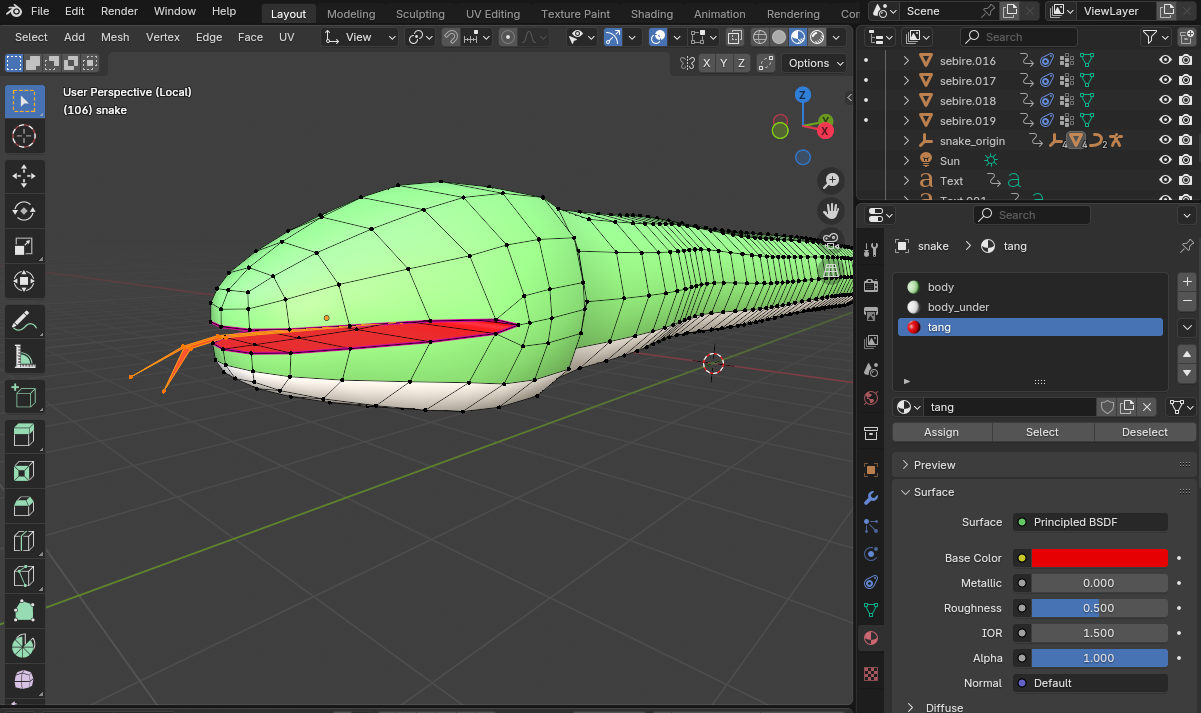
To make the snake form clearer after the dragon’s whiskers fall off, I duplicated the inner mouth mesh to create a tongue.
This model was kept very simple, so I didn’t do any UV unwrapping. Instead, I assigned three material slots for the back, belly, and mouth, coloring them green, white, and red, respectively.
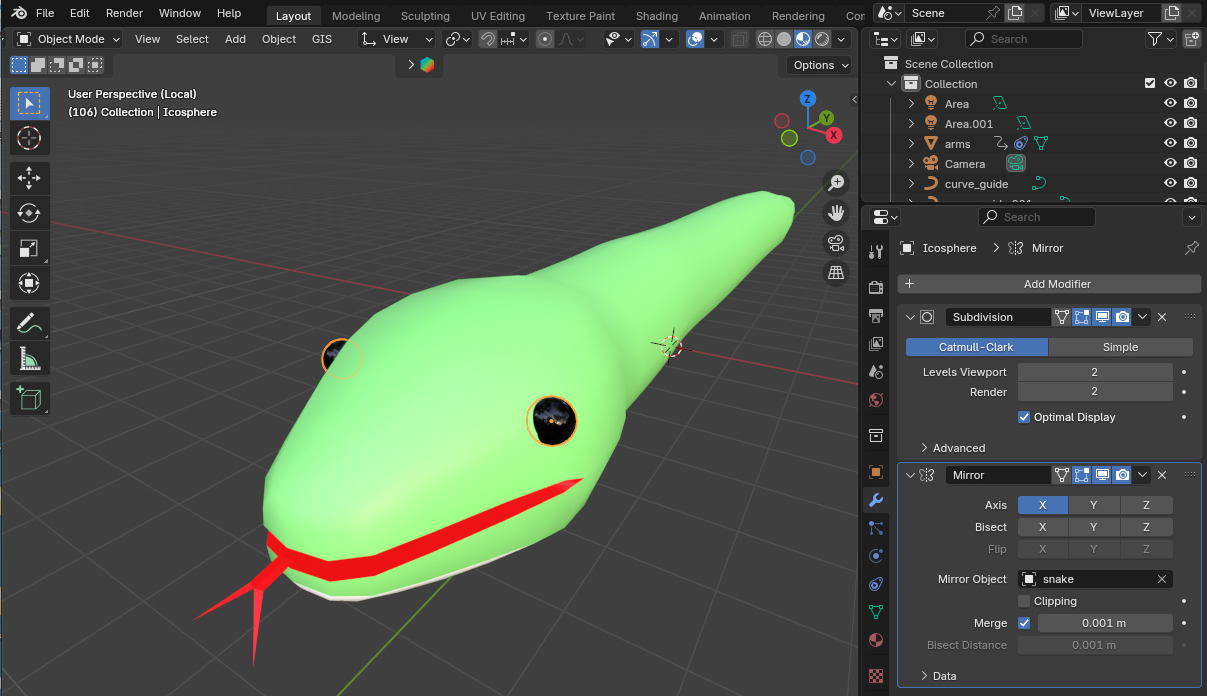
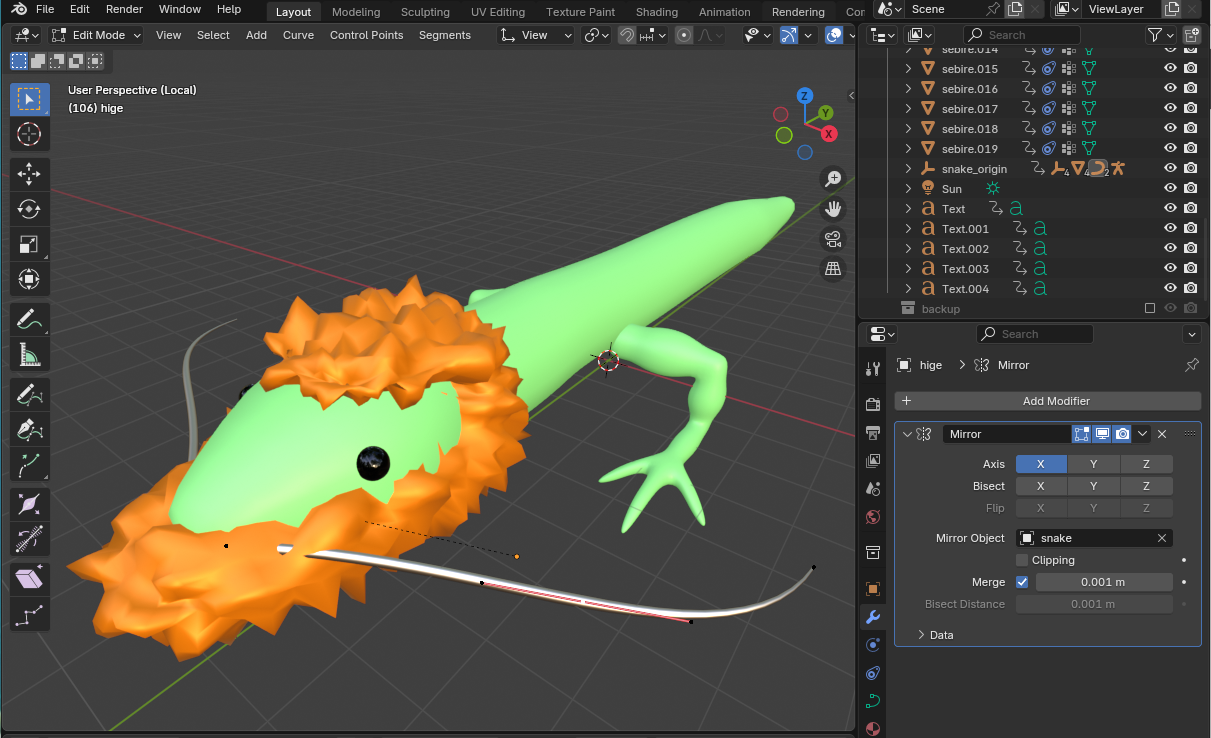
Creating the Eyes
The eyes were made from a UV sphere.
I added a Mirror Modifier and set the mirror object to the body, ensuring symmetry.
Creating Parts That Will Be Removed During Transformation
To animate the transition from dragon to snake, I created removable parts:
- Arms & legs
- Horns
- Moustache
- Long whiskers
- Dorsal fin
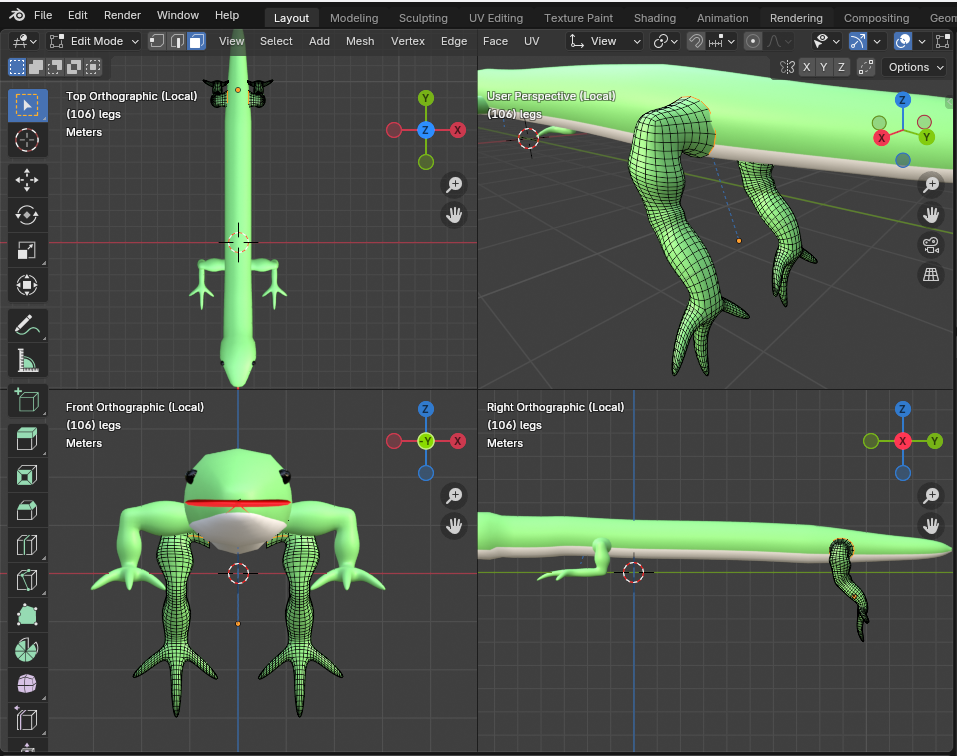
Arms & Legs
- Started with a cube, extruded each segment based on the joints, and added slight bulges to suggest muscle definition.
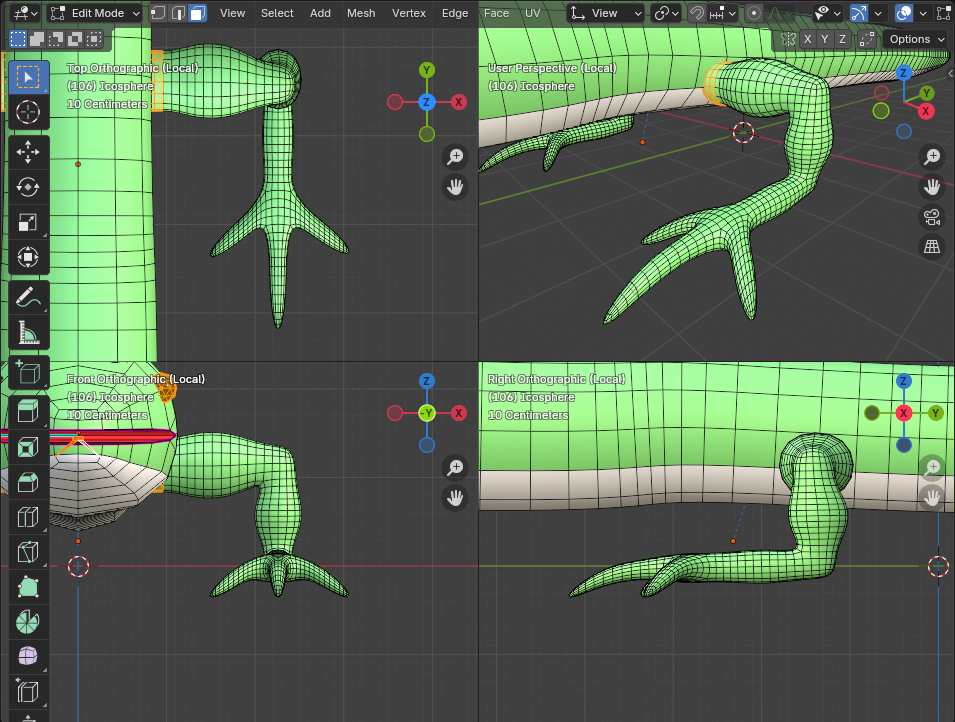
After completing one arm, I duplicated it (Shift + D) and adjusted the size and rotation for the legs.
The Mirror Modifier and Subdivision Surface Modifier were applied.
Horns
- Created similarly to the arms, using a cube with Subdivision Surface & Mirror Modifiers.

Moustache
- Started with an L-shaped mesh, applied a Subdivision Surface Modifier, and used a Displacement Modifier with a Cloud texture to create a bumpy surface.
Long Whiskers
Made with a Bezier curve, just like the tail.
The tip was thinned using “Alt + S".
Dorsal Fin
- Created a triangular mesh and used an Array Modifier to align them along the dragon’s spine.
- The fin was then separated as a new object using “P" (Separate by Selection).
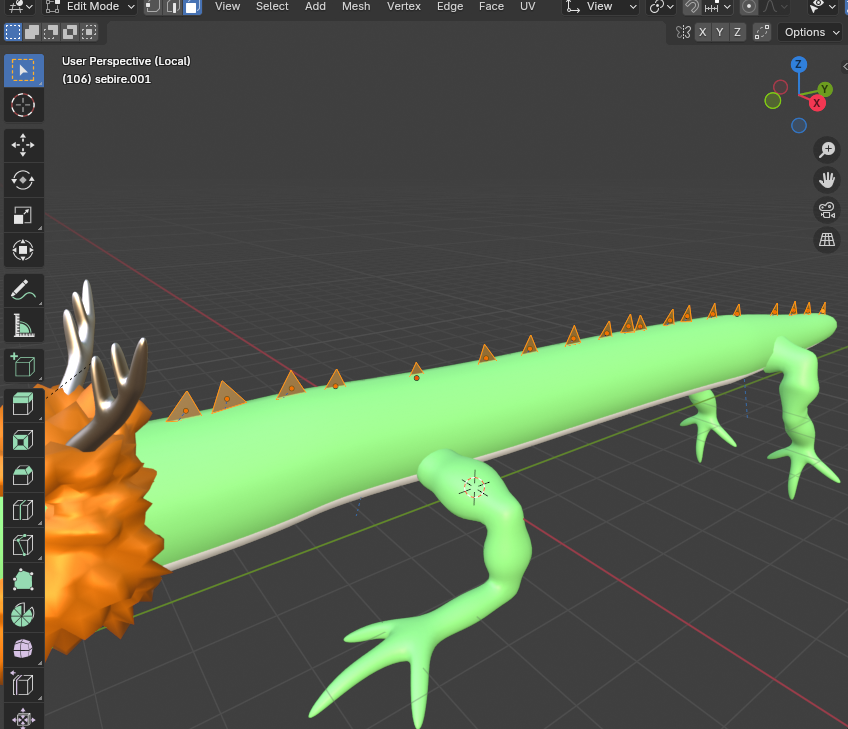
At this point, the “snake wearing a dragon disguise" is complete! 🐉➡🐍
Creating the Animation
To animate the dragon transforming into a snake, I added an armature to the model and applied various constraints to different objects.
Below, I will summarize the process of setting up the rig and constraints to create the animation.
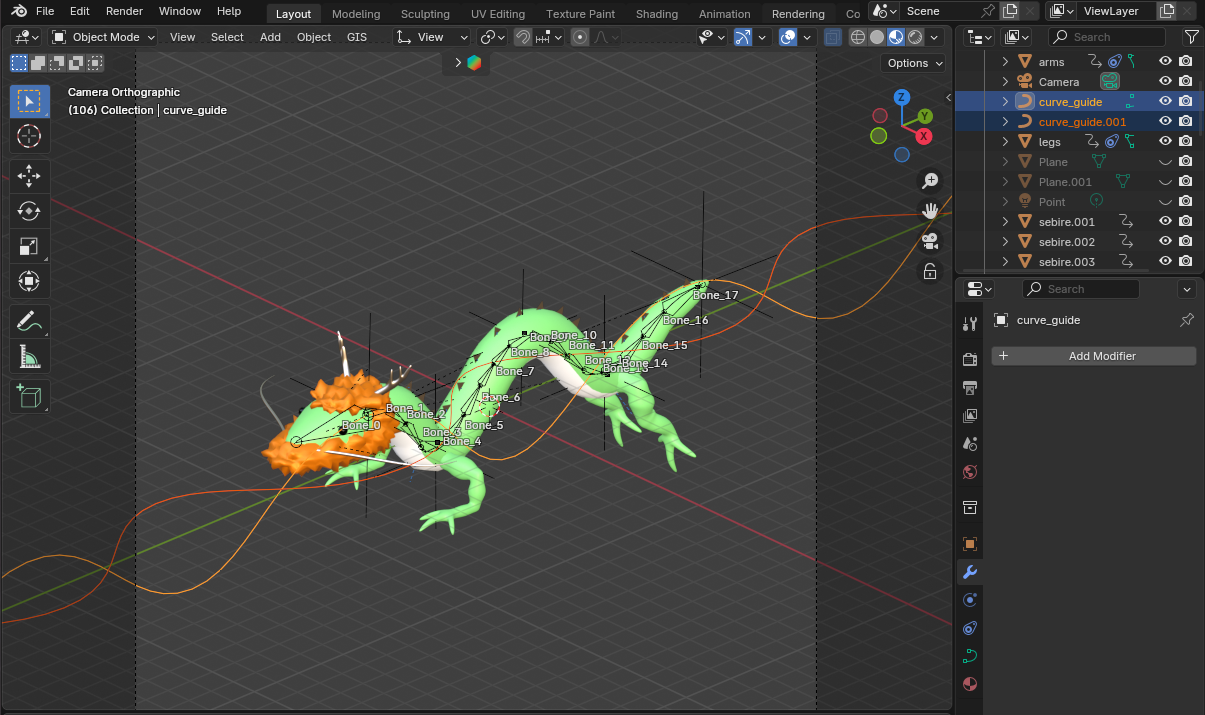
Rigging the Dragon
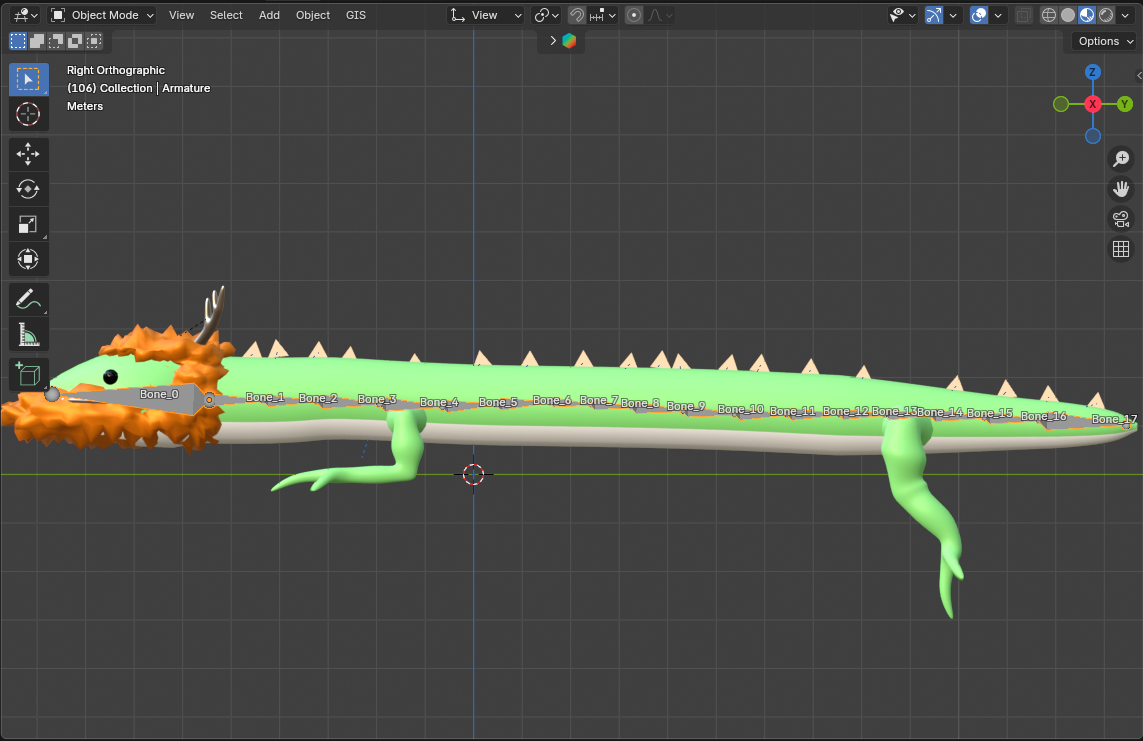
To animate the dragon (or snake) movement, I added bones to the head and body.
First, I created an armature with a single bone for the head.
Then, I extruded (shortcut: E) from the base of that bone, adding 18 smaller bones at equal intervals along the body, all the way to the tip of the tail.
Applying the Spline IK Constraint
- I added a Bezier curve and adjusted its shape to match the dragon’s natural posture.
- Switching to Pose Mode (Ctrl + Tab), I selected the last tail bone.
- Then, I applied a Spline IK constraint from the Bone Constraints tab and adjusted the Chain Length to cover all body and tail bones.
Now, when the Bezier curve is modified, the armature follows the deformation automatically.
Adding an Empty Object for Control
To easily position the dragon, I created an Empty Object at the neck area.
Now, moving the Empty Object controls the entire dragon, making animation adjustments much more intuitive.
I parented both the Armature and the Bezier curve to this Empty Object (in Object Mode, select Armature and Bezier Curve, then select Empty last and press Ctrl + P).
Setting Constraints for Each Part
For the eyes, horns, and whiskers, I directly parented them to the head object using Ctrl + P.
For all other parts, I used the Child Of constraint, which is one of the Object Constraints in Blender.
Go to the “Object Constraints" tab and add a Child Of constraint.
Set the closest body bone as the parent for the hands and feet.
Attaching the Back Fins to the Body
In Edit Mode, I used P → Separate by Loose Parts to split each fin into a separate object.
Then, I re-centered their origins by selecting Set Origin → Origin to Geometry.
Finally, I used the Child Of constraint to attach each fin to the nearest body bone.
Once all the parts followed the body’s movement correctly, the setup was complete. 🎉
Setting Constraints for the Bézier Curve
To control the Bézier curve linked to Spline IK, I added four empty objects (cross-shaped) – one for each control point. These were positioned to align with the curve’s control points.
- Select the empties first, then the Bézier curve, and switch to Edit Mode (Ctrl + Tab).
- Select the control points of the Bézier curve (three points).
- Press Ctrl + H to add a Hook Modifier, binding the control points to the empty objects.
Now, when moving or rotating the empties, the Bézier curve deforms accordingly.
Alternative Hook Modifier Method
The Hook Modifier can also be added manually through the Modifier Properties panel.

To ensure the empties follow the dragon’s movement, I parented all four of them to the main empty object at the dragon’s head.
広告/AD
Dragon and Snake Animation
Now it’s time to create the dragon (snake) animation.
First, I added a camera and decided on the angle and movement path for the dragon (snake).
I placed a Bézier curve as the path for the dragon and the serpent. Two Bézier curves were added: one for the dragon’s entrance and one for the snake’s exit.
This Bézier curve serves as a reference when adding keyframes to the empty objects.
Creating the Animation
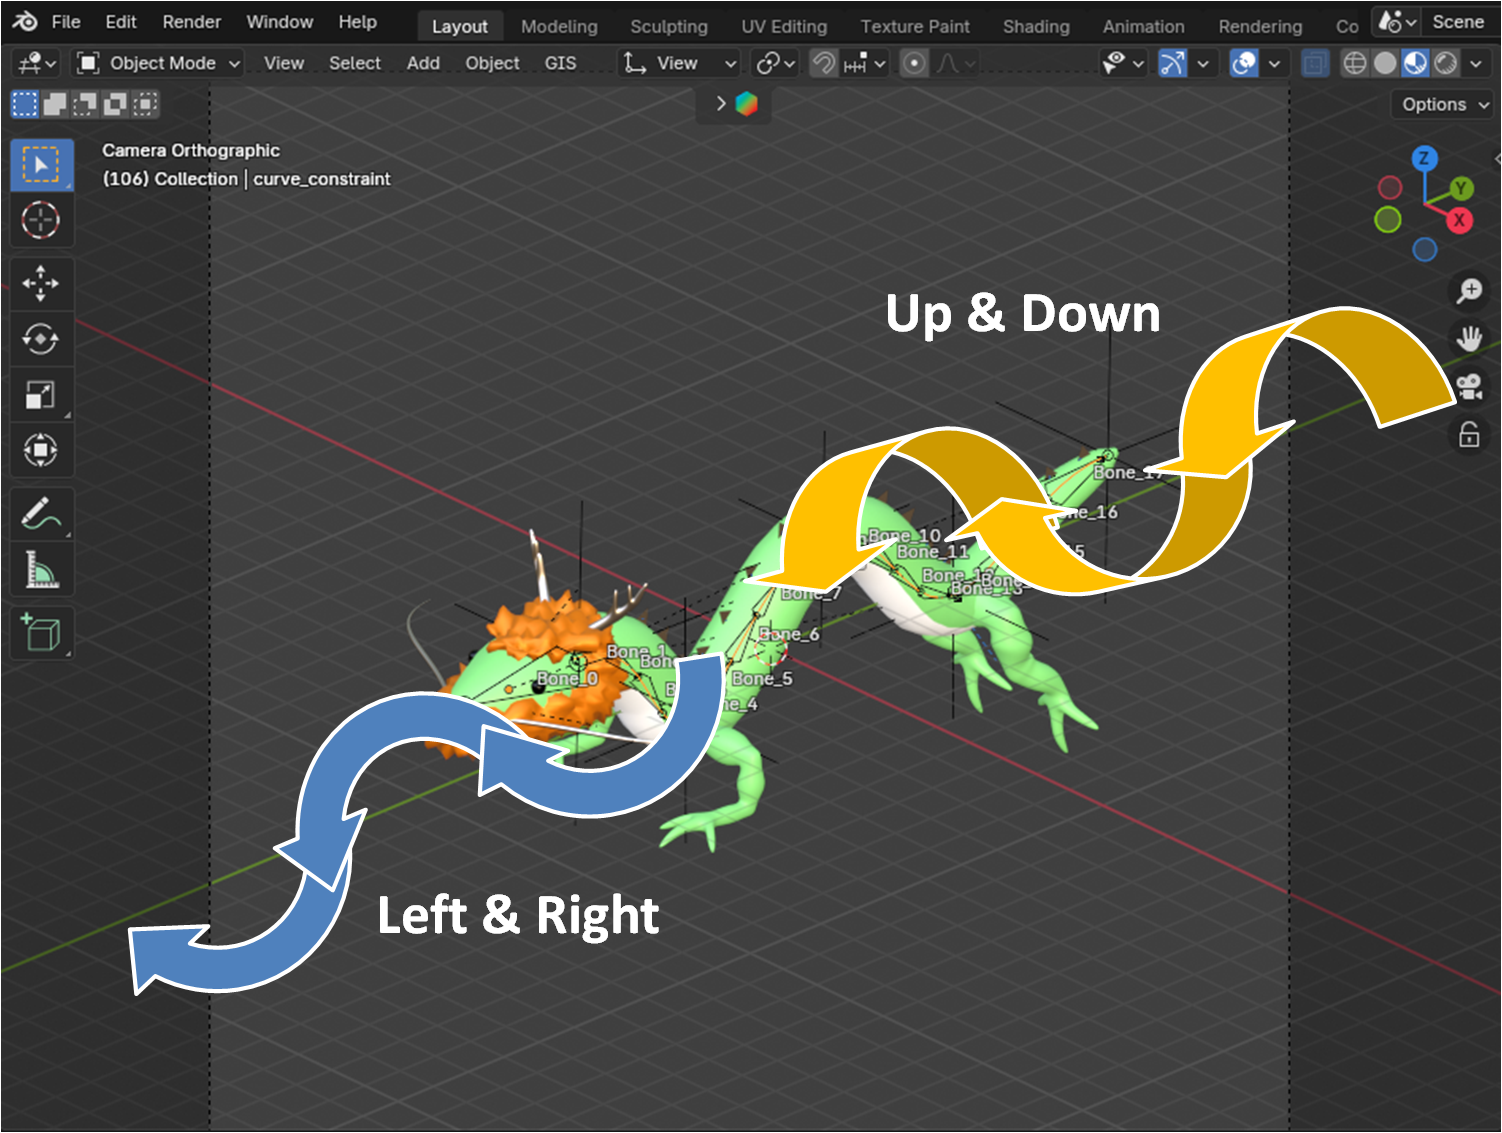
Next, I added keyframes for the dragon’s armature and the empty objects to create the snake’s motion.
While replaying the timeline several times, I added keyframes to wiggle the body up and down, refining the movement until the desired effect was achieved.
In this animation, at frame 95, the dragon stops, transforms into a snake, and exits, slithering away.
Transformation Scene
For the transformation scene, I added keyframes to each part’s position so they would exit off-camera one by one.
Keyframes were also added to the armature and empty objects to move them from the entrance path to the exit path.
For the snake’s exit animation, I followed the same process as the dragon’s entrance animation to maintain consistency.
Text Animation
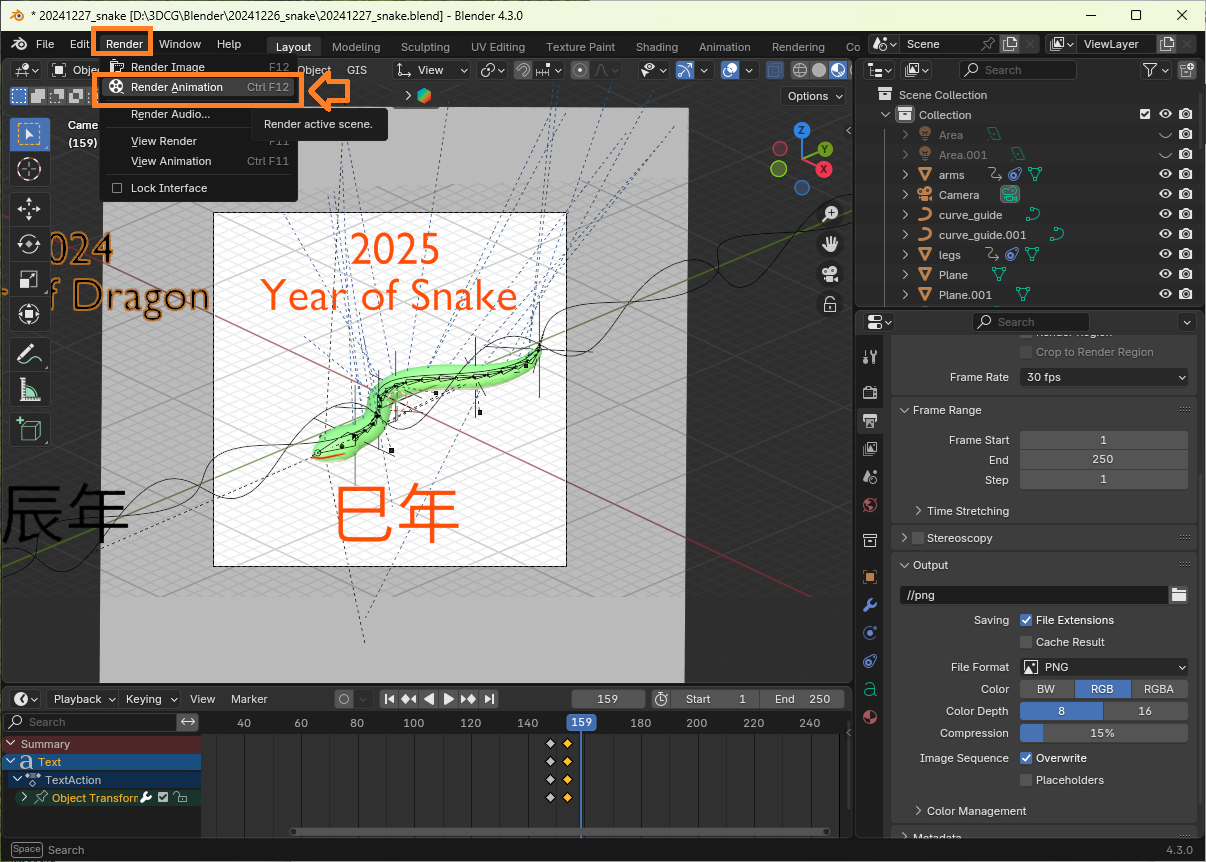
I added a text object as shown here, to clearly represent the transition from the Year of the Dragon (2024) to the Year of the Snake (2025).
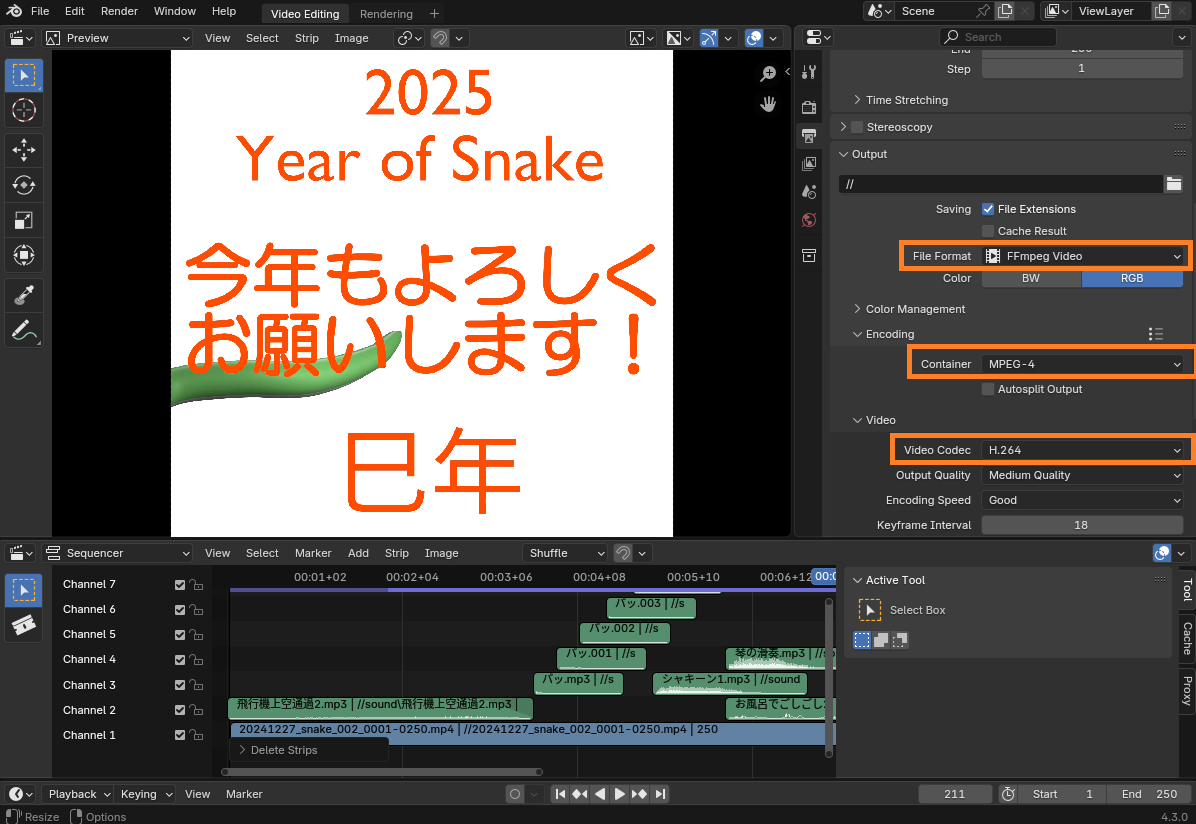
Adding Sound Effects in the Video Editor
First, render the video without sound and export it.
I used the Eevee rendering engine to render the video in PNG format.
Next, I launched Blender’s “New Project" → “Video Editing," and dragged and dropped the video file onto the video editor’s sequencer.
On the video editor’s track, I dragged and dropped the downloaded sound effect audio files and added them.
By the way, all the sound effects used in this project are from “Sound Effect Lab."

For the settings when rendering the video with sound, I always set the output format to “FFmpeg Video," the container to “MPEG-4," and the video codec to “H.264."
広告/AD
How to Make It Move More Smoothly
In this project, I used “Spline IK + Hook Modifier" to express the snake’s movement.
However, if you simply want to express smoother motion, it’s recommended to avoid using an armature and instead apply a curve modifier to the mesh object of the snake’s body. This method will result in a smoother movement, like the example shown above, and it’s easier to set up.
If I find a way to make the armature-based method smoother, I’ll share it in another post.
Conclusion
I summarized the process of creating the animation transition from the dragon to the snake.
It was surprisingly challenging to express smooth, serpentine movements using rigs 😅
If I have the chance again, I’ll take on the challenge and try to find a better approach!
広告/AD