[3D Generative AI] Testing Hunyuan3D-2-Win Portable
Hello, this is Klala.
Since autumn 2025, the surge in demand driven by the AI boom has caused a sharp increase in prices for PC components such as RAM, SSDs, and GPUs.
Every time I check online or visit stores to see that RAM prices haven’t come down, my fellow PC self-build enthusiasts and I feel quite gloomy 😅
However, one could also interpret this as progress in AI development. Embracing this trend, I decided to try out AI software capable of creating 3D CG models and video content.
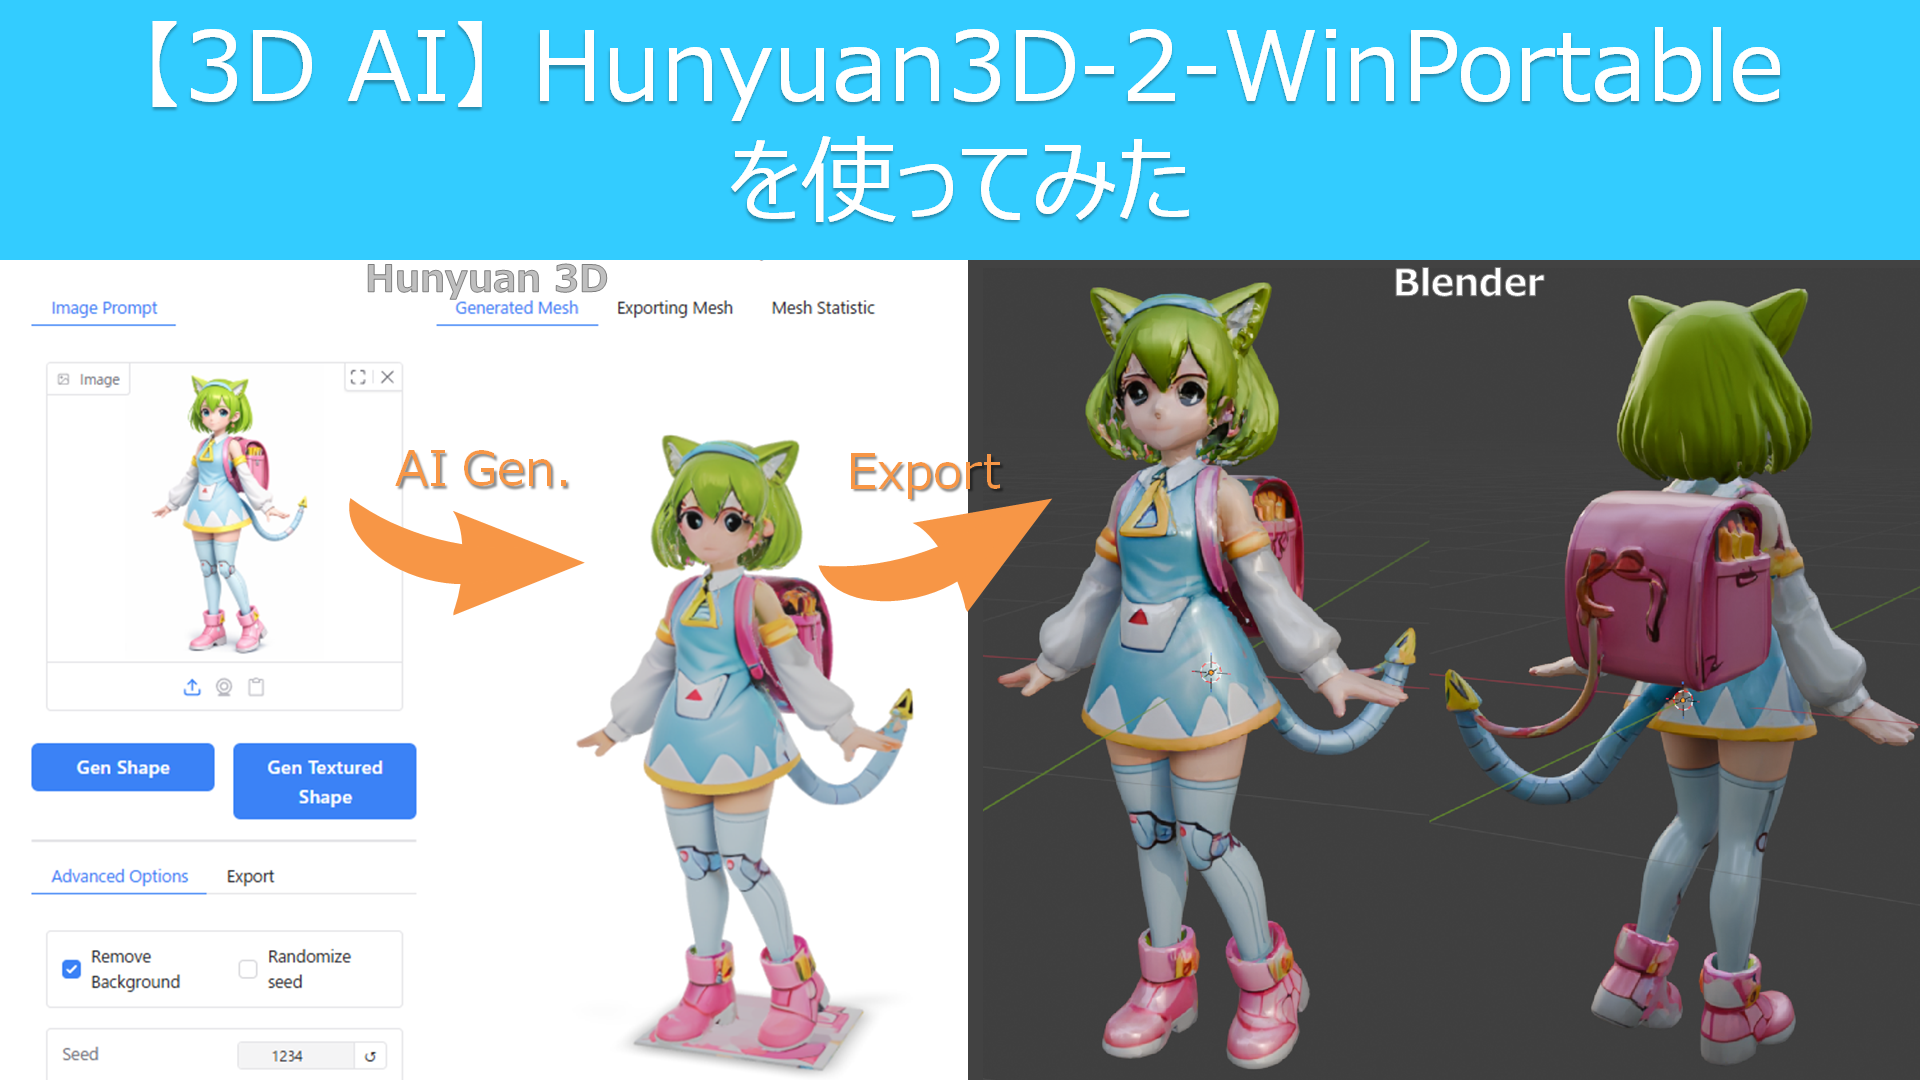
In this article, I will share my experience using “Hunyuan3D-2-WinPortable"—a local 3D generative AI that runs on your own PC without relying on cloud AI services—to create 3D models from character illustrations.
While setting up local AI can be a bit tricky, I’ve compiled the actual steps to use it, along with the hurdles I encountered and how I overcame them.
I’ll also introduce methods for creating 3D models using Hunyuan 3D-2, including sample creations.
If you have any comments or questions, feel free to reach out via Klala’s Twitter: https://twitter.com/klala_lab(^^)/
About 3D Generative AI
To understand what 3D generative AI is, I asked Google Gemini.
3D generative AI is a technology that automatically creates three-dimensional models from text or two-dimensional images.
It automates tasks that would otherwise require specialized knowledge or hours of manual modeling, enabling the rapid production of data for games, VR, metaverse applications, and 3D printing. This makes 3D content creation accessible to anyone, regardless of their background.
Here is an example of a 3D model created using “Hunyuan3D-2.1" from a 2D illustration, rendered in the 3D CG software Blender.
While my blog has previously introduced various modeling techniques in Blender, mastering them takes time. Manually modeling complex character models or creating textures can also be time-consuming.
However, with 3D generative AI, you can generate a 3D model from an illustration in just tens of seconds to a few minutes.
(The illustration used as input for the AI was of “Delta Mon," a character created by Blend AI Co., Ltd.)
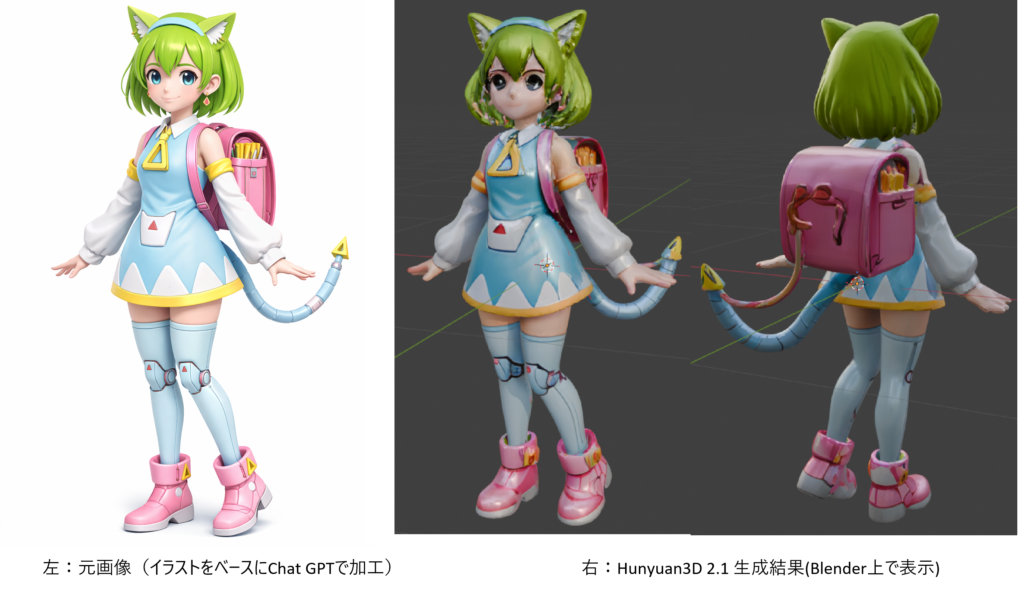
Although the quality of current 3D models is still imperfect—with occasional geometric distortions or strange textures—manual adjustments are often required at some point. That said, these tools appear highly useful for creating base assets for artwork, generating large quantities of background objects, and many other applications in 3D CG production.
Difference Between Cloud AI and Local AI
AI services are primarily divided into two categories based on where the computing operations take place: Cloud and Local.
- Cloud AI: Runs AI on external servers accessed via the internet.
- Local AI: Runs AI directly on your own PC (local environment).
Because Cloud AI performs computations on a service provider’s powerful servers, users can leverage this technology without purchasing high-performance hardware or setting up a complex environment themselves.
Additionally, it typically offers access to much larger and more sophisticated models that are difficult to run on personal PCs, making it generally more powerful than local solutions in terms of raw capability.
However, using these services comes at a cost. You usually need to pay via subscription (monthly fees) or credits (pay-per-use), which means there are restrictions on the number of free generations and available features.
On the other hand, while Local AI requires a significant upfront investment (buying a capable PC) and effort in environment setup, it offers complete freedom: you can customize the AI to your liking and use it as much as you want.
That said, compared to Cloud AI, local solutions often offer fewer service options, and the quality of generated models may be lower than paid cloud services. Personally, I don’t think they are ideally suited for commercial purposes (though this is just my opinion).
Nevertheless, for those who already own a PC equipped for gaming or 3D CG work, local AI allows you to utilize your existing hardware resources for free. For these users, there is definitely value in trying out Local AI.
Required PC Specifications for Using Local AI
To use local AI comfortably, the performance and capacity of your Video Card (GPU) are critical.
Regarding the video card used for AI computations: since AI processing requires massive amounts of temporary data storage (i.e., memory) during calculations, the GPU’s VRAM capacity is just as important as its raw compute power. You should aim for at least a 12GB GPU, though 16GB or more is highly recommended.
Additionally, since the frameworks used by AI tools (such as PyTorch) are optimized for NVIDIA GPUs, using an NVIDIA GPU—particularly from the RTX series—is strongly recommended.
Furthermore, system RAM is also vital during AI computation to handle model loading, buffering, and complementing VRAM limitations. At least 32GB of system memory is recommended.
Incidentally, here are the basic PC specifications required to run the local AI featured in this article, “Hunyuan3D-2-WinPortable“:
- NVIDIA Video Card (GPU): Must support driver version 576.57 or later
- VRAM Capacity:
- 3GB+ (if generating geometry only)
- 6GB+ (if generating both geometry and textures)
- System Memory (RAM): 24GB+
(Source: https://github.com/YanWenKun/Hunyuan3D-2-WinPortable)
Furthermore, because you need to install model data taking up several tens of GBs to use AI, you will need an SSD of at least 500GB, though 1TB or more is recommended.
To summarize, here are the recommended PC specifications for 3D Generative AI:
- GPU: NVIDIA video card with 16GB+ VRAM (e.g., RTX 5060 Ti 16GB, RTX 5070 Ti, RTX 5080, etc.)
- RAM: 32GB or more
- SSD: 1TB or more
In 2025 (leading into the AI boom discussed earlier), I built a custom PC equipped with 32GB of RAM and an RTX 5060 Ti specifically for 3D CG production.
I have compiled articles detailing how to select components and the actual assembly process, so if you are interested, please check those out as well.
Introduction to Hunyuan3D-2-WinPortable
In this section, we will introduce the local 3D generative AI tool, “Hunyuan3D-2-WinPortable," and explain how to install it.
Additionally, we will cover important precautions during installation, as well as common errors that may occur and their solutions.
About Hunyuan3D
Hunyuan3D (also known as 混元3D in Chinese) is an AI model developed by China’s Tencent.
By inputting images or text commands (prompts), it generates 3D models. Since its announcement in 2024, the model has received annual updates. As of 2026, version 3.0 is the latest release for cloud-based AI services.
On the other hand, earlier versions have been made open-source and released on GitHub (see link below). Based on these, various volunteers have created and published applications incorporating the AI models.
https://github.com/Tencent-Hunyuan/Hunyuan3D-2
About Hunyuan3D-2-WinPortable
“Hunyuan3D-2-WinPortable" is an application developed by YanWenKun and released on GitHub that allows the Hunyuan3D-2 model to run in a Windows environment.
You can download it from the link below:
https://github.com/YanWenKun/Hunyuan3D-2-WinPortable
Since the downloadable file differs depending on your operating environment, I will explain the detailed steps in the next section.
Installation Guide (Using RTX 5060 Ti)
As described on YanWenKun’s GitHub page, the version of CUDA Toolkit required and the corresponding file to download depend on your GPU.
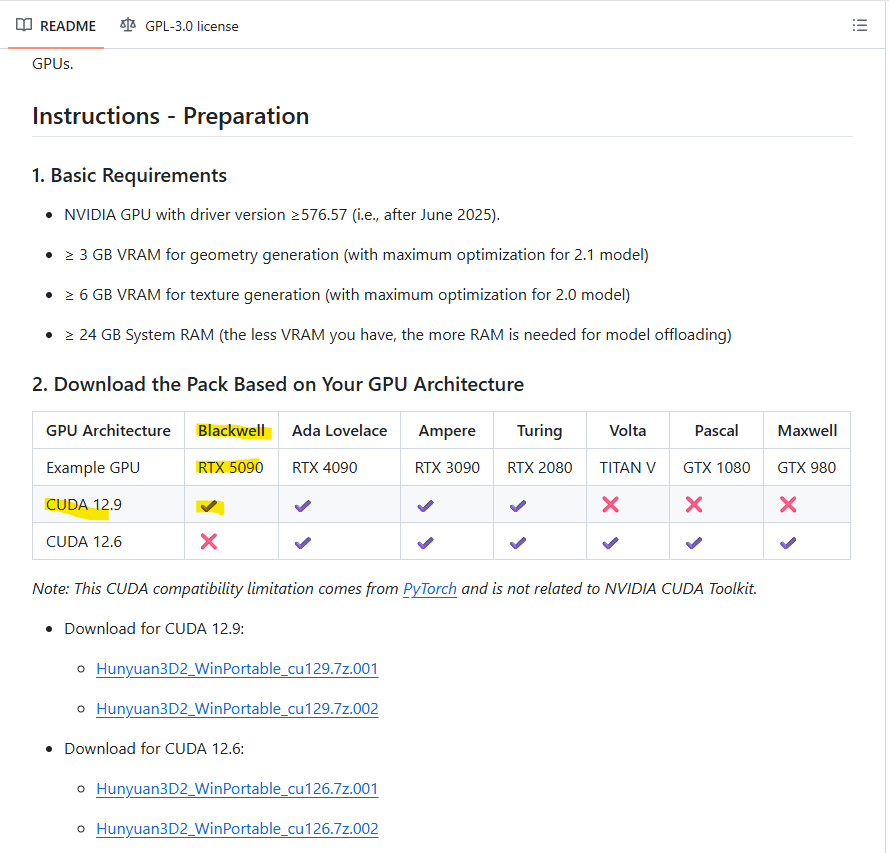
In this guide, we will introduce the installation steps using an RTX 5060 Ti as an example.
1.Install CUDA Toolkit
If you are using a GPU from the RTX 50xx series (Blackwell architecture), you must install CUDA Toolkit 12.9.
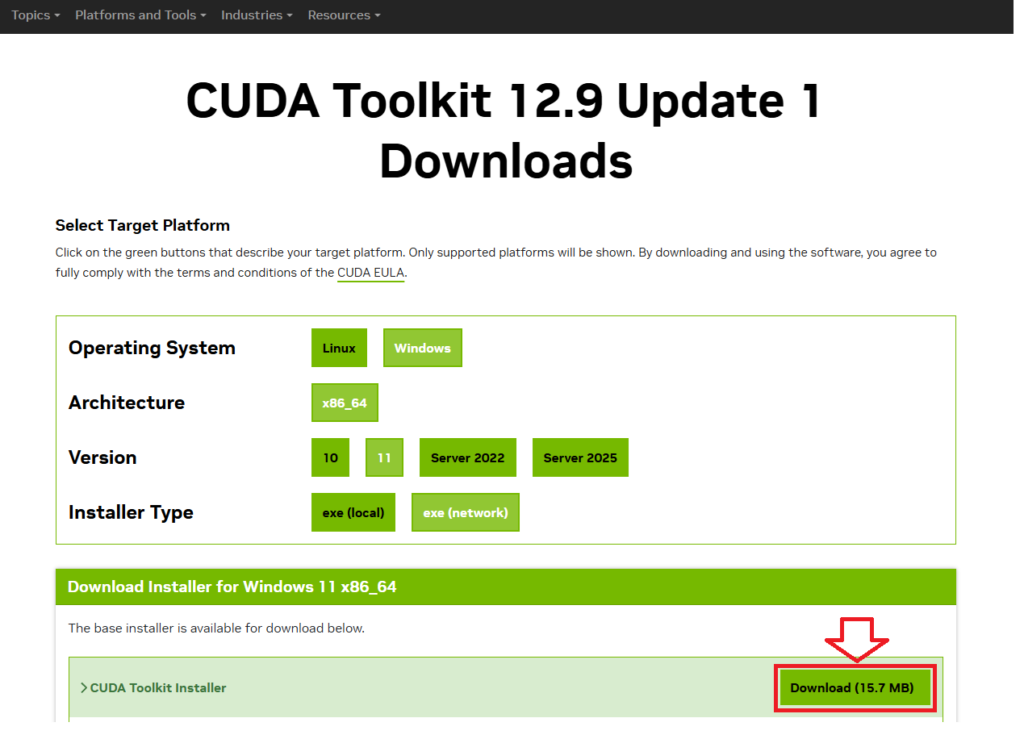
You can download the installer for CUDA Toolkit 12.9 from the link below:
Select your operating system and click “Download" to begin the installation.
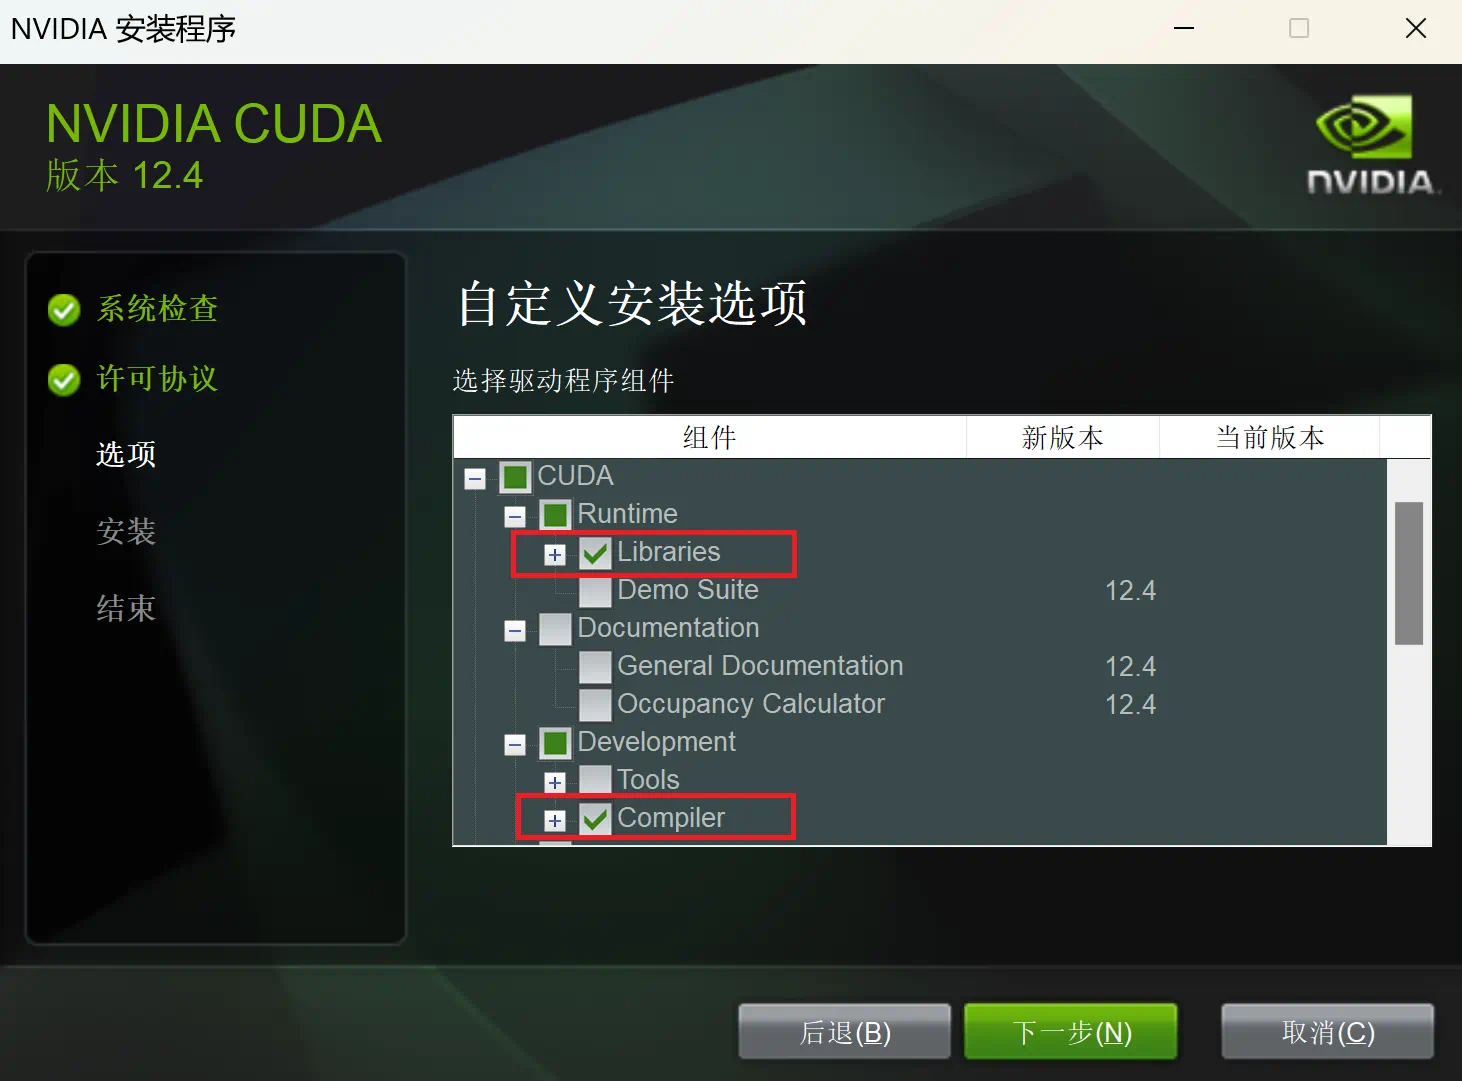
(According to the GitHub instructions, you should choose “Custom Install" and select only the libraries and compilers during setup; however, I opted to install everything.)
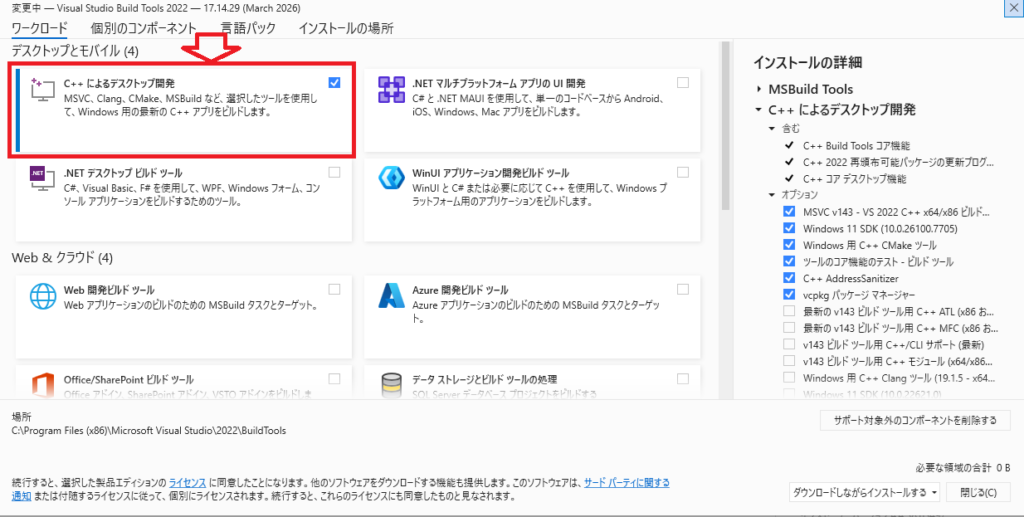
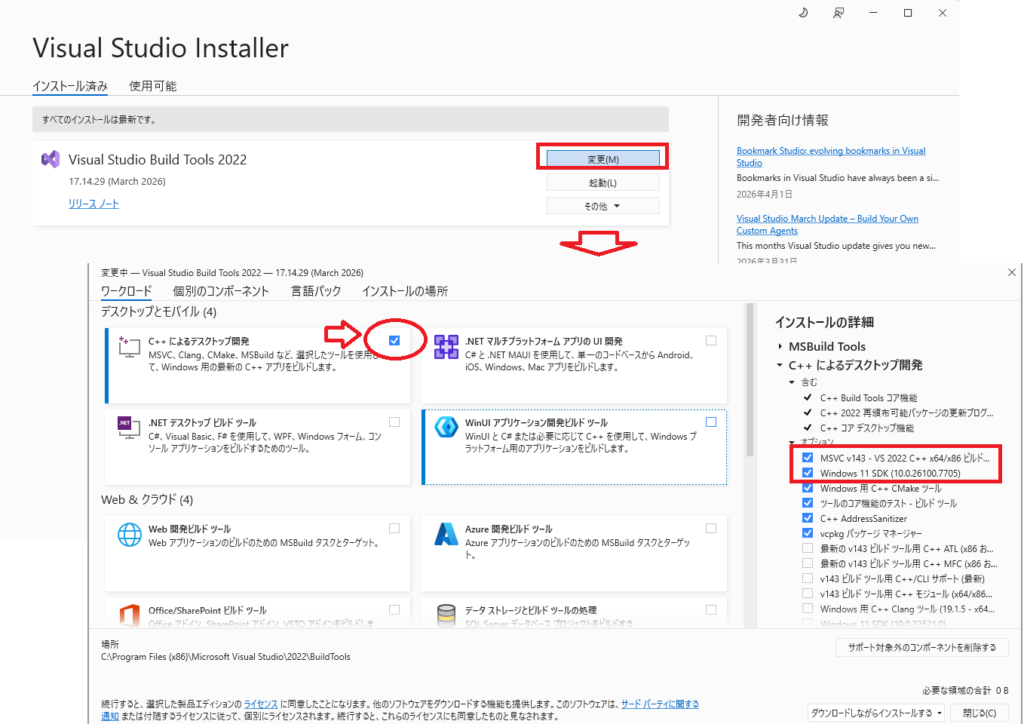
2. Install Visual Studio Build Tools 2022
If you are using Windows, Visual Studio Build Tools are required to build the application.
The current latest version is 2026, but I installed the Visual Studio Build Tools 2022 from the link below (note that a Microsoft account login may be required):
https://visualstudio.microsoft.com/ja/vs/older-downloads

Check the box for “Desktop development with C++" and install the following components:
- MSVC v143
- Windows 10/11 SDK
3.Download and Extract the Zip File
Following the GitHub instructions, download the following two files (compatible with RTX 50xx series and CUDA Toolkit 12.9):
Hunyuan3D2_WinPortable_cu129.7z.001
Hunyuan3D2_WinPortable_cu129.7z.002
Place both files in the same folder and extract the one named “7z.001". The extraction process will automatically reference both parts (7z.001 and 7z.002) (please use a compression tool like 7-Zip).
Warning: If the file path is too long, errors may occur. Please use a short folder name, such as C:\AI\HY3D2.
4.Run the Batch Files
After extraction, your folder structure should look like this:
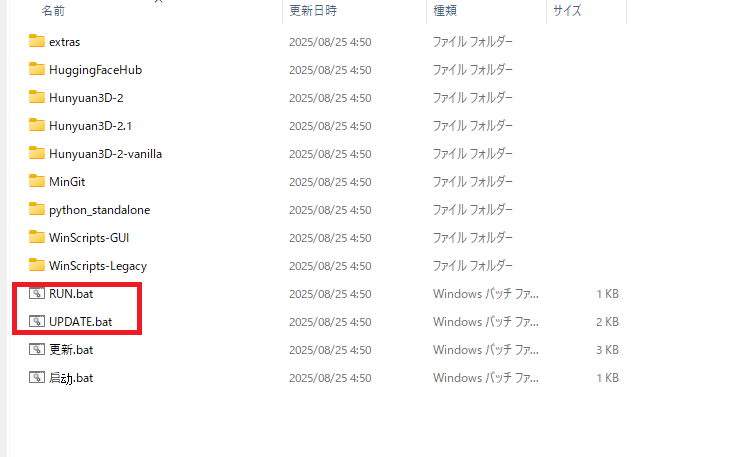
There are two files: RUN.bat and UPDATE.bat. These serve as the startup and update batch files, respectively.
First, double-click UPDATE.bat to check for updates available for Hunyuan3D.
Next, double-click RUN.bat. A command prompt window will appear, followed by the “Hunyuan 3D 2 Series Launcher" interface.
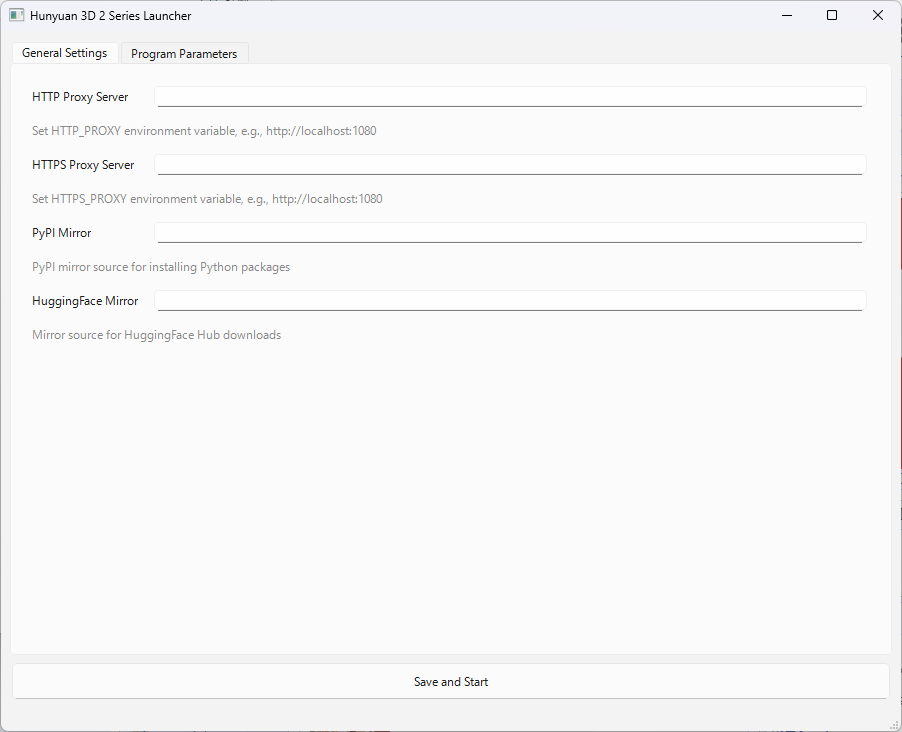
In the “General Settings" tab of the Launcher, you do not need to enter anything. Click the “Program Parameters" tab, and the screen will look as follows:
We will explain these settings in detail later. For now, click “Save and Start" at the bottom of the screen.
The interface will transition to a command prompt-like window.
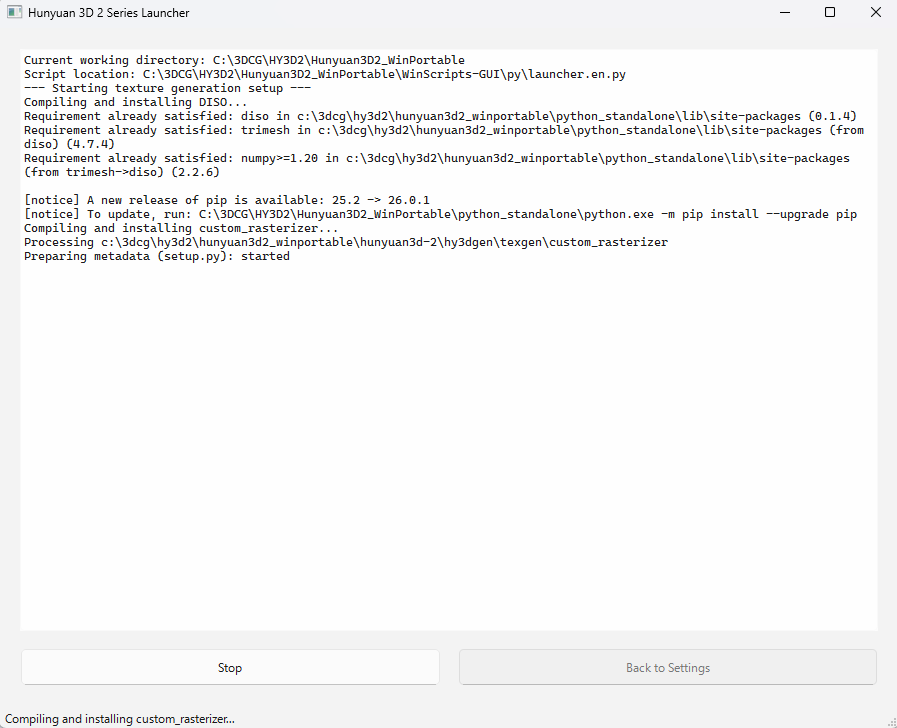
You may see an error message like this: "ModuleNotFoundError: No module named 'triton'"
This does not affect the launch of Hunyuan3D, so you can safely ignore it.
You will know the GUI is ready once you see a message similar to this:
INFO:     Started server process [34188]
INFO:     Waiting for application startup.
INFO:     Application startup complete.
INFO:     Uvicorn running on http://0.0.0.0:8080 (Press CTRL+C to quit)
Open your web browser and access “http://localhost:8080/“. The Hunyuan 3D-2 GUI should appear as shown below.
Once you reach this point, you have successfully launched Hunyuan3D-2-WinPortable.

Important Notes and Error Troubleshooting for Installation
When installing Hunyuan3D-2-WinPortable, please observe the following key points:
- Use an Nvidia GPU.
- Ensure your GPU drivers are up to date.
- Install a CUDA Toolkit compatible with your GPU version.
- For Visual Studio Build Tools 2022, install “MSVC v143" and “Windows 10/11 SDK".
- Configure and verify Environment Variables (restart your PC after making changes).
- Depending on the error messages, you may need to recompile
custom_rasterizeror update PyTorch.
Below, we introduce common errors and their solutions.
(By the way, nowadays, you can often input error messages into generative AI like ChatGPT to get advice on causes and fixes, which is highly recommended as a first step when encountering issues.)
custom_rasterizer (CUDA Extension for Textures) is Broken
When I first tried to run Hunyuan3D-2, mesh generation worked, but enabling texture generation resulted in an error.
Upon investigation, I found that texture generation internally builds and uses a CUDA extension located at hy3dgen/texgen/custom_rasterizer. The build process for this component failed, leaving it broken.
You can manually rebuild custom_rasterizer by running the following command:
C:(Hunyuan3D_Install_Folder)Hunyuan3D2_WinPortable\Hunyuan3D-2\hy3dgen\texgen\custom_rasterizer>C:(Hunyuan3D_Install_Folder)Hunyuan3D2_WinPortable\python_standalone\python.exe -m pip install .Missing or Version-Mismatched CUDA Toolkit / Visual Studio Build Tools
Errors will occur if the appropriate versions of CUDA Toolkit and Visual Studio Build Tools required for environment setup are not installed.
For example, if you are using an RTX 50xx series GPU:
- CUDA Toolkit: Version 12.9
- Visual Studio Build Tools 2022
- MSVC v143
- Windows 10/11 SDK
To check your CUDA Toolkit version via Command Prompt, run the following:
nvcc --versionIf the output resembles the following, Version 12.9 is working correctly:
nvcc: NVIDIA (R) Cuda compiler driver
Copyright (c) 2005-2025 NVIDIA Corporation
Built on Tue_May_27_02:24:01_Pacific_Daylight_Time_2025
Cuda compilation tools, release 12.9, V12.9.86
Build cuda_12.9.r12.9/compiler.36037853_0
To verify the version of Visual Studio Build Tools, open the “Visual Studio Installer" from the Windows Start Menu. If “Desktop development with C++" is checked, both “MSVC v143" and “Windows 10/11 SDK" are installed correctly, so you can proceed without worry.
PyTorch Version Mismatch
For RTX 50xx series GPUs, the PyTorch framework included in the package might conflict with CUDA Toolkit 12.9, causing errors. In such cases, update PyTorch to the “Nightly" (latest) version using the following commands in Command Prompt:
C:$Hunyuan3D_Install_Folder)\Hunyuan3D2_WinPortable\python_standalone\python.exe -m pip uninstall torch torchvision torchaudio
C:$Hunyuan3D_Install_Folder)\Hunyuan3D2_WinPortable\python_standalone\python.exe -m pip install --pre torch torchvision torchaudio --index-url https://download.pytorch.org/whl/nightly/cu129
Next, start the Python interpreter and import torch to confirm that the PyTorch version matches your CUDA Toolkit version (Version 12.9 is recommended for RTX 50xx series):
C:($Hunyuan3D_Install_Folder)\Hunyuan3D2_WinPortable\python_standalone>python.exeExpected Input/Output:
Python 3.12.11 (main, Aug 18 2025, 19:17:54) [MSC v.1944 64 bit (AMD64)] on win32
Type "help", "copyright", "credits" or "license" for more information.
>>> import torch
>>> print(torch.__version__)
2.8.0+cu129
>>> print(torch.cuda.is_available())
True
Environment Variable PATH Issues
During the PyTorch CUDA extension build process, you might encounter an error similar to the following:
UserWarning:
It seems that the VC environment is activated but DISTUTILS_USE_SDK is not set.
In this case, your environment variables are incomplete. You need to launch Command Prompt as Administrator and execute the following commands to fix them:
set DISTUTILS_USE_SDK=1
set CUDA_HOME=C:Program FilesNVIDIA GPU Computing ToolkitCUDAv12.9
set CUDA_PATH=C:Program FilesNVIDIA GPU Computing ToolkitCUDAv12.9
Finally, run the following commands to ensure the PATH variables are correctly outputted:
echo %CUDA_HOME%
echo %CUDA_PATH%
Let’s Give Hunyuan3D a Try
From here on out, we will explore how to use Hunyuan3D and review the generated results, showcasing the settings interface and 3D model outputs.
System Specifications:
- OS: Windows 11
- CPU: Intel Core Ultra 7 265KF
- RAM: 32GB(DDR5-6000)
- GPU: RTX5060Ti(VRAM 16GB)
Let’s review the startup procedure one more time.
Step 1: Launch the Launcher
First, double-click RUN.bat to start the launcher.
Step 2: Start the Service
Click the Save and Start button at the bottom of the screen. Wait until you see the message:
”Uvicorn running on http://0.0.0.0:8080”
Step 3: Access via Browser
Once the service is ready, open your web browser and navigate to:
The Hunyuan3D-2 interface will now launch in your browser.
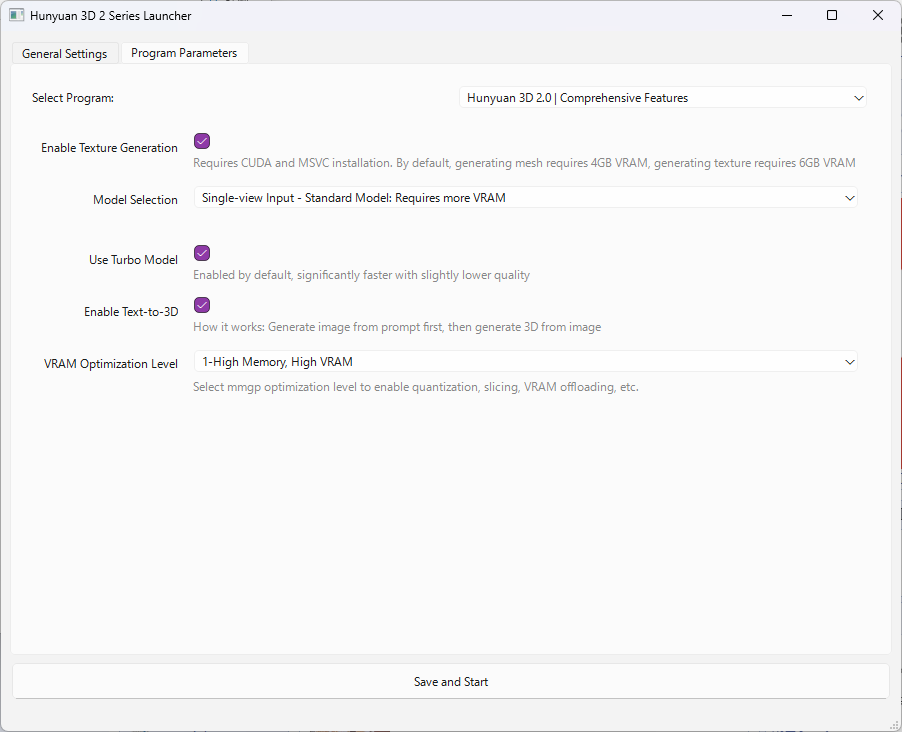
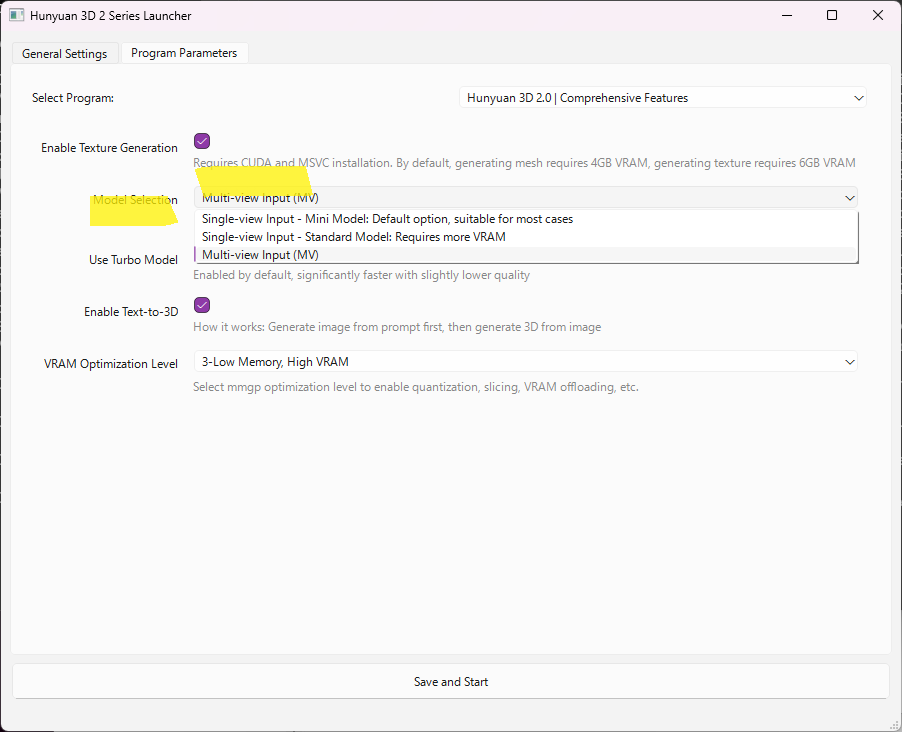
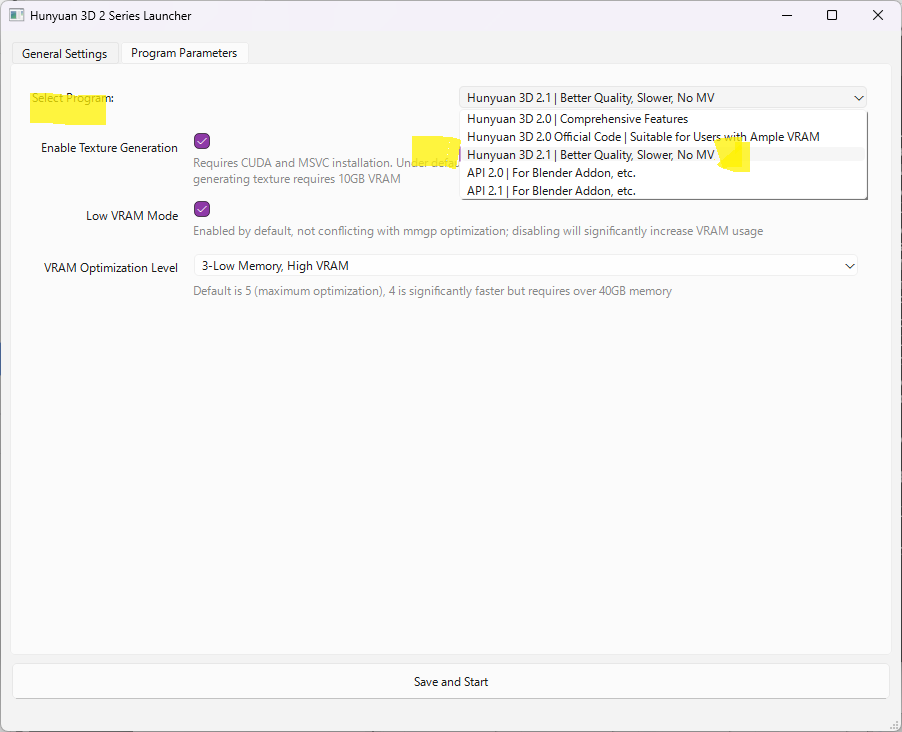
Selecting the Program
From the top-right corner of the launcher, you can select which program to execute.
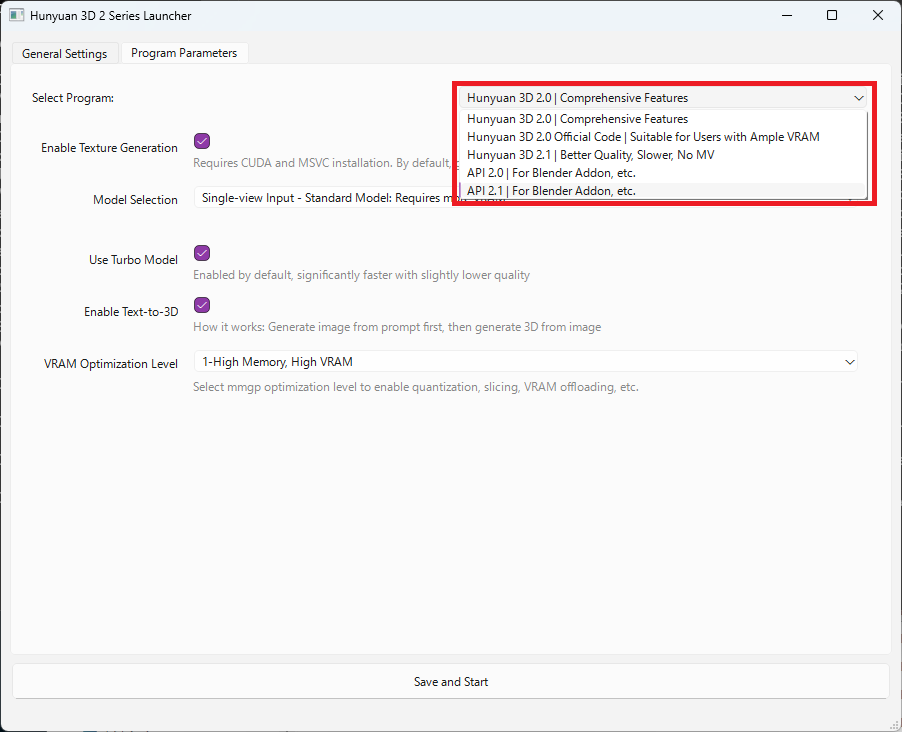
You have five options available:
- Hunyuan3D 2.0 | Comprehensive Features: Includes comprehensive features supporting text-to-3D generation and MV (Multi-View: generating from multiple images).
- Hunyuan3D 2.0 Official Code: A high-resolution version that requires large amounts of VRAM.
- Hunyuan3D 2.1: A newer version than 2.0. It offers higher-quality generation models and supports PBR (Physically Based Rendering) materials, though generation times are longer compared to the 2.0 version.
- API 2.0/2.1: A mode designed to function as an API server for external applications like Blender.
Recommendation: Depending on your desired inputs and output, we recommend choosing either the first option (Hunyuan3D 2.0) or the third (2.1).
In this article, I will actually perform 3D generation using both Hunyuan3D 2.0 and 2.1 to demonstrate their differences.
Hunyuan3D-2.0
When you select “Hunyuan3D 2.0 | Comprehensive Features" as the program to run, you can choose the specific model in the “Model Selection" section:
- Single-view Input – Mini Model: A compact model designed for single-image generation (default option).
- Single-view Input – Standard Model: Generates from a single image but produces high-resolution textures. Note that this requires more VRAM than the Mini Model.
- Multi-view Input (MV): Generates 3D models from 1 to 4 multi-view images (e.g., orthographic projections).
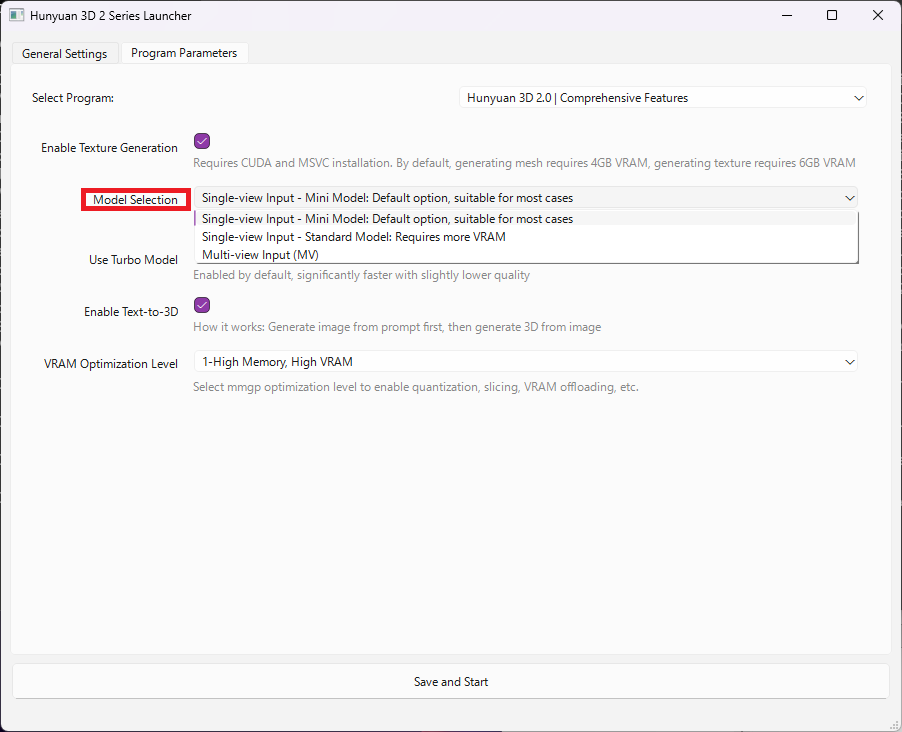
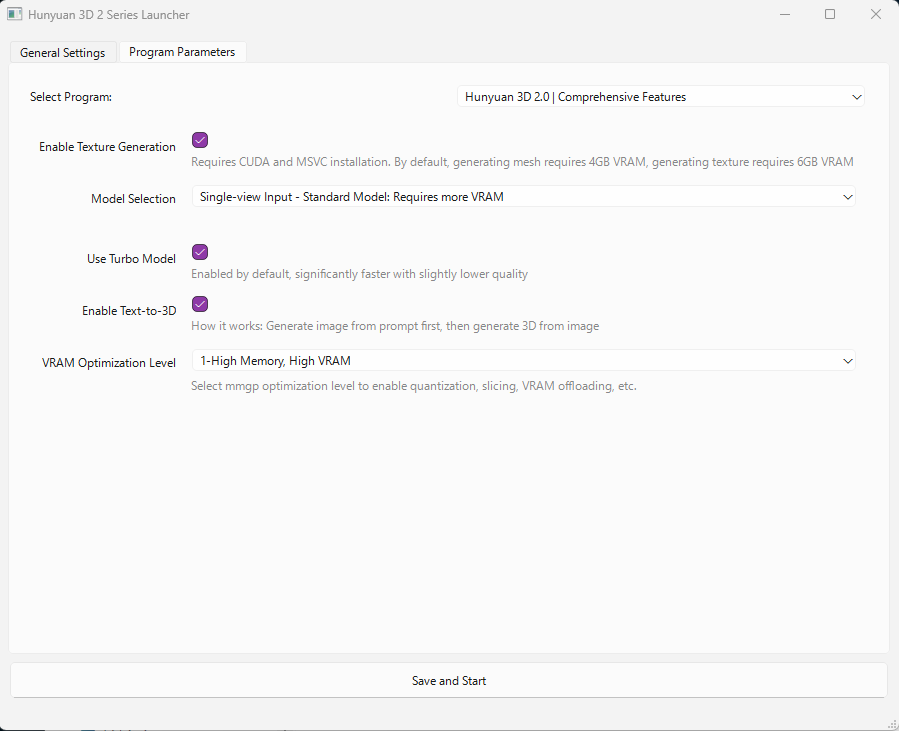
The launcher’s “Program Parameters" section includes three additional settings:
- Use Turbo Model: When set to ON, generation time is significantly reduced, with a slight trade-off in quality.
- Enable Text-to-3D: When set to ON, enables the feature for generating 3D models directly from text prompts.
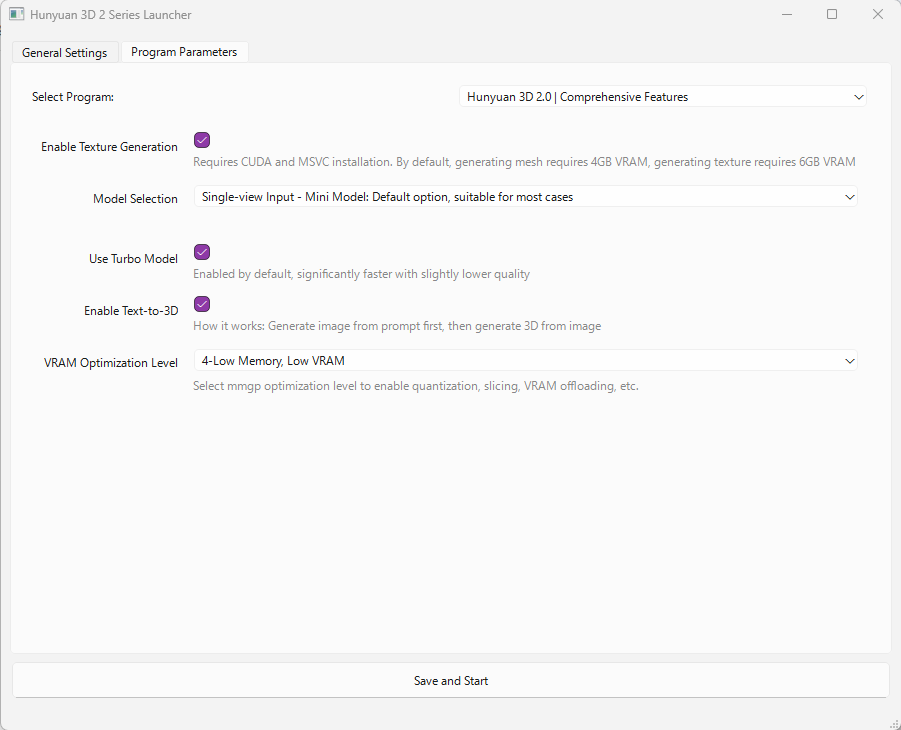
- VRAM Optimization Level:
In the example below, enabling “Use Turbo Model" reduced the generation time by about 30% without noticeably affecting model quality.
Regarding VRAM Optimization Level, the software implements a memory management tool called “mmgp“. According to the official GitHub documentation for mmgp, the recommended hardware requirements for levels 1–5 are as follows:
- Level 1 (High Memory, High VRAM): RAM ≥ 48 GB, VRAM ≥ 24 GB
- Level 2 (High Memory, Low VRAM): RAM ≥ 48 GB, VRAM ≥ 12 GB
- Level 3 (Low Memory, High VRAM): RAM ≥ 32 GB, VRAM ≥ 24 GB
- Level 4 (Low Memory, Low VRAM): RAM ≥ 32 GB, VRAM ≥ 12 GB
- Level 5 (Very low Memory, Low VRAM): RAM ≥ 24 GB, VRAM ≥ 10 GB
Note: In the Hunyuan3D 2.0 Mini version, VRAM usage is optimized and suppressed. Consequently, on my system, I found that setting it to Level 1 worked perfectly without any issues, even if my hardware specifications technically fit other categories.
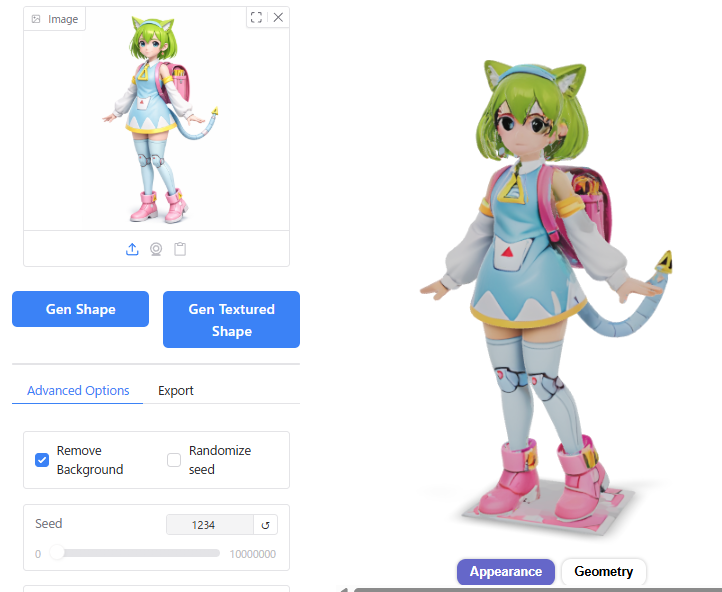
Generating and Exporting a 3D Model from a Single Image
From here on, we will walk through the process of generating and exporting a 3D model from a single image after launching Hunyuan3D-2.0.
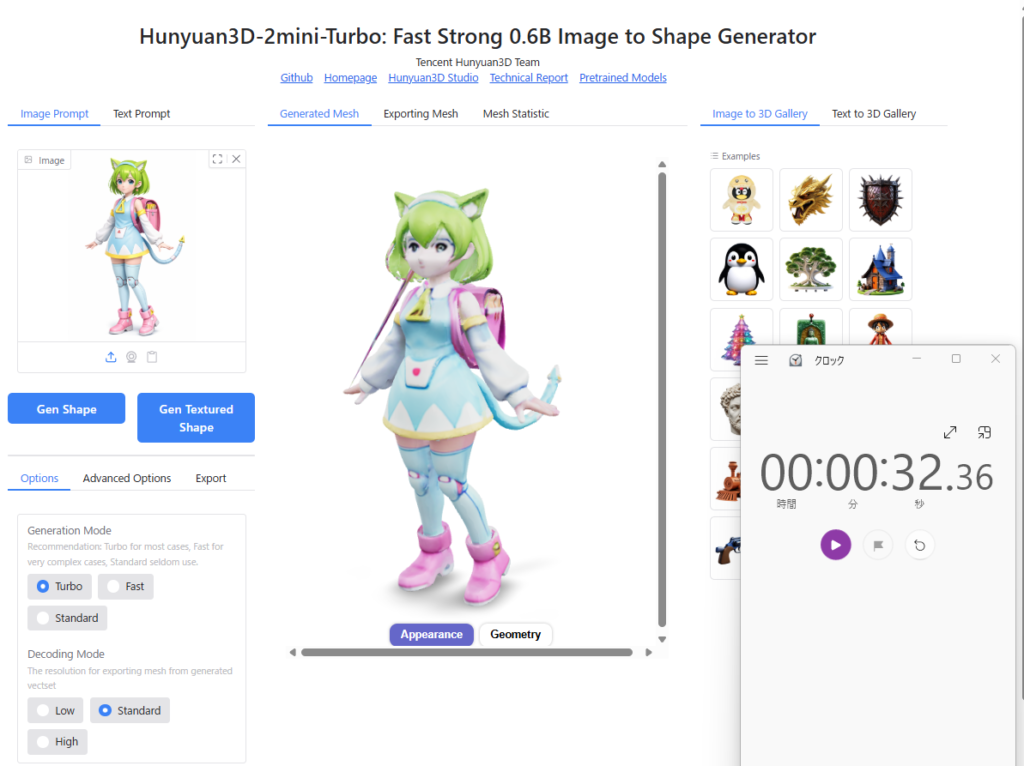
First, select the “Single-view Input – Mini Model" and ensure that “Use Turbo Model" is set to ON.
Before starting, prepare an illustration of your character.
I used an illustration of my company, BlendAI, character “Delta-Mon," which I first converted into a 3D-style image using ChatGPT, and then fed it as input into Hunyuan3D.
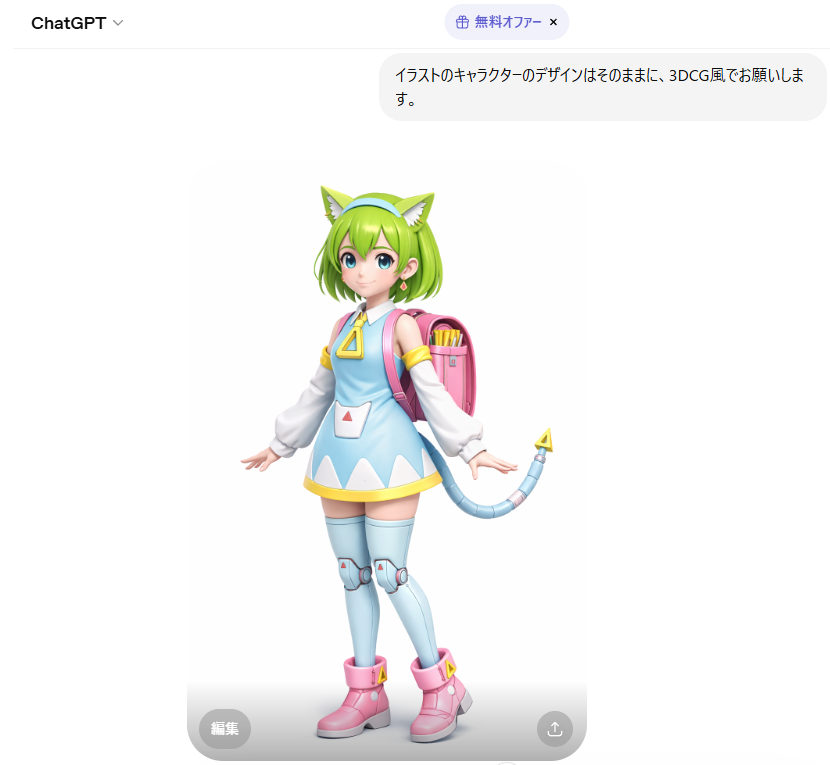
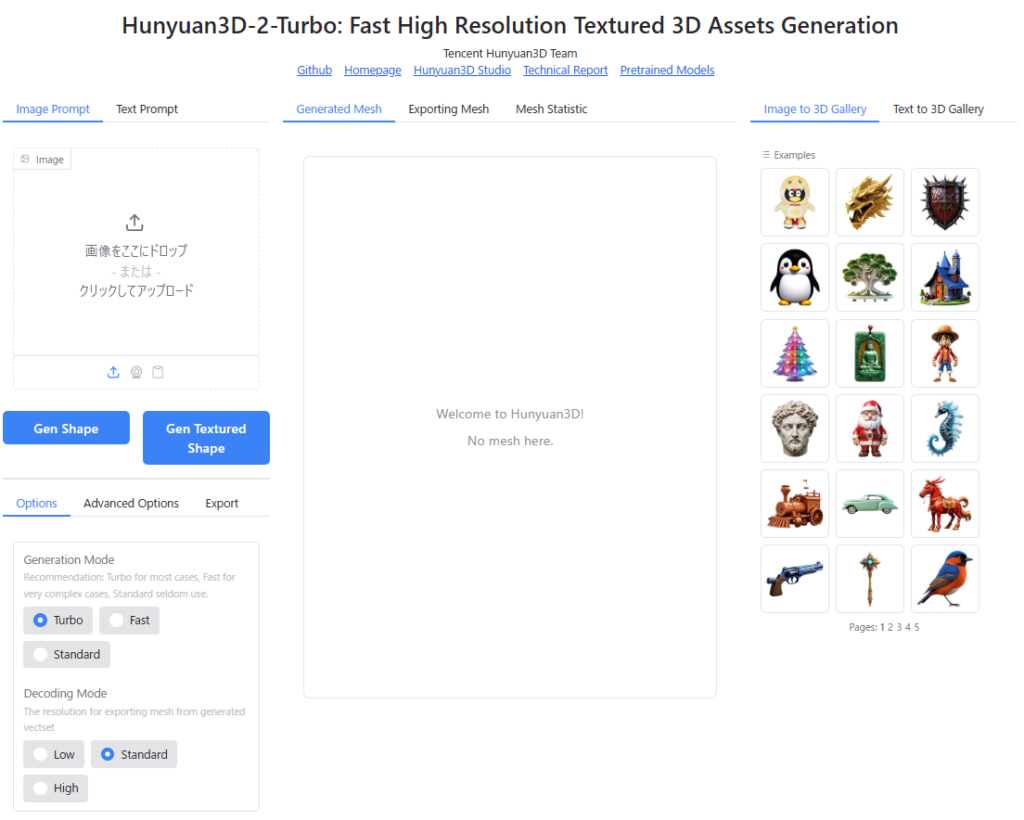
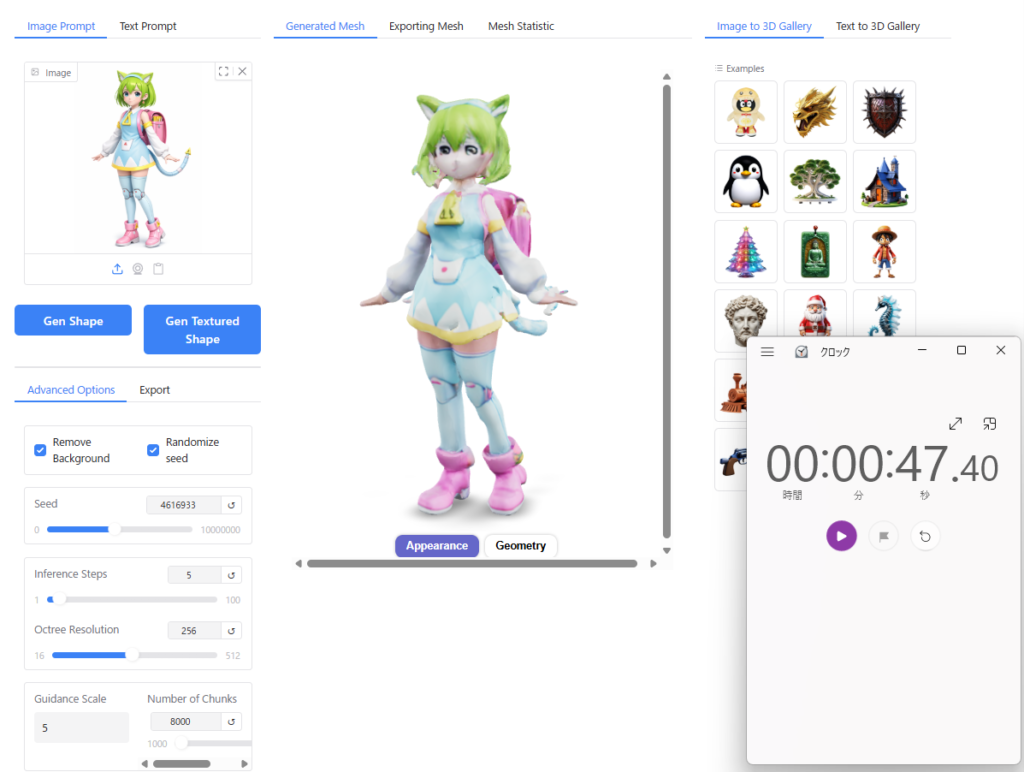
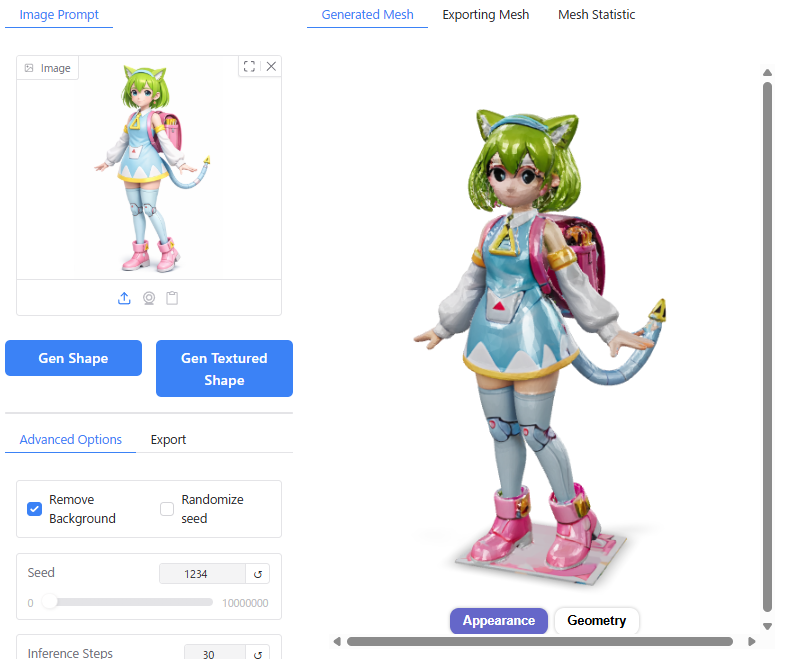
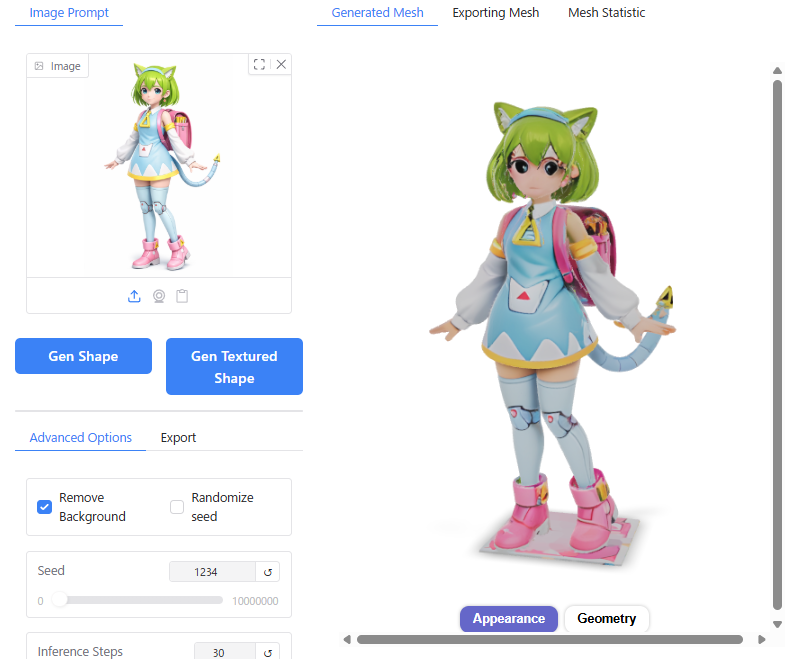
In the top-left corner of the Hunyuan3D interface, click on “Image Prompt" and drag your image into the designated area to load it.
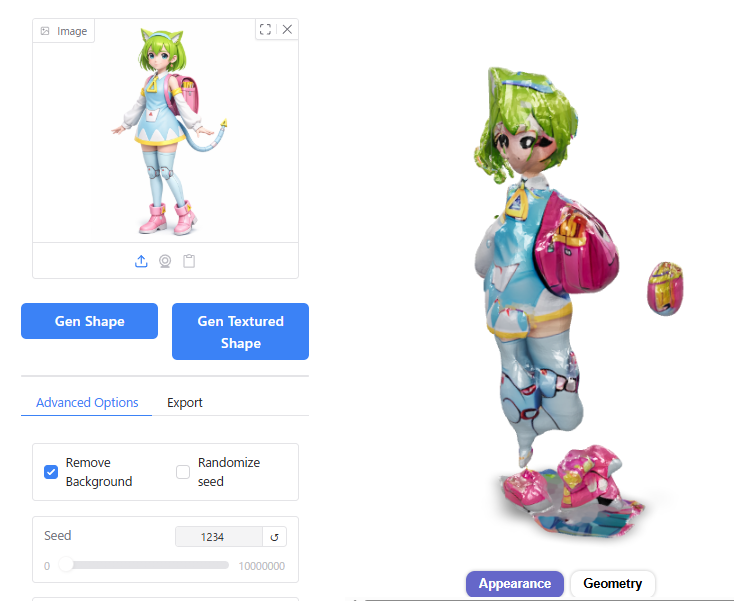
Clicking the “Gen Shape" button generates a 3D model with no texture (shape only).
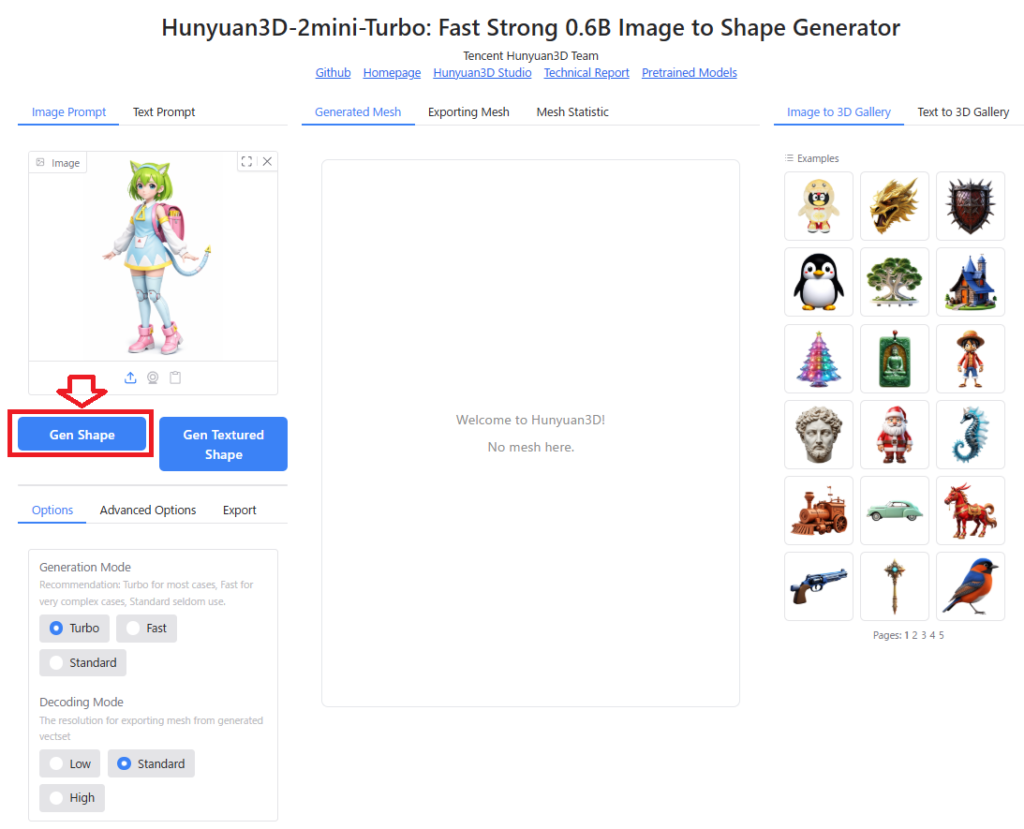
On my system equipped with an RTX 5060 Ti, this process took approximately 7 seconds.
Next, clicking the “Gen Textured Shape" button generates a 3D model complete with textures.
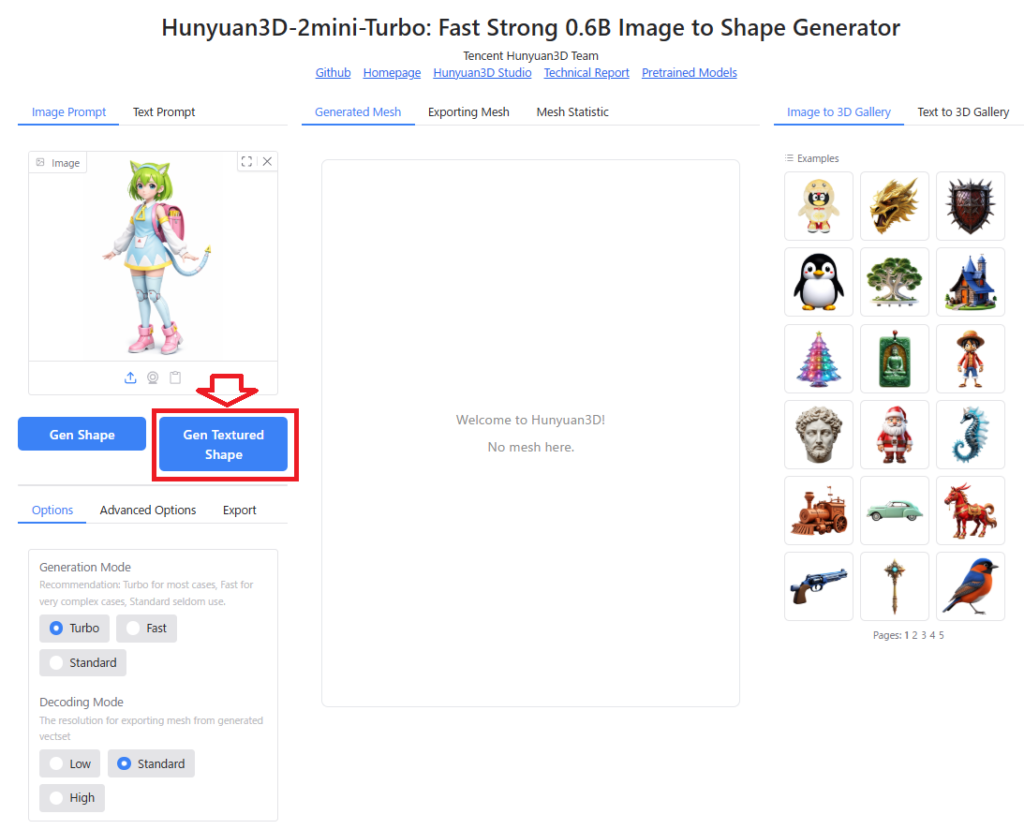
This step was roughly 4 times slower than mesh generation alone; on my RTX 5060 Ti setup, it took about 28 seconds.
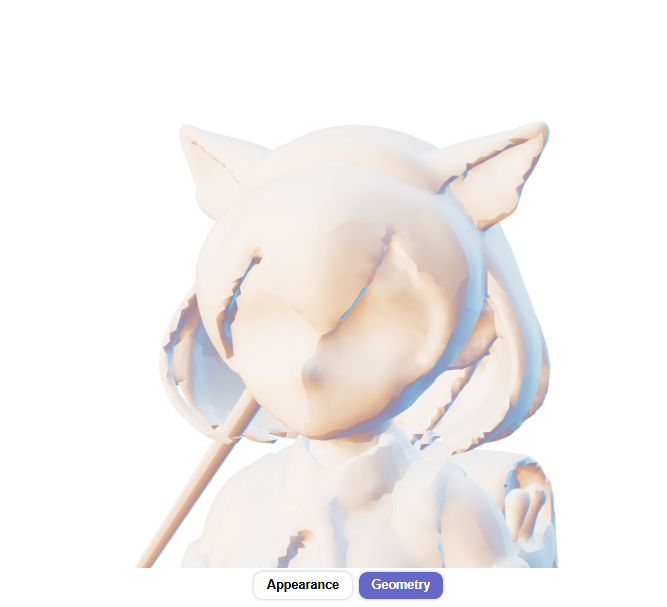
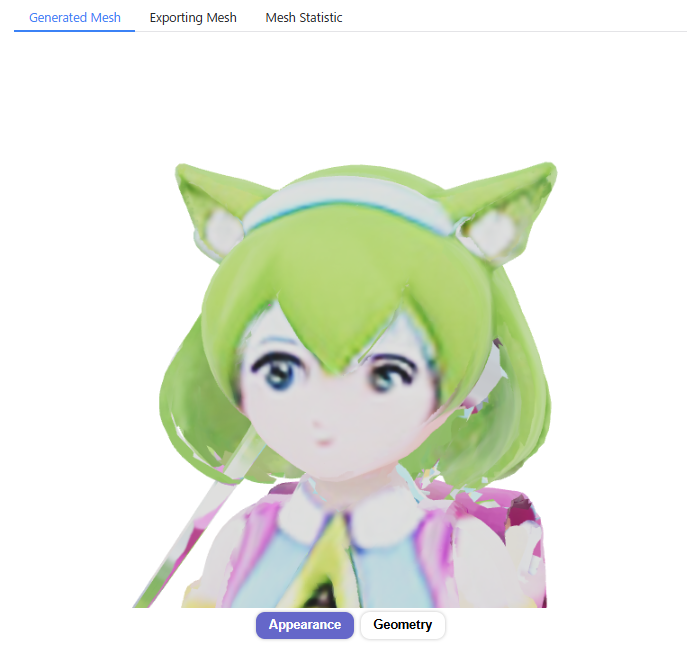
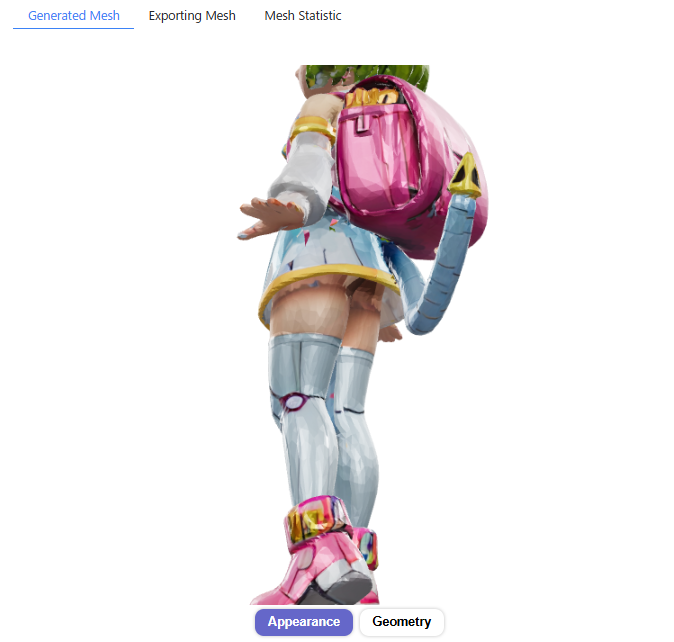
Although there are some minor distortions in the mesh and the texture resolution is relatively low, the model successfully represents a human face and body structure.

To export the generated 3D model for use in 3D software like Blender, navigate to the “Export" tab at the bottom-left of the screen. Note that you must first convert it into an exportable polygon model by applying the “Transform" function.

Within the “File Type" section, you can choose the output format among glb, obj, ply, or stl.
If you enable “Include Texture," a textured polygon model will be generated. (Note: During testing, I found that only the .glb format could be successfully exported to Blender while retaining textures.)
The “Simplify Mesh" option allows you to reduce the polygon count while preserving the overall shape of the model; however, this feature is unavailable when generating textured models.
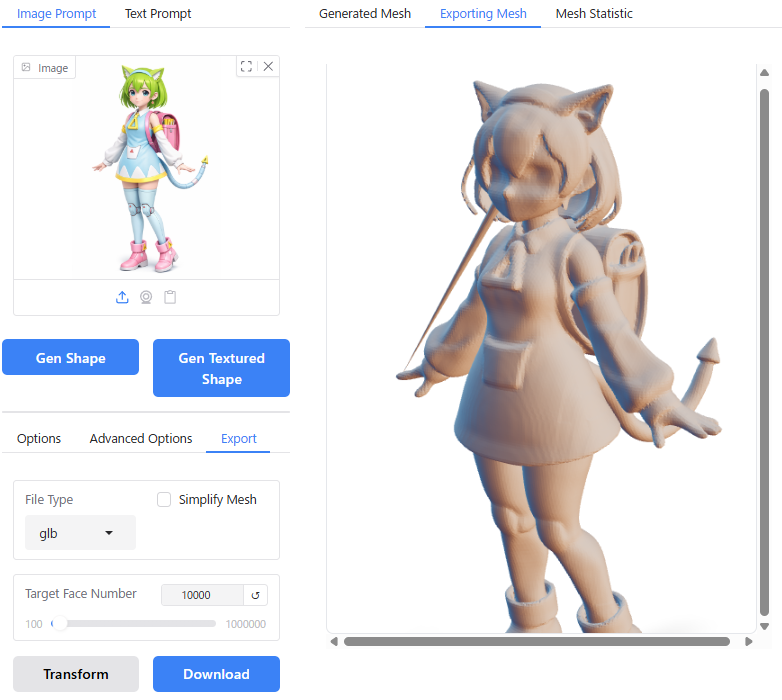
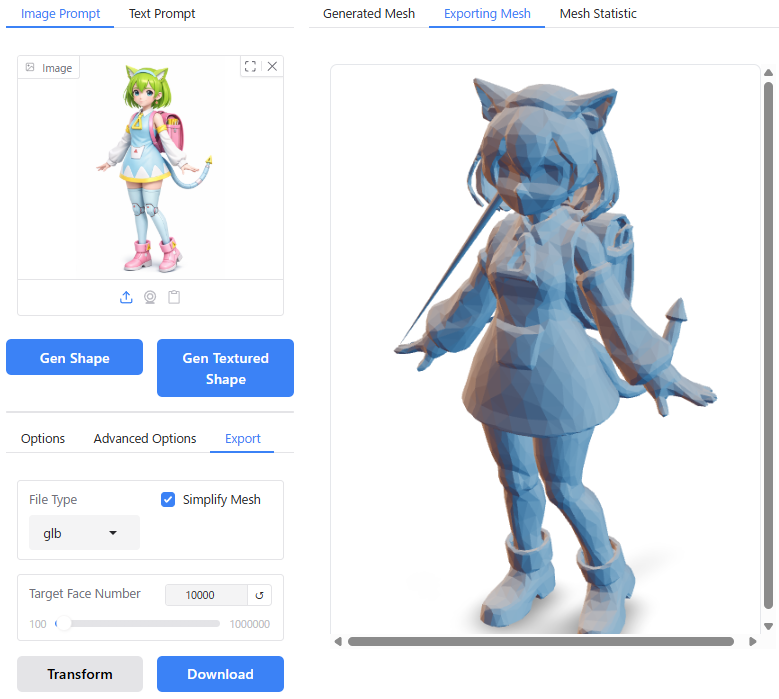
You can set the desired number of polygons for the converted model using the “Target Face Number" setting.
Once you have configured the above settings, click “Transform" to generate the polygon model, and then click “Download" to save it directly via your browser.
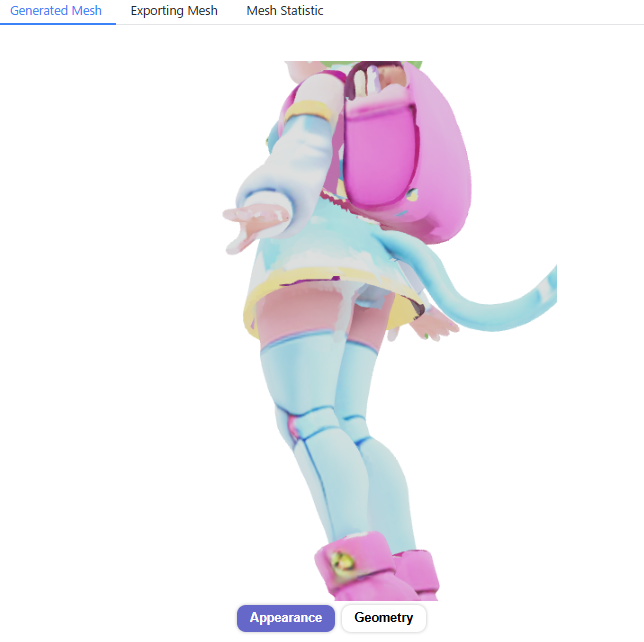
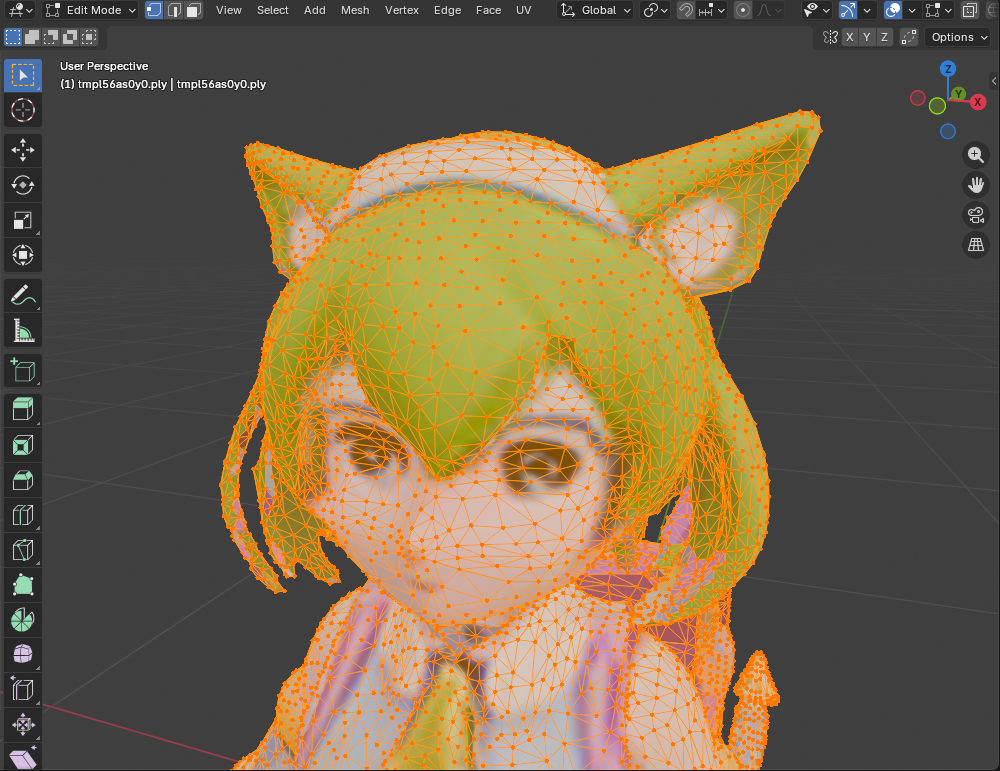
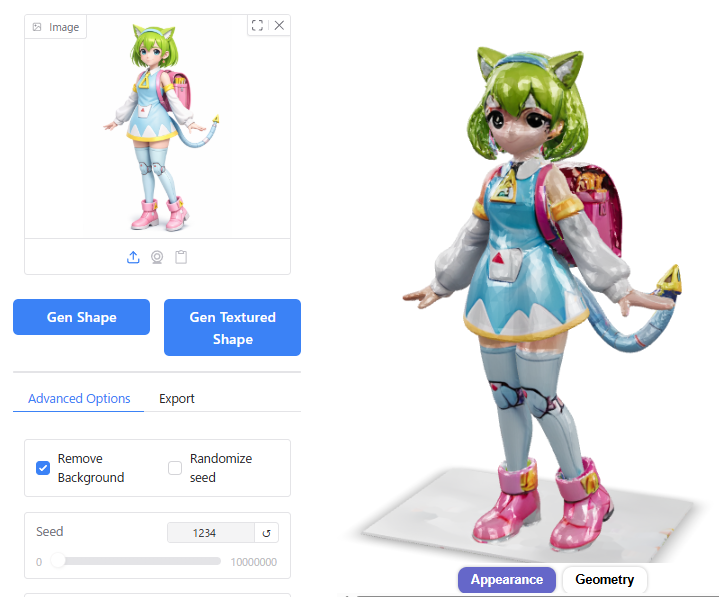
Drag the downloaded .glb file onto the Blender workspace, and you can view the textured model as shown below:
When checking the polygon structure in Edit Mode, you can see that the geometry is composed of triangles (triangles) as illustrated below:
This concludes the walkthrough for generating and exporting a 3D model from a single image using Hunyuan3D-2.0.
Differences in Output Based on Settings
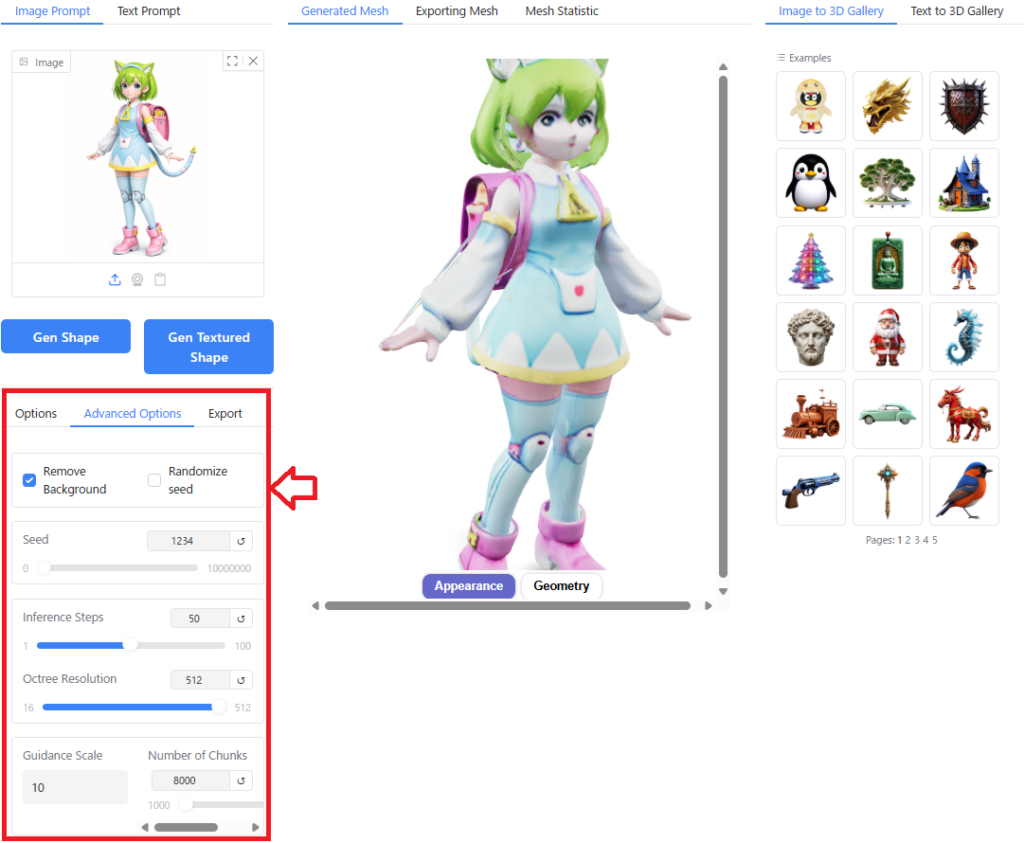
You can fine-tune the parameters used for AI computation by navigating to the “Options" and “Advanced Options" tabs located at the bottom-left of the screen.
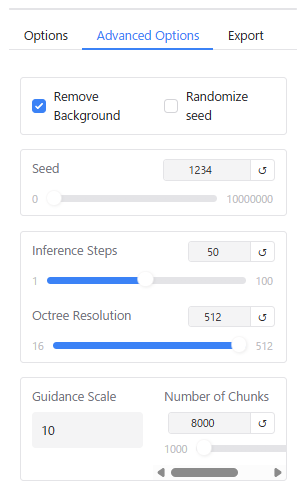
The “Advanced Options" provide a detailed menu with the following settings (descriptions referenced from Google Gemini):
- Seed: Controls the randomness of the generation process. You can set any integer value greater than or equal to 0. Setting the same number will produce nearly identical outputs.
- Inference Steps: The number of inference steps. Fewer steps result in faster computation but coarser mesh quality.
- Octree Resolution: The resolution of the 3D grid. Ranges from 16 to 512. Higher values allow for greater detail representation but increase computation time.
- Guidance Scale: Controls how strictly the model adheres to the input image (or text). The default value is 5. Increasing this value makes the output more faithful to the image, but it may lead to unnatural shapes or longer generation times.
- Number of Chunks: The number of chunks (subdivisions) used during computation. The default value is 8000; valid settings range from 1000 upwards. Increasing this reduces memory consumption but extends computation time.
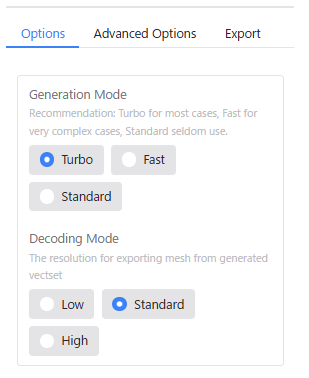
The “Options" menu offers simplified settings.
The “Generation Mode" and “Decoding Mode" items in the “Options" menu correspond to the “Inference Steps" and “Octree Resolution" in “Advanced Options," respectively:
| Options Item | Advanced Options Equivalent |
|---|---|
| Generation Mode : Turbo | Inference Steps : 5 |
| Generation Mode : Fast | Inference Step : 10 |
| Generation Mode : Standard | Inference Step : 30 |
| Decoding Mode : Low | Octree Resolution : 196 |
| Decoding Mode : Standard | Octree Resolution : 256 |
| Decoding Mode : High | Octree Resolution : 384 |
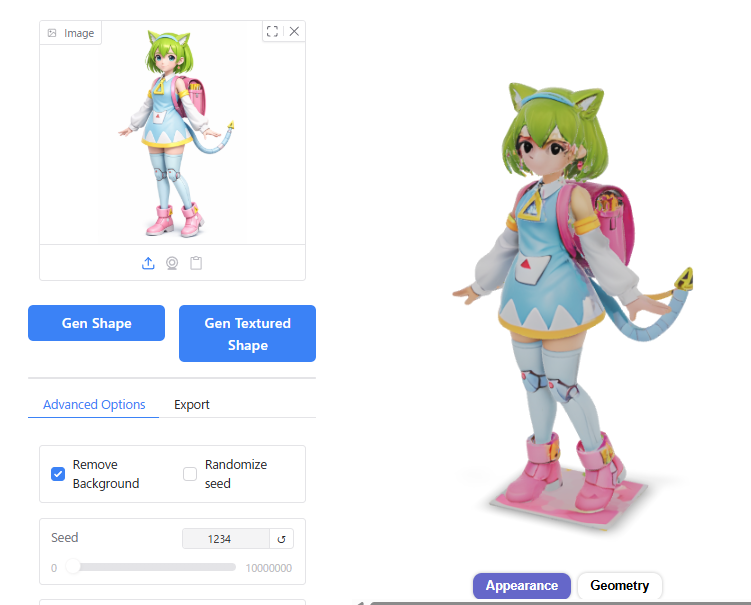
I tested various parameter combinations to observe their effects on the generation results. Below is a summary of my findings.
Conclusion: Generally, it is best to stick with the default settings. If you wish to improve detail quality, it is recommended to increase the Octree Resolution. In some cases, you may also need to adjust the Seed, Inference Steps, or Guidance Scale.
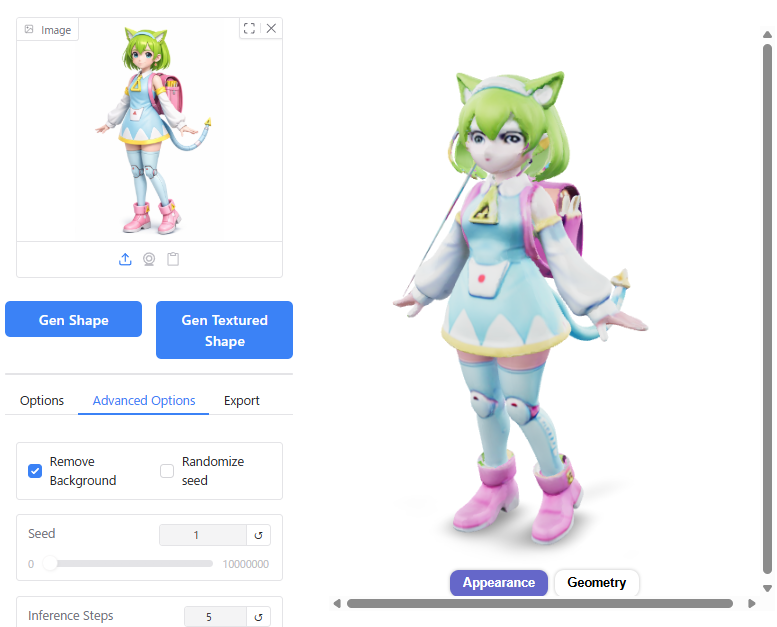
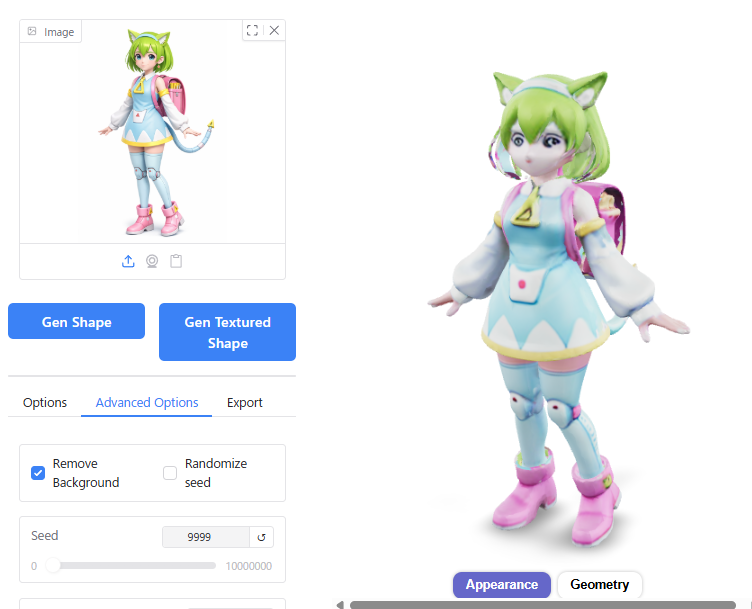
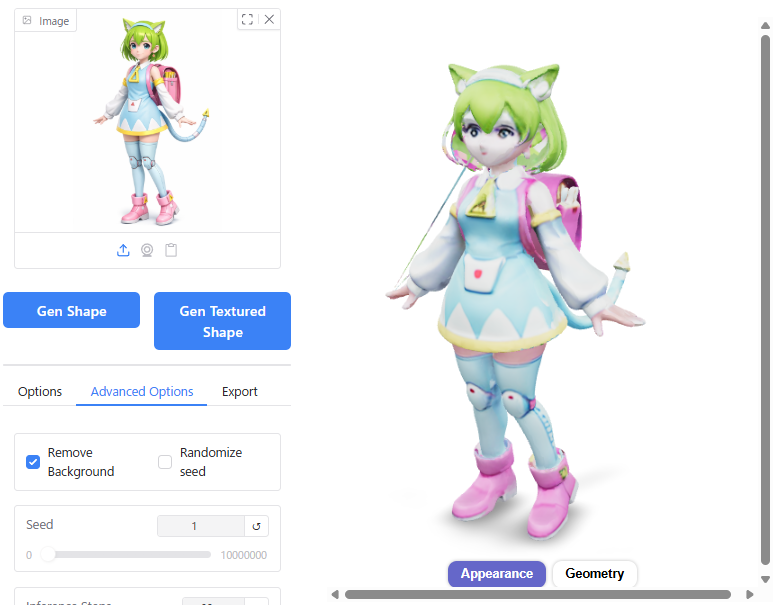
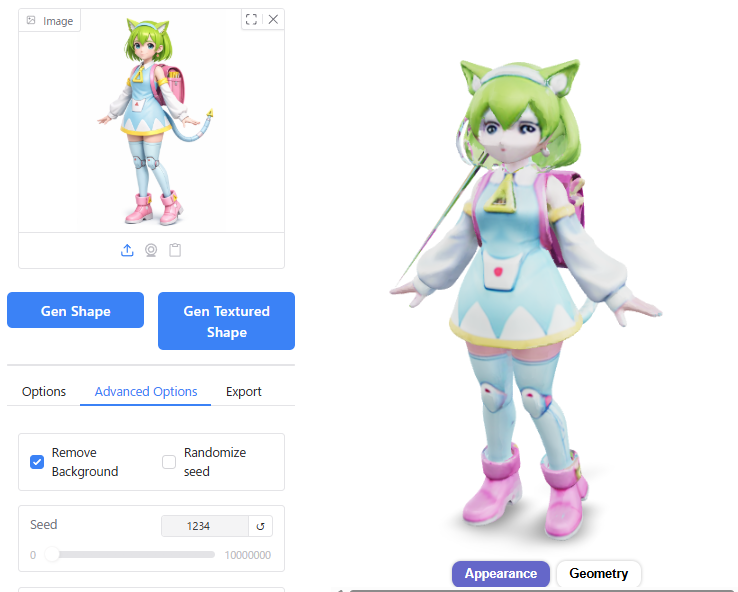
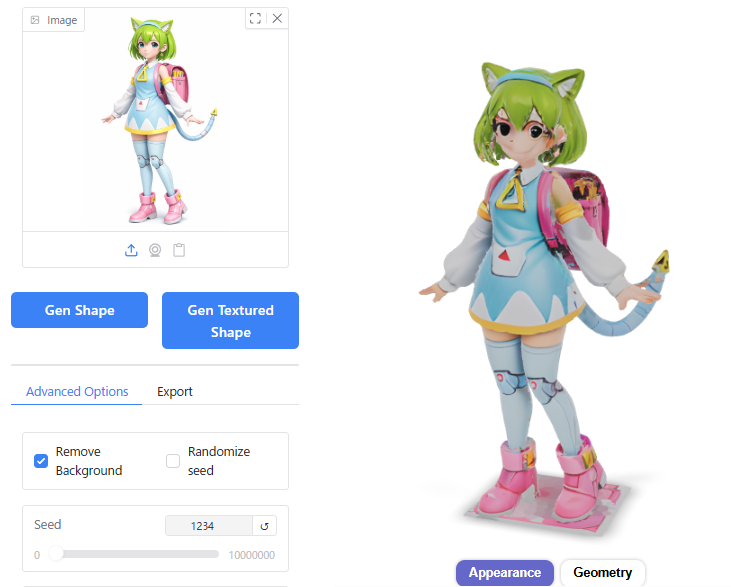
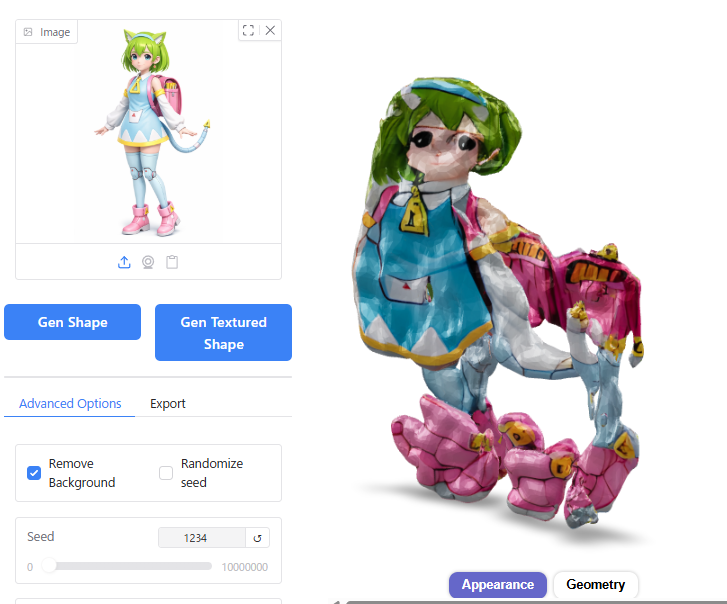
Seed
Changing the Seed value affects the variation in generation results, subtly altering the character’s facial features. It can also prevent mesh fractures; if a distortion occurs, changing the Seed often resolves it.

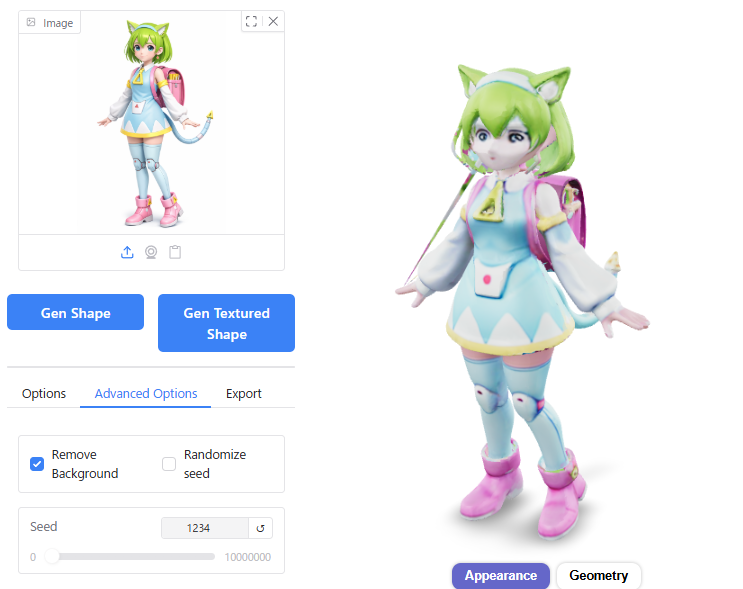
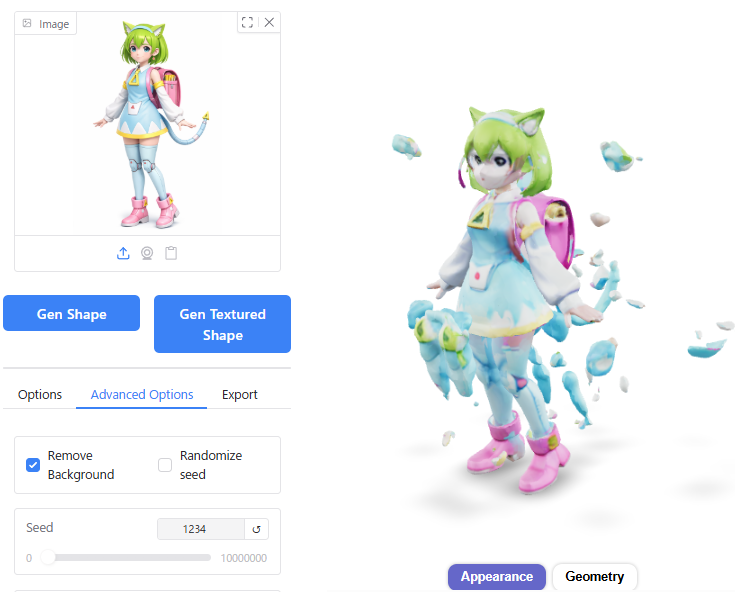
Inference Steps
When I set the Seed to 1234 and increased the Inference Steps from the default of 5, the 3D shape became distorted.
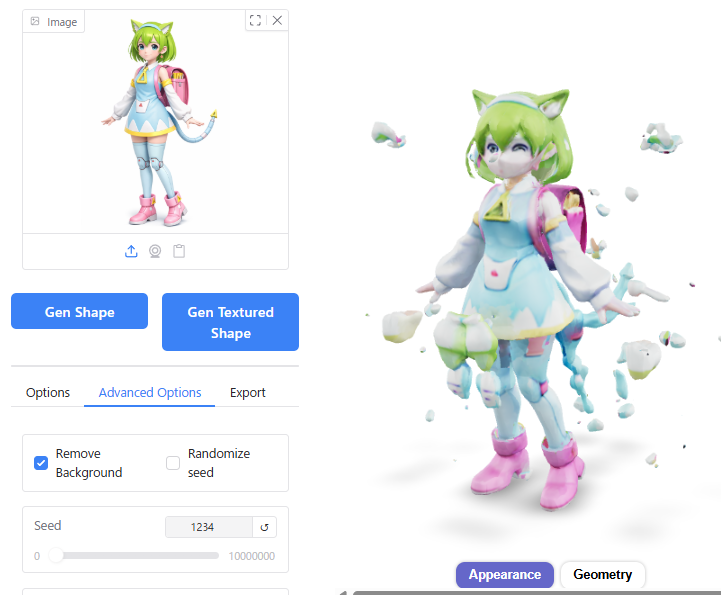
After testing different Seed values, I found that Seed 1 worked well. It appears slightly closer to the original image in terms of facial features.
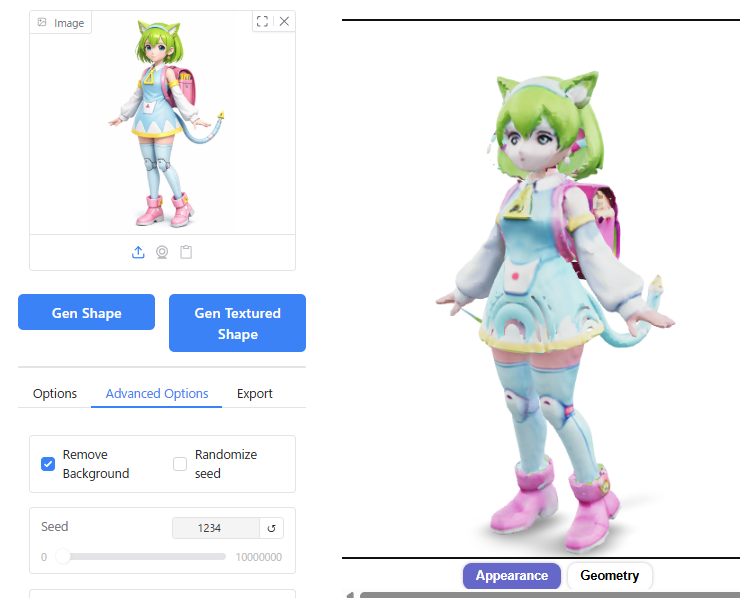
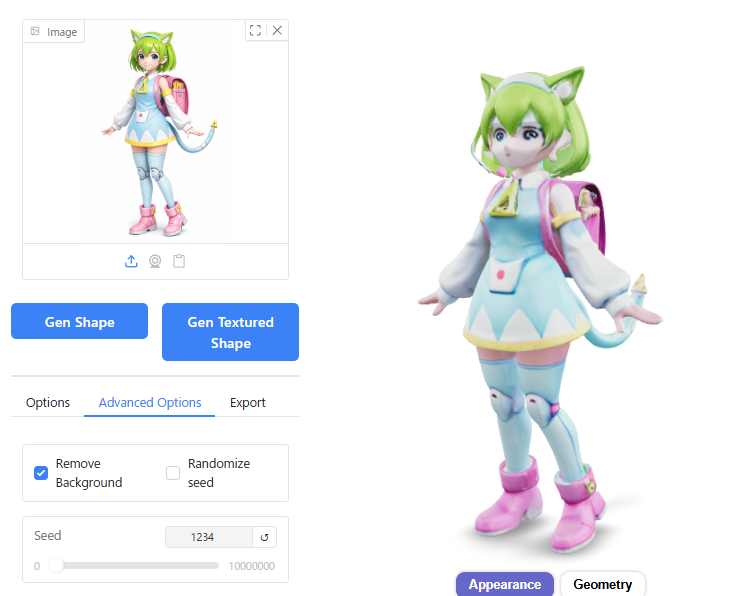
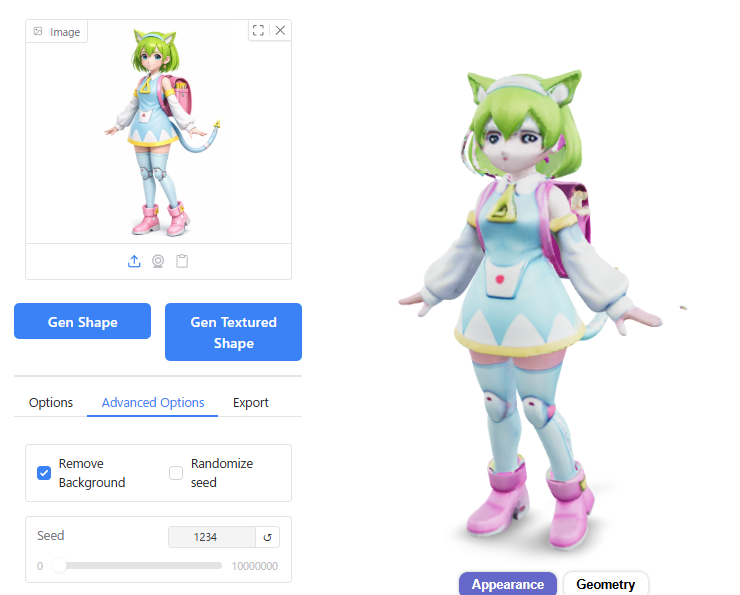
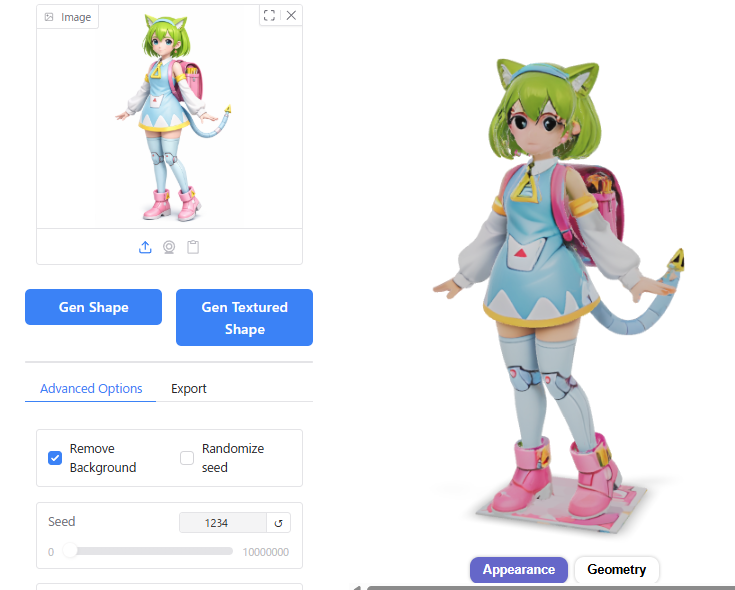
Octree Resolution
Changing the Octree Resolution from the default of 256 resulted in unnatural bumps on the skirt and hair when set to 128.
While increasing the resolution to 512 eliminated mesh fractures and improved overall model quality, generation time increased significantly from 23 seconds to 32 seconds (an increase of nearly 10 seconds).

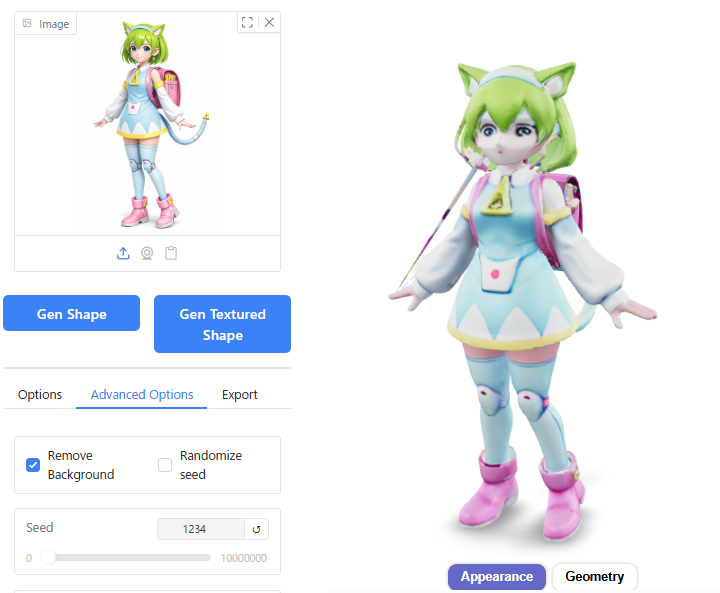
Guidance Scale
Increasing the Guidance Scale value improved mesh fractures.
However, the overall quality of other aspects of the model did not change significantly as a result.
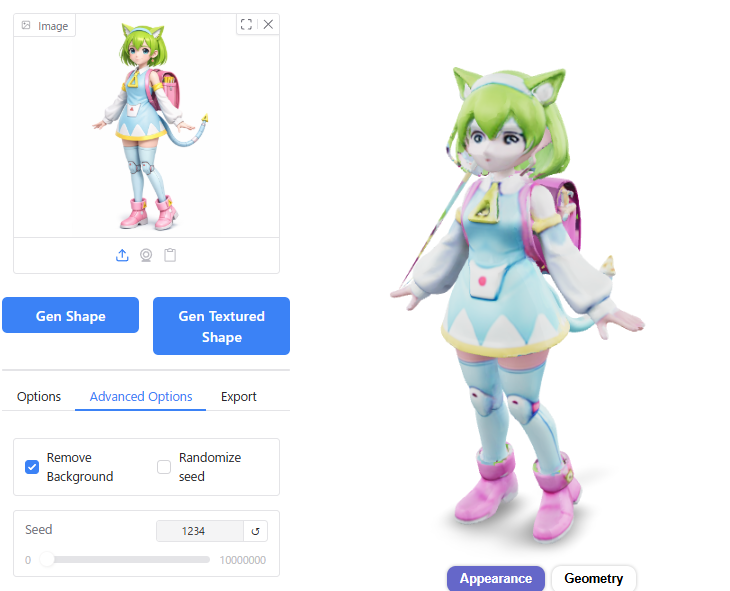
Number of Chunks
I tried changing the Number of Chunks from the default of 8000 to either 1000 or 80000, but there was almost no noticeable effect on the generation results. Increasing the value did extend generation time slightly by about 2 seconds (from 23s to 25s).
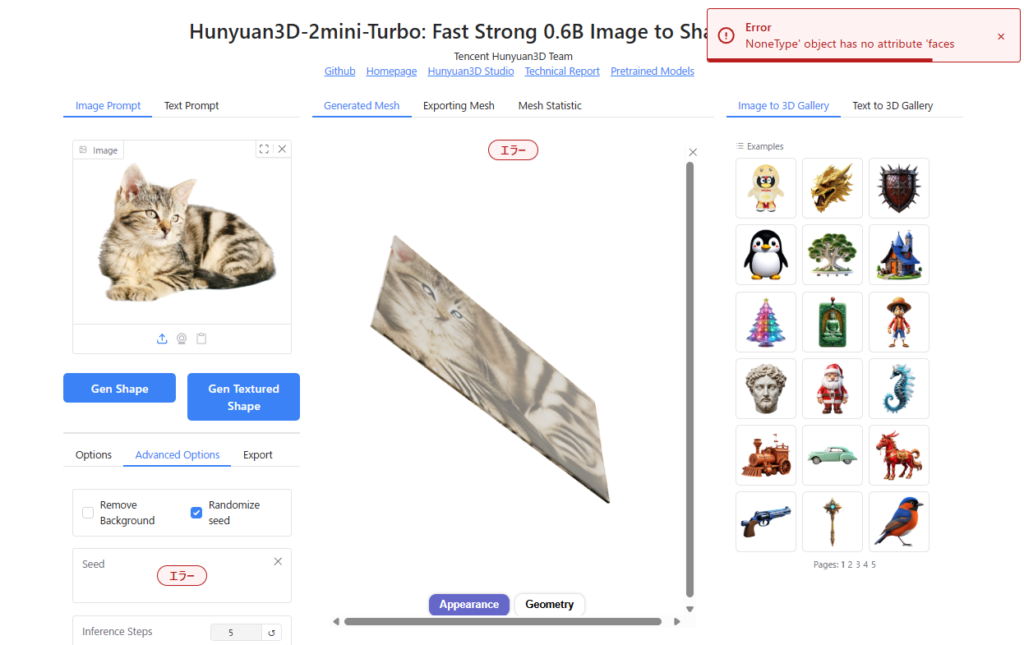
Various Image Outputs
Beyond the “Delta Mon" example, I tested a wide variety of input images. Screenshots are provided below for reference:
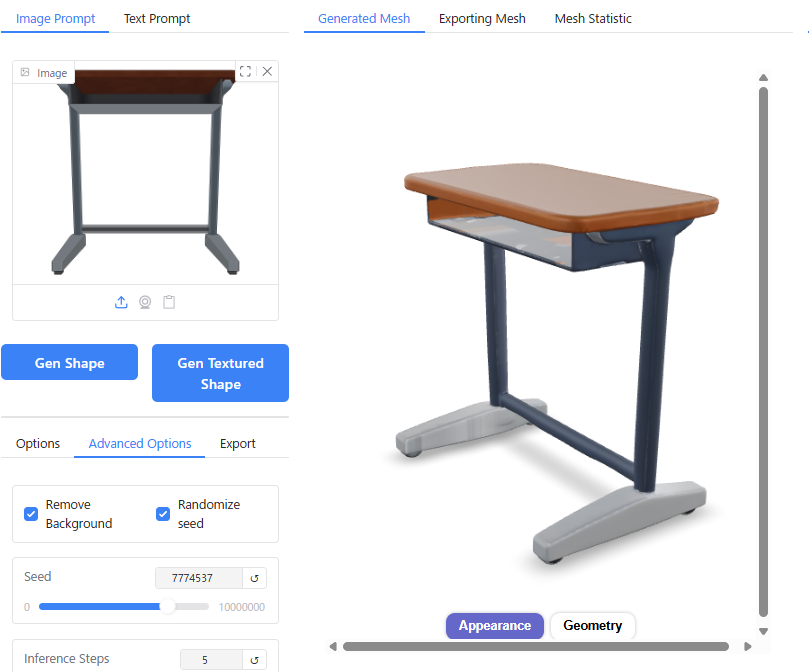
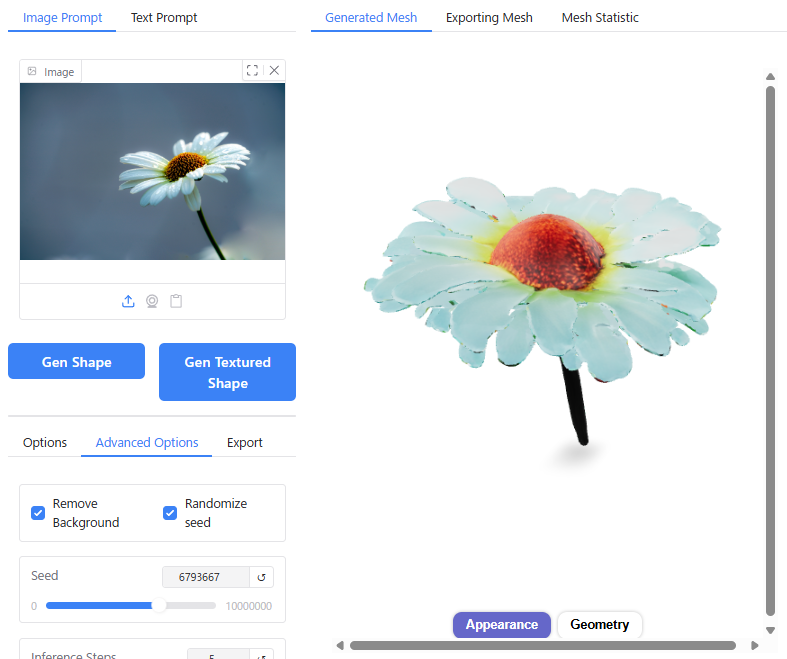
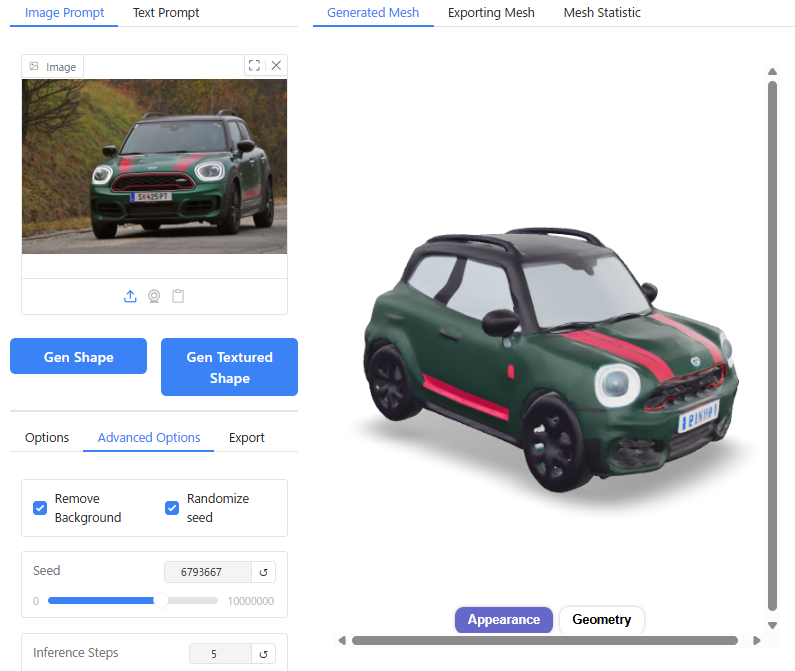
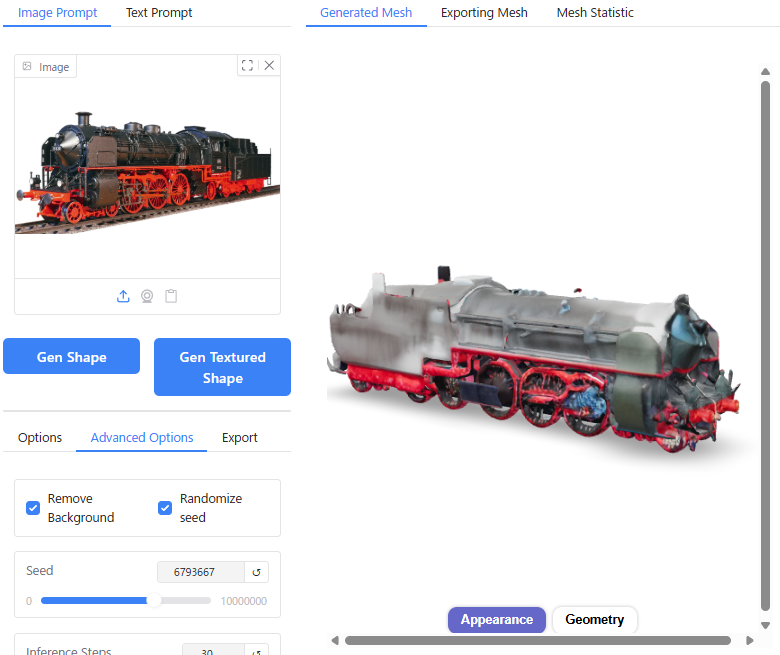
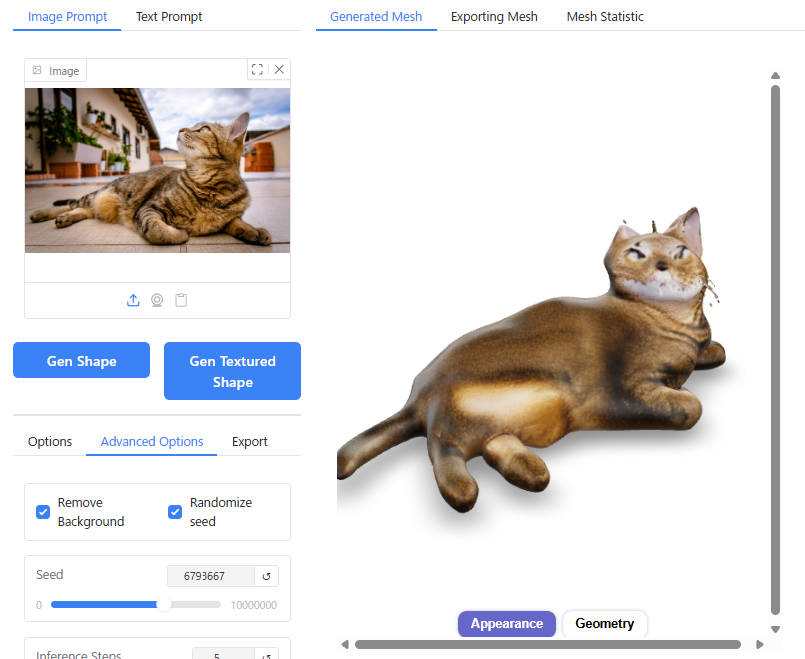
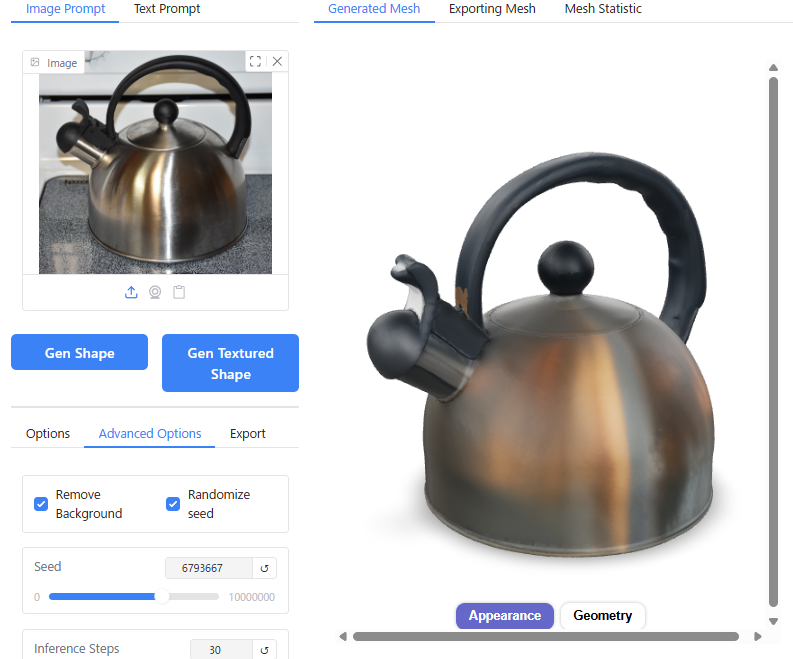
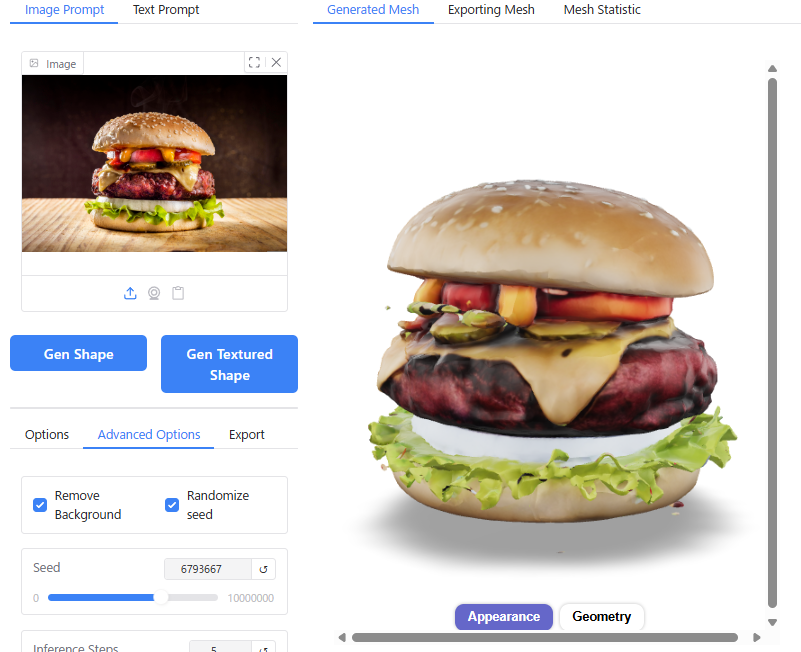
For simple shapes, Hunyuan3D reproduces the actual 3D geometry very well. However, with complex shapes, there is a tendency for details to be omitted.
In particular, non-human animals seem to be a weak point, likely due to insufficient training data. Depending on the input image of a cat, errors occur because Hunyuan3D fails to correctly recognize the 3D form, or it cannot generate a proper 3D shape at all; instead, it produces “some flat object with a cat pattern."

You can also create content using preset images located in the upper right corner. You can set these by clicking on them or using drag-and-drop functionality.
Generating from Text Prompts
Hunyuan3D-2.0 includes a feature to generate 3D models directly from text prompts.
To use this functionality, you must first enable “Enable Text-to-3D" in the Launcher settings.

With no images attached to the “Image Prompt" field, enter your desired description for the 3D model into the “Text Prompt" box at the top-left corner, then click either “Gen Shape" or “Gen Textured Shape".
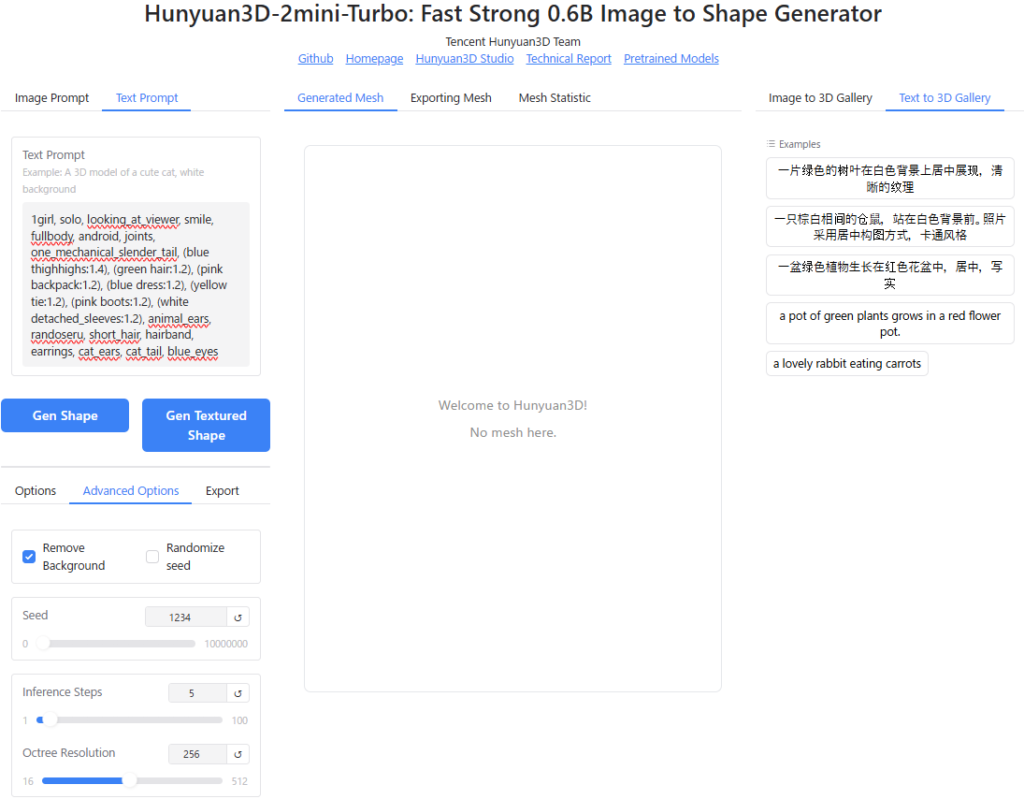
To test this, I entered the prompt written on BlendAI Co., Ltd's website to generate “Delta Mon."
Prompt:
1girl, solo, looking_at_viewer, smile, fullbody, android, joints, one_mechanical_slender_tail, (blue thighhighs:1.4), (green hair:1.2), (pink backpack:1.2), (blue dress:1.2), (yellow tie:1.2), (pink boots:1.2), (white detached_sleeves:1.2), animal_ears, randoseru, short_hair, hairband, earrings, cat_ears, cat_tail, blue_eyes
The resulting output was as follows:
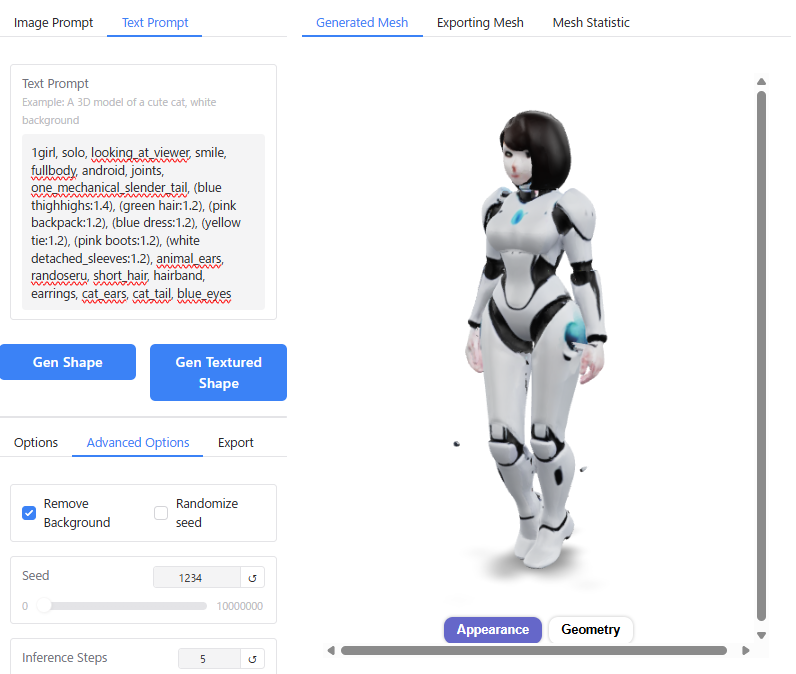
It appears the AI could not process the sheer volume of information provided. While terms like “girl," “android," and “joints" were reflected in the output, detailed elements such as the cat ears, school backpack (randoseru), and mechanical tail were completely ignored.
Incidentally, generation from text prompts takes more than three times longer than generating from an image prompt.
I even tried refining the prompt using AI ChatGPT specifically for Hunyuan3D, but the results did not improve significantly.

Honestly, the accuracy of Hunyuan3D-2’s text-to-3D feature is currently too low to be practically useful. Therefore, I highly recommend this workflow:
- Use other image generation AIs like Stable Diffusion or ChatGPT-assisted tools to create your base image from a text prompt.
- Use that generated image as the “Image Prompt" for Hunyuan3D to convert it into a 3D model.
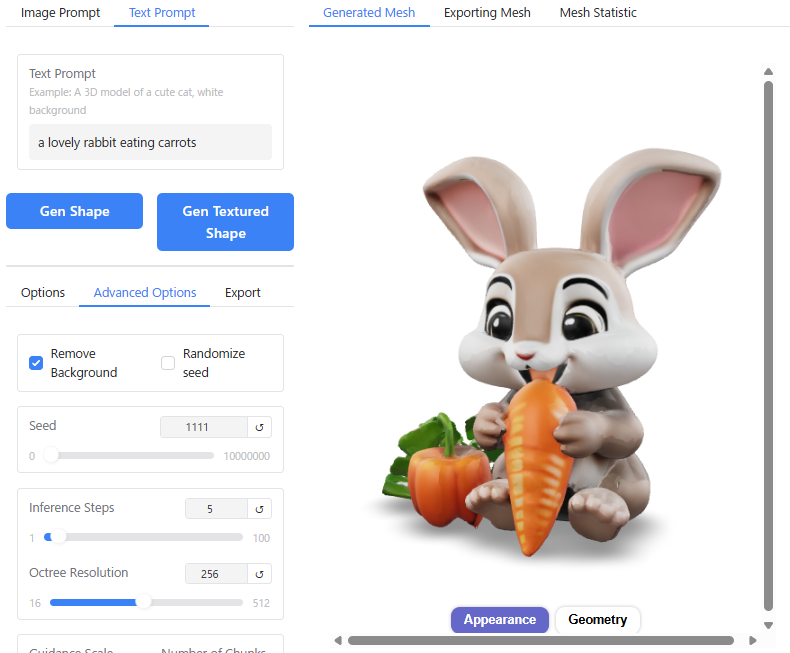
Bonus: If you use simple prompts such as “a lovely rabbit eating carrots," it can still generate models with an animated character vibe (somewhat resembling Disney-style characters).
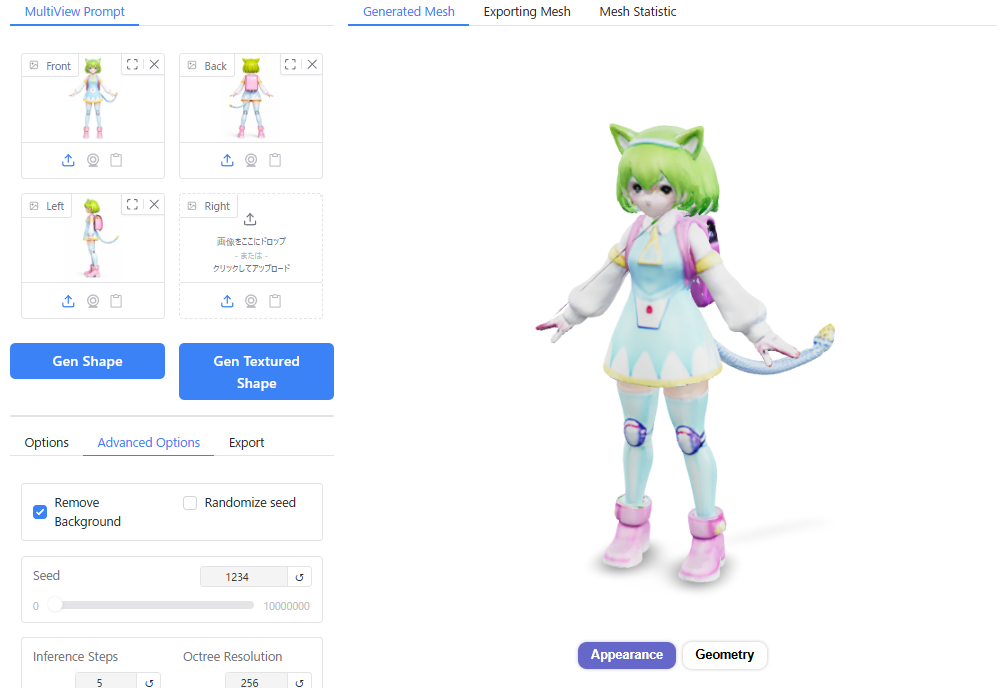
Generating from Multiple Images
In Hunyuan3D-2.0, selecting “Multi-View Input (MV)" in the “Model Selection" menu allows you to generate 3D models from multiple images.
While a single frontal image prompt often results in inaccurate shapes for the back and unseen sides, using Multi-View Input enables the creation of highly accurate 3D geometry approximating a full 360° view.
Upon launching with “Multi-View Input (MV)" selected, the interface “Hunyuan3D-2mv-Turbo: Fast Image to 3D Generation with 1-4 Views" appears.
Drag and drop images of the front, back, left, or right sides (one view or even partial views are acceptable) into the “MultiView Prompt" field at the top-left corner.
Generation takes about 10 seconds longer than using a single image, but it produces significantly more accurate 3D geometry based on the input images from all angles.
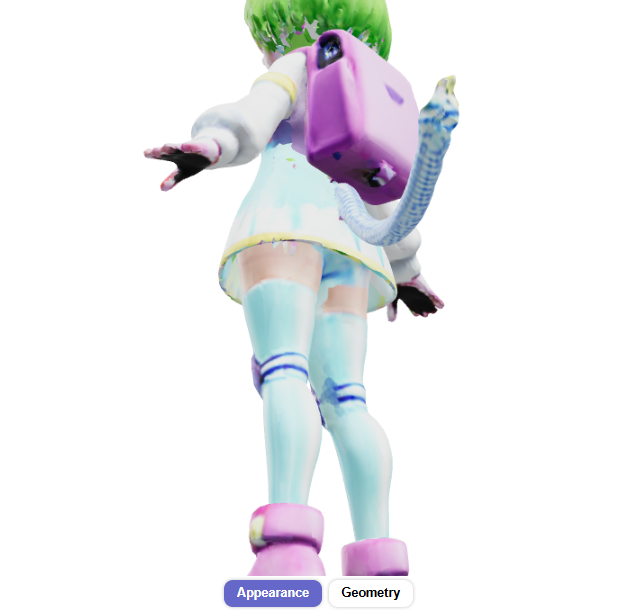
Comparing a model created from a single image (Left) versus one created from three orthogonal views (Right), the rear shape of items like the school backpack (randoseru) is rendered with much higher accuracy.
However, unfortunately, the texture quality appears to be slightly lower in the Multi-View generation compared to Single Image mode.
Hunyuan3D-2.1
In addition to version 2.0, you can also utilize the newer version 2.1.
While text prompts and Multi-View Input (MV) are no longer supported in this version, and generation times have increased significantly, version 2.1 compensates for these drawbacks by producing shapes and textures that adhere much more closely to the source images. This allows for the creation of higher-quality 3D models compared to version 2.0.
The usage method remains the same as version 2.0.
However, note the performance difference: while generation took about 20–30 seconds on version 2.0, it takes nearly 3 minutes on version 2.1.
Comparing Hunyuan3D 2.0 and version 2.1 reveals the following:
- Texture Quality: You can clearly observe that version 2.1 adds a sheen/gloss to the textures, enhancing the overall realism.
- Fidelity: Version 2.1 reproduces the source image with far greater accuracy than version 2.0.
In my environment, I noticed two specific issues while using version 2.1:
1. Change in Appearance Rendering
Clicking “Geometry" and then clicking “Appearance" strangely removes the glossy finish from the texture.
However, this behavior is likely a bug. The lack of gloss creates a more “cell-shaded" look, which I personally prefer.
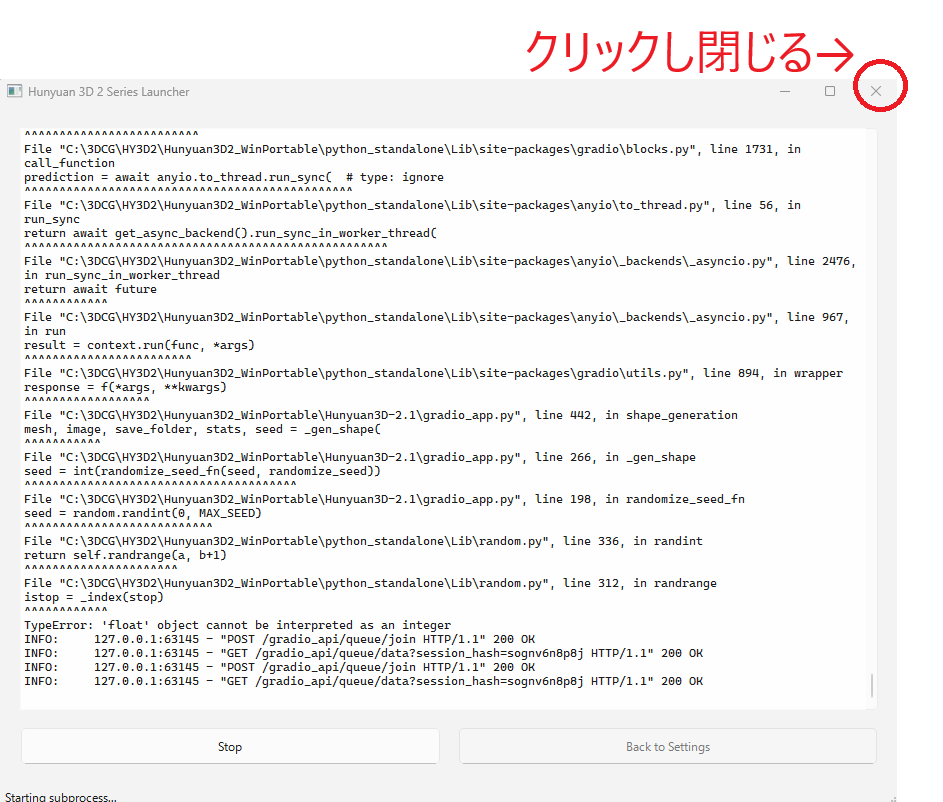
2. Error when Enabling “Randomize Seed"
Checking the box for “Randomize Seed" triggers an error message:"Error 'float' object cannot be interpreted as an integer"
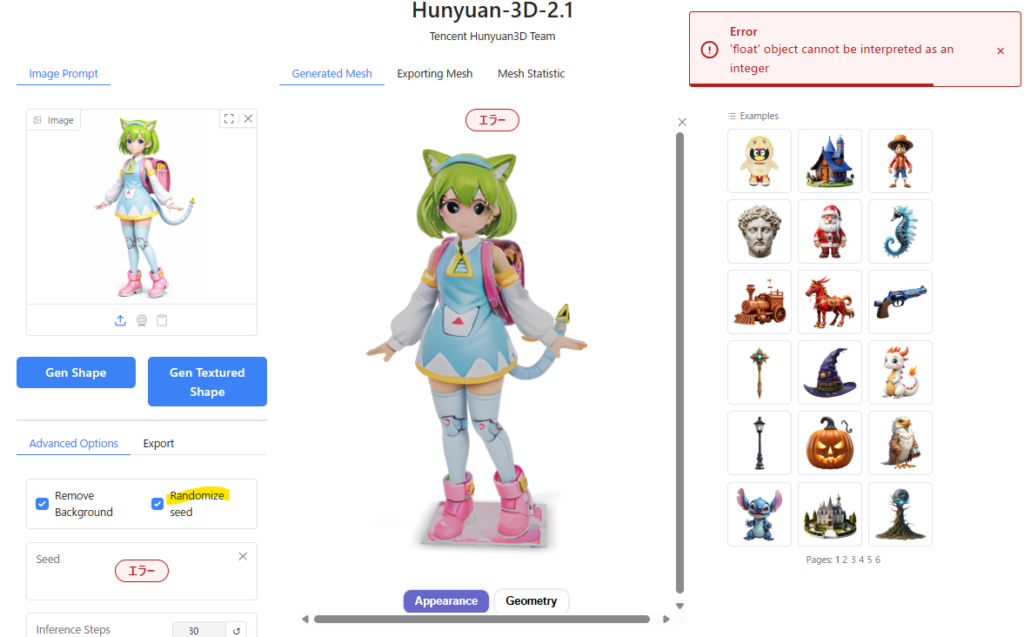
This appears to be a bug where the seed value is being passed as a floating-point number (Float) instead of an integer (Int).
Since it doesn’t significantly impact my workflow, I left it as is. If you have access to the source code and can fix this, please consider doing so.
Output Variations Based on Settings
Similar to version 2.0, I conducted comparative tests by adjusting various parameter values for version 2.1 to observe their impact on the generation results. Below are the findings.
Conclusion:
As with version 2.0, the default settings work well for general use. If you wish to enhance detail quality, it is recommended to increase the Octree Resolution. You may also need to adjust the Seed, Inference Steps, and Guidance Scale depending on your specific needs.
⚠️ Important Note: The default value for Inference Steps in version 2.1 is 30. Be careful not to set it back to the version 2.0 default of 5, or the output will appear distorted/corrupted.
Inference Steps
Below 10: The shape begins to collapse or distort.
Above 30: Increasing further does not significantly affect the result.


Octree Resolution
128: Details such as facial features become somewhat simplified or omitted.
256 vs 512: The difference in visual quality between these two settings is negligible.
Guidance Scale
Above 10: The shape becomes distorted or breaks apart.
How to Exit Hunyuan3D
Lastly, here is how to properly exit Hunyuan3D.
When using Hunyuan3D, you will see three windows open: the Launcher, the Command Prompt, and the Browser. To exit, simply close the Launcher window.
⚠️ Important Note on Browsers:
Closing the browser alone does not shut down Hunyuan3D if the Launcher remains open. However, please be aware that closing the browser will reset the generated models. Ensure you have downloaded any desired assets before closing the browser.
When you close the Launcher, the Command Prompt window will also close automatically.
Precautions When Exiting Hunyuan3D
Do not close the Command Prompt window before closing the Launcher. Closing the Command Prompt first can prevent Hunyuan3D from terminating properly.
If you try to launch Hunyuan3D again afterward, you may encounter the following error:
[Errno 10048] error while attempting to bind on address ('0.0.0.0', 8080)If this error occurs, open a Command Prompt from your Windows programs and run the following command to identify what is using port 8080:
netstat -ano | findstr :8080If you see output similar to this, it means port 8080 is occupied by Process ID (PID) 12345:
TCP 0.0.0.0:8080 ... LISTENING 12345To resolve the error, enter the following command to forcefully end that PID:
taskkill /PID 12345 /FConclusion
We have provided an overview of installing and using Hunyuan3D version 2.
I hope this article offers a new option for PC enthusiasts wondering, “What can I use my newly built PC for?"
For creators involved in 3DCG, I trust this guide will serve as a useful reference for future AI-assisted production (Please note that usage is strictly for preliminary sketches or reference materials only due to copyright considerations).
Finally, to make 3D generation via AI easy and engaging for our readership in this article, we were permitted to use the character “Delta Mon" from BlendAI Co., Ltd. Please accept my sincere gratitude once again.